CI/CD pipeline integrations

Your CI/CD is the engine of your DevOps process. Read here how you can easily integrate DAST Essentials into your CI/CD Pipeline.

Overview

This section highlights the conceptual integration of the tool before explaining the webhook functionality. It also provides details about a specific integration for CircleCI, Jenkins, TeamCity, Bamboo, and Travis CI.

If you need assistance, contact Veracode Technical Support.
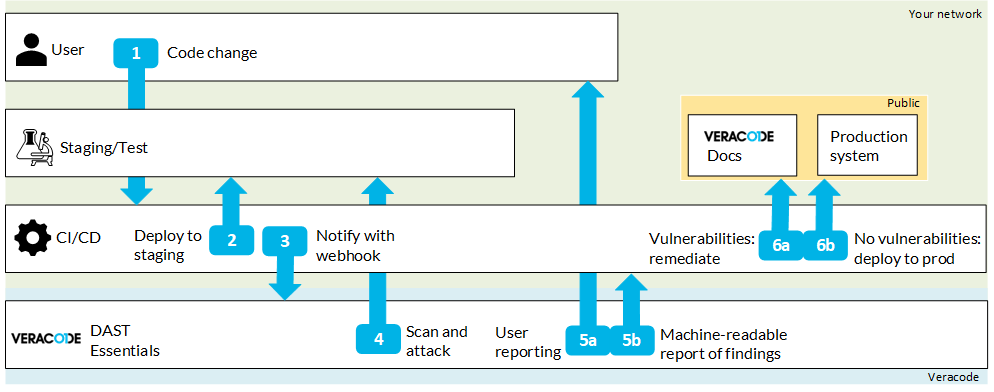
How does the integration work?

dast-essentials-int-workflow.png

  1. Your developer commits code or triggers your CI/CD pipeline through another event.

  2. Your CI/CD toolchain deploys your code to your staging/test system.

  3. After building your staging system, your CI/CD pipeline uses a webhook to trigger the scan.

  4. DAST Essentials scans your newly built system and launches the attack vector scanners.

  5. DAST Essentials provides the following reports:

    a. The Scan details page in the UI.

    b. Downloadable reports in PDF, JUnit, or CSV format.

    These reports can be pulled back in the CI/CD toolchain through the webhook mentioned above.

  6. Because machines can read the reports, you can let builds fail based on your own set of rules. Example rules to let builds fail include:

    a. The number of detected vulnerabilities.

    b. The maximum severity of detected vulnerabilities.

  7. If DAST Essentials finds a vulnerability, you can quickly fix the detected vulnerabilities through the integrated docs with specific code examples to remediate vulnerabilities efficiently.
    If there are no vulnerabilities, your CI/CD toolchain deploys the new code to your production system.

Let's now look deeper into the webhook functionality.

Webhook functionality

The following script will start the scan for your project and periodically poll the status of the scan. When the scan is finished, the report will be downloaded to the file report.xml. For the examples below, assume that you have stored this file as ./start\_crashtest.sh.

#!/usr/bin/env sh  

# TODO: Set WEBHOOK to webhook ID (without URL)
WEBHOOK="aaaaaaaa-aaaa-aaaa-aaaa-aaaaaaaaaaaa"

API_ENDPOINT="https://api.crashtest.cloud/webhook"

# Start Scan and get scan ID
SCAN_ID=`curl --silent -X POST --data "" $API_ENDPOINT/$WEBHOOK | jq .data.scanId`
echo "Started Scan for Webhook $WEBHOOK. Scan ID is $SCAN_ID."

# Refresh Scan status
STATUS="100"
while [[ $STATUS -le "101" ]]
do
   echo "Scan Status currently is $STATUS (101 = Running)"

   # Only poll every minute
   sleep 60

    # Refresh status
   STATUS=`curl --silent $API_ENDPOINT/$WEBHOOK/scans/$SCAN_ID/status | jq .data.status.status_code`

done

echo "Scan finished with status $STATUS."

# Download Report
curl --silent $API_ENDPOINT/$WEBHOOK/scans/$SCAN_ID/report/junit -o report.xml
echo "Downloaded Report to report.xml"

See this topic for other webhook functionalities (i.e., configuring authentication).

So, how can you apply that to your existing CI/CD tools?

CircleCI

For CircleCI, you can use this complete example that allows you to run an example app, set up your CI/CD pipeline in CircleCI, and configure rules for failing/passing builds.

See the complete DevSecOps example pipeline.

Jenkins

In your Jenkinsfile test stage, you can easily define a security test with DAST Essentials:

Jenkinsfile (Scripted Pipeline)  
node {
   stage('Build') {
      sh 'make'
    }
    stage('Test') {
        sh 'make check'
    }
    if (currentBuild.currentResult == 'SUCCESS') {
        stage('Deploy') {
            sh 'make publish'
        }
       stage('Security') {
           sh './start_crashtest.sh'
        }
    }
}

Analog to the webhook script defined above; you can configure the scan and set up your own pass/fail rules. Ensure that the Jenkins JUnit plugin is installed to parse the scan output.

For more information on Jenkins pipelines, see the Jenkins documentation.

TeamCity

In TeamCity, you can create a new build step where you run the webhook directly or use the script below:

teamcity_test_template.png

See the TeamCity documentation for more information on TeamCity build steps.

Bamboo

Like TeamCity, Bamboo allows you to set up an individual job for your DAST Essentials scan.

If you need an introductory guide on setting up projects, plans, and jobs, see this guide.

You can find the Bamboo documentation with more support on the Atlassian help page.

Travis CI

For Travis CI, you can define your build stages in your travis.yml file:

jobs:  
include:
- stage: test
script: ./test 1
- # stage name not required, will continue to use `test`
script: ./test 2
- stage: deploy
script: ./deploy
- stage: deploy
script: ./start_crashtest.sh

As for the above examples, you can enter your script to start the DAST Essentials scan and enter pass/fail rules.

For more information, see the Travis CI documentation.