Veracode Internal Scanning Management
Veracode Internal Scanning Management (ISM) provides a simplified approach to scanning web applications or REST APIs that are hosted within a corporate firewall, and not accessible from the public internet. ISM enables consistent scanning of both internal and external applications and APIs for Veracode DAST Essentials and Veracode Dynamic Analysis.
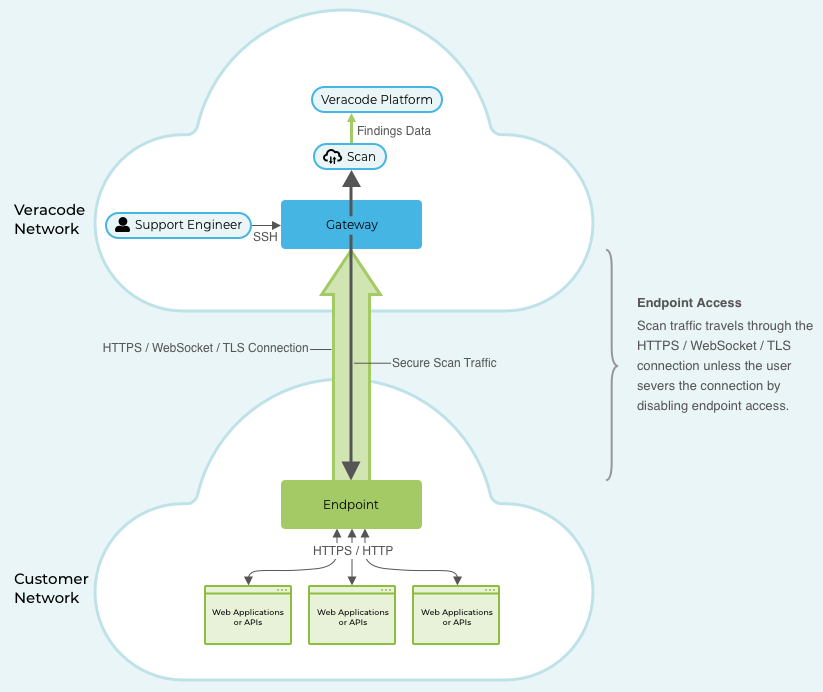
We specifically designed ISM to not expose you to any security risks. All scanning and support occur in the Veracode Platform cloud, and you can disable access between your applications or APIs and the Veracode Platform cloud at any time.
In the Veracode Platform, you create a gateway and endpoint that securely connect your internal applications or APIs to the Veracode Platform cloud for scanning and analysis.

Benefits
ISM provides the following benefits.
| Benefit | Description |
|---|---|
| Usability | Set up ISM using a simple workflow. Configure Dynamic Analysis or DAST Essentials scans for your internal applications and REST APIs in the same way you do for external ones. ISM does not restrict where you can host your internal applications or APIs. With ISM, you can perform scans of applications and REST APIs hosted in containers, virtual machines, bare-metal servers, or in the cloud. |
| Compliance | With ISM, you have full control of your environment. You can grant and revoke Veracode access to scan or provide support for your applications or REST APIs. The only software you need to maintain is a JAR file that you run in your environment. |
| Stability | ISM does not require you to regularly update any software, eliminating the need for reboots and extensive downtime. |
| Scalability | You can run several scans simultaneously on a single ISM deployment. |
| Patching | ISM uses AWS Patch Manager to automatically patch your Amazon EC2 instances. There is a maintenance window for applying patches every Tuesday at 7:00 AM Coordinated Universal Time (UTC). |
Prerequisites
To set up and use ISM, you must have:
- A Veracode Dynamic Analysis subscription.
- A Veracode account with the Administrator or Security Lead role.
Endpoint requirements
The machine on which you install endpoints must meet the following requirements. These requirements are based on the minimum requirements to run a Java Virtual Machine (JVM) on Java 21 or greater.
| Requirement | Description |
|---|---|
| Operating system | You can install an ISM endpoint on the following operating systems:
|
| Java version | Java 21 or later. |
| Memory | Minimum of 8 GB. |
| Disk space | Minimum of 4 GB. |
| Network |
|
| Port | Requires one-way communication over port 443 to the Veracode Platform URL, based on the region domain for your Veracode account. |
| WebSocket | Your firewall must allow WebSocket traffic. |
Best practices
Consider the following best practices when using ISM gateways and endpoints.
ISM gateways
When setting up and using ISM, we recommend complying with the following best practices for managing your gateway.
Add endpoints to the same gateway
A single gateway is sufficient for connecting all of your endpoints to the Veracode cloud for scanning. There are no performance benefits to using multiple gateways.
If the endpoint cannot connect to the gateway, allow the gateway IP address
If an endpoint fails to connect to your gateway after installing the endpoint, your organization might need to add the gateway IP address to your allowlist.
Monitor emails from Veracode about your gateway
Veracode sends an email notifying you if your gateway goes offline and comes back online. If you have an analysis in progress when the gateway goes offline, you need to restart them when it comes back online.
You can also monitor the status of your gateway by opening ISM in the Veracode Platform.
ISM endpoints
When setting up and using ISM, we recommend complying with the following best practices for managing your endpoints.
Follow hardening practices
Keep endpoint versions current and secure all credentials. Restrict network access wherever possible.
Use diagnostics and logs
Before you run a scan, review ISM logs or use the diagnostic tool to confirm connectivity and readiness.
Install one endpoint in each network in which you want to scan
We recommend installing one endpoint in each network in which you scan your internal applications or APIs. For example, if you have applications deployed in multiple data centers, you install a unique endpoint for each data center.
Each endpoint is capable of supporting at least 30 concurrent scans, though a strong network connection and powerful server can improve this capability. If you reach or approach the limit to the capability of your endpoint machine, a LOG.info message about thread limits or an OutOfMemoryError message about Java memory might appear in the endpoint logs.
Scans wait in a queue only when you reach your scan capacity.
Deploy endpoints close to targets
Install ISM in the same data center or VPC as the application to reduce latency.
Example: If your application runs in AWS us-east-1, deploy the ISM endpoint in the same region.
Install endpoints with the endpoint installer
On Windows and Linux, the endpoint installer simplifies the installation process and creates a service that continuously runs the endpoint.
For manual installations, run endpoints as a service
If you manually install an endpoint, configure your machine to run the endpoint as a service.
Install endpoints close to the targets
To minimize network latency, install your endpoints in close proximity to the applications or REST APIs you plan to scan with the endpoint.
Do not try to install the same endpoint in multiple networks
You encounter an error if you attempt to run the same endpoint in more than one network. Create a new endpoint for each network in which you scan internal applications or REST APIs.
If an endpoint goes offline, restart it
- Windows machines: Open the Services application from the Windows start menu, find the Veracode_ISM service, and select Start the service or Restart the service.
- Linux machines: From the command line, enter
service Veracode_ISM statusto get the status of the ISM service. If it is running, enterservice Veracode_ISM stopto stop it. After it stops, enterservice Veracode_ISM startto start it. - Manual installations: Restart the endpoint JAR file from the command line.
If the endpoint does not come back online, contact Veracode Technical Support.
Monitor emails you receive from Veracode about your endpoints
Veracode sends an email notifying you when an endpoint goes offline and comes back online. In cases where an inconsistent network connection causes your endpoint to become unstable, repeatedly switching between online and offline, you receive a single email alerting you of the instability. After you receive the endpoint instability email, Veracode suspends notifications about the endpoint for 24 hours to avoid sending redundant email alerts.
You can also monitor the status of your endpoints on the gateway page of the Veracode Platform.
Set up ISM
If you are setting up ISM for the first time, complete this workflow to install a gateway, which is the access point to the Veracode Platform cloud. Then, use the endpoint installer to install an endpoint, which uses the gateway to connect your internal applications or REST APIs to the Veracode Platform cloud for scanning. The endpoint runs as a service.
If you have already created a gateway, you can add endpoints to it or install additional endpoints.
We automatically delete a gateway and its associated endpoints if it has no scan activity for four months. When Veracode deletes a gateway, the Veracode Platform displays the name of the deleted gateway on the Internal Scanning Management page. To prevent Veracode from deleting a gateway, schedule a recurring analysis that uses the gateway for internal scanning. To scan internal web applications or REST APIs after Veracode deletes your gateway, you must create a new gateway and endpoint.
Before you begin:
- Ensure you meet the prerequisites, and you have administrator permissions on the machine on which you want to install an endpoint.
- Ensure that the machine on which you install an endpoint can reach the URLs or API server you want to scan. Open the URLs in a web browser and, if the machine cannot connect to the URLs, ask your IT administrator to enable the connection.
- We recommend creating only one gateway.
To complete this task:
-
Sign in to the Veracode Platform.
-
From the gear icon
at the top, select Internal Scanning Management.
-
Select Configure Internal Scanning.
-
Enter the name and description of the gateway. Then, select Next. Only ASCII characters are supported. UTF-8 is not supported.
-
Enter the name and description of the endpoint you want to connect to this gateway.
-
Select the platform (operating system) of the machine on which to install the endpoint. To perform a manual endpoint installation on a platform other than Windows or Linux, select Other and continue to Manually install an ISM endpoint.
-
Select Next.
-
To download the ZIP file containing the installer, select Download.
-
To copy your endpoint key, which you'll use later, to your clipboard, select Copy in the text box in step 2.3 .
-
Move the downloaded ZIP file to a machine behind your firewall with access to your internal applications or REST APIs.
-
Extract the installer file from the ZIP file.
- For Windows machines, the filename is
veracode_ism_install.bat. - For Linux machines, the filename is
veracode_ism_install.sh
- For Windows machines, the filename is
-
Run the installer file to open the wizard. If you are using a Linux machine without a GUI wrapper, run:
sudo -s ./veracode_ism_install.sh. The installer prompts you to provide the information in the following steps on the command line. -
Read the terms of use for the endpoint, select the checkbox, and select Next.
-
Verify the installation folder and Java home are correct or select your preferred folders and select Next. If the installer cannot automatically detect the Java home, you must specify it.
-
If you use a proxy, select Manual configuration and provide the following information.
-
Enter your proxy hostname and port number.
-
If you want to use the proxy only for communication between the endpoint and gateway:
- Select For gateway connection.
- If you want the proxy to resolve the gateway hostname, which means you need to allow only the gateway hostname, clear the Let endpoint resolve hostname for gateway checkbox. If you do not clear it, you must include the hostname and IP address of the gateway in your allowlist.
-
If you want to use the proxy for communication between the endpoint and gateway, and between the endpoint and the URLs you scan:
- Select For gateway and URL connections.
- If you want the proxy to resolve the gateway or URL hostnames, which means you need to allow only the hostname for the gateway and the URLs you scan, clear the Let endpoint resolve hostname for gateway or Let endpoint resolve hostname for URLs checkboxes. If you do not clear them, you must include the hostname and IP address of the gateway and URLs in your allowlist.
-
If the proxy requires authentication, select Authentication Required. Then, enter your proxy credentials.
-
Select Next.
-
Paste the endpoint key you copied in step 9 and select Next. If you did not copy the endpoint key, go to the gateway page in the Veracode Platform, select the Actions menu for this endpoint, and select Copy Endpoint Key.
-
When the key validates, select Install.
-
Select Close.
-
If you configured a proxy, configure the proxy exclusion list.
The gateway and endpoint you created appear on the Internal Scanning Management page. The gateway might have a status of Initializing for a few minutes after you create it. The endpoint has a status of Pending until you successfully deploy it. When you successfully deploy the endpoint, it has a status of Ready. If the endpoint fails to connect to the gateway, your organization might need to add the gateway IP address or domain name to your allowlist. The IP address and domain are visible from the Internal Scanning Management page and the gateway page.
-
Configure a new or existing analyses to use the gateway and endpoint for internal scanning.
- DAST Essentials
- Dynamic Analysis
Configure the proxy exclusion list
If you install an endpoint on a machine that uses a proxy, create a proxy exclusion list that contains hosts that can bypass the configured proxy. All other internet traffic routes through the proxy.
To complete this task:
- Open File Explorer and go to the ISM endpoint installation folder.
- Open the
configfolder. - Open the
application.propertiesfile. - Search for
proxyExclusionList. If the entry exists, add the necessary proxies, separated by commas. If it doesn't exist, create a new line and addproxyExclusionListfollowed by the necessary proxies, separated by commas (e.g.,proxyExclusionList = veracode.com, *code.com). - To save changes, select File > Save.
Download the endpoint installer
The endpoint installer simplifies the process of deploying endpoints and creates a service that runs the endpoint continuously until you stop it.
For instructions, see Install an endpoint.
If you have insufficient permissions to create the service, try running the installer as an administrator.
To download the installer for your region domain using the following links, you must be signed in to the Veracode Platform. If you encounter errors during the installation, see the Troubleshooting ISM.
Commercial region
European region
United States Federal region
Install an endpoint
Use the endpoint installer to install an endpoint on Windows or Linux servers. To install an endpoint on different platforms, use the command line.
Before you begin:
- Ensure you have a gateway to which to add the endpoint. If you have not created a gateway, see Set up ISM.
- Ensure the machine on which you install the endpoint meets the prerequisites, and you have administrator permissions on the machine.
- Ensure that the machine on which you install an endpoint can reach the URLs you want to scan. Open the URLs in a web browser and, if the machine cannot connect to the URLs, ask your IT administrator to enable the connection.
To complete this task:
-
Sign in to the Veracode Platform.
-
Download the latest endpoint installer.
-
Extract the installer file from the ZIP file.
- On Windows, the filename is
veracode_ism_install.bat - On Linux, the filename is
veracode_ism_install.sh
- On Windows, the filename is
-
Run the endpoint installer to open the wizard. If you are using a Linux machine without a GUI wrapper, run:
sudo -s ./veracode_ism_install.sh. The installer prompts you to provide the information in the following steps on the command line. -
Read the terms of use, select the checkbox, and select Next.
-
Verify the installation folder and Java home are correct or select your preferred folders and select Next. If the installer cannot automatically detect the Java home, you must specify it.
-
If you use a proxy, select Manual configuration and enter the following information.
- Enter your proxy hostname and port number.
- If you want to use the proxy only for communication between the endpoint and gateway:
- Select For gateway connection.
- If you want the proxy to resolve the gateway hostname, which means you need to allow only the gateway hostname, clear the Let endpoint resolve hostname for gateway checkbox. If you do not clear it, you must include the hostname and IP address of the gateway in your allowlist.
- If you want to use the proxy for communication between the endpoint and gateway and between the endpoint and the URLs you scan:
- Select For gateway and URL connections.
- If you want the proxy to resolve the gateway or URL hostnames, which means you need to allow only the hostname for the gateway and the URLs you scan, clear the Let endpoint resolve hostname for gateway or Let endpoint resolve hostname for URLs checkboxes. If you do not clear them, you must include the hostname and IP address of the gateway and URLs in your allowlist.
- If the proxy requires authentication, select Authentication Required and, then, enter your proxy credentials.
-
Select Next.
-
In the Veracode Platform, go to the gateway page for the gateway to which you added the endpoint.
-
Select the Actions menu for the endpoint, and select Copy Endpoint Key.
-
Paste the endpoint key and select Next.
-
When the key validates, select Install.
-
Select Close.
-
If you configured a proxy, configure the proxy exclusion list.
You can access the gateway and endpoint on the Internal Scanning Management page. The gateway might have a status of Initializing for a few minutes after you create it. The endpoint has a status of Pending until you successfully deploy it. When you successfully deploy the endpoint, it has a status of Ready.
Install an endpoint from the command line
If you are running your endpoint on a machine other than Windows or Linux, or you choose not to use the endpoint installer, you can install an endpoint from the command line.
You must deploy the endpoint to a location accessible to the web applications or REST APIs you want to scan or the analysis fails.
To complete this task:
-
Select Download to download the ZIP file containing the endpoint.
-
Move the ZIP file to a machine behind your firewall with access to your internal applications or REST APIs.
-
Extract the ZIP file.
-
Start the endpoint JAR file from the command line with the appropriate commands for your proxy configuration. You can also copy the following commands from the Set Up Your Environment window:
-
If you are not using a web proxy to access the internet:
java -jar Veracode_ISM_Endpoint_{yourendpointname}.jar -
If you are using an unauthenticated web proxy:
java -Dhttps.proxyHost={your_proxy_host} -Dhttps.proxyPort={your_proxy_port} -jar Veracode_ISM_Endpoint_{your_endpoint_name}.jar -
If you are using an authenticated web proxy, launch the endpoint:
java -Dhttps.proxyHost={your_proxy_host} -Dhttps.proxyPort={your_proxy_port} -jar Veracode_ISM_Endpoint_{your_endpoint_name}.jar --authenticate -
After launching the endpoint for an authenticated web proxy, run the endpoint:
java -Dhttps.proxyHost={your_proxy_host} -Dhttps.proxyPort={your_proxy_port} -jar Veracode_ISM_Endpoint_{your_endpoint_name}.jar -
If you only want to use the web proxy for communication between the endpoint and gateway:
java -Dhttps.proxyHost={your_proxy_host} -Dhttps.proxyPort={your_proxy_port} -jar Veracode_ISM_Endpoint_{your_endpoint_name}.jar --proxygatewayonly
-
-
Select Close.
-
If you configured a proxy, configure the proxy exclusion list.
The new gateway and endpoint now appear on the Internal Scanning Management page. If the endpoint fails to connect to the gateway, your organization might need to add the gateway IP address or domain name to the allowlist. The IP address and domain are viewable on the Internal Scanning Management page and the gateway page.
After creation, the gateway status displays as Initializing for a few minutes. The endpoint status remains Pending until deployment is complete. Once deployed, the status changes to Ready.
Update an endpoint
Update an endpoint to the latest version, change the proxy settings or Java home. You can also update an endpoint from the command line.
The Endpoints table displays the endpoint version. From the Version column, you can view the updates included in the latest endpoint versions.
To complete this task:
- Stop the endpoint service on the server where the endpoint is installed.
- Sign in to the Veracode Platform.
- From the gear icon
, select Internal Scanning Management.
- Select the name link of the gateway for which you want to update an endpoint.
- Select Actions > Set Up in the endpoint row.
- To download the ZIP file containing the endpoint installer, select Download.
- Move the downloaded ZIP file to a machine behind your firewall with access to your internal applications or REST APIs.
- To copy the endpoint key to your clipboard, select Copy.
- Run the endpoint installer. On Linux, run
sudo -s ./veracode_ism_install.sh - To update your endpoint to the latest version, select Next.
- To change your Java home to a different Java version, select the new location, then select Next.
- To update your proxy settings, select Manual configuration and enter your proxy details, then select Next.
- Select Next on the Endpoint Key page.
- Select Install on the Summary page.
- After updating the endpoint, select Close.
- If you configured a proxy, configure the proxy exclusion list.
Add an endpoint to a gateway
After creating a gateway, you must add one endpoint to it. After you configure the gateway, you can add more endpoints to it. We recommend installing one endpoint in each network in which you scan your internal applications or APIs.
ISM currently supports ASCII characters, not UTF-8, for the names and descriptions of gateways and endpoints.
Before you begin:
Before installing an endpoint on a machine, verify that you can connect to the applications you want to scan from that machine.
To complete this task:
-
From the gear icon
at the top of the Veracode Platform, select Internal Scanning Management.
-
Select the name of the gateway to which you want to add the endpoint.
-
On the gateway page, select Add Endpoint.
-
Enter the endpoint name and description.
-
Select the platform of the machine running the endpoint. For platforms other than Windows or Linux, select Other and install an endpoint from the command line.
-
Select Next.
-
Install the endpoint. After installing the endpoint, it appears on the gateway page with a status of Ready.
-
If you configured a proxy, configure the proxy exclusion list.
-
Configure a new or existing analyses to use the gateway and endpoint for internal scanning.
- DAST Essentials
- Dynamic Analysis
Edit an endpoint
After you create an endpoint, you can edit the endpoint name and description.
To complete this task:
- From the gear icon
at the top of the Veracode Platform, select Internal Scanning Management.
- Select the name of the gateway for which you want to edit an endpoint.
- From the Endpoints table, select the Actions menu for the endpoint you want to edit and select Edit.
- Edit the Endpoint Name or Description field and select Save.
Manage endpoint access
Control whether your endpoints are accessible to the Veracode Platform cloud for security scanning and to receive support from Veracode Technical Support.
By default, Scan Access is enabled and Veracode Support Engineer Access is disabled.
To complete this task:
-
From the gear icon
at the top of the Veracode Platform, select Internal Scanning Management.
-
Select the name of the gateway for which you want to edit the endpoint access.
-
In the Endpoints table, open the Actions menu for the endpoint you want to update and select Manage Access.
-
To enable or disable Veracode scan access to your endpoint, select Scan Access.
ImportantDisabling scan access while scans are in progress terminates those scans.
-
To enable or disable Veracode support engineer access to your endpoint, select Veracode Support Engineer Access.
noteDisabling Veracode support engineer access while engineers are providing support interrupts that support.
-
If you enable Veracode support engineer access, select the access window. You can enable access for a specific number of days, up to 30, or enable it indefinitely.
-
Select Save.
Delete a gateway
If you created a gateway in error or have stopped using it, you can delete it from your ISM configuration.
Before you begin:
- Ensure you have deleted the endpoints connected to it.
- If you allowed the gateway IP address, we recommend removing it from your network allowlist.
To complete this task:
- From the gear icon
at the top of the Veracode Platform, select Internal Scanning Management.
- Select the name of the gateway you want to delete.
- Select Delete Gateway.
- In the Delete window, select Delete.
Delete an endpoint
If you created an endpoint in error or have stopped using it, you can delete it from your ISM configuration.
To complete this task:
- From the gear icon
at the top of the Veracode Platform, select Internal Scanning Management.
- Select the name of the gateway from which you want to delete the endpoint.
- From the Endpoints table, select the Actions menu for the endpoint you want to edit and select Delete Endpoint.
- In the Delete window, select Delete.
Uninstall an endpoint
If you no longer want to use an endpoint for scanning, you can uninstall it from your machine.
Uninstalling an endpoint stops all scans currently using the endpoint.
To complete this task:
- Navigate to the installation folder specified during the endpoint installation. The default destination is
C:\Program Files\Veracode\ISM. - Open the
uninstallfolder. - Open the uninstall file.
- On Windows, the filename is
uninstall.bat. - On Linux, the filename is
uninstall.sh.
- On Windows, the filename is
- Select Uninstall.
- When the endpoint successfully uninstalls, select Close.
View endpoint logs
If you encounter errors using ISM, you can refer to the log files for your endpoint to help with troubleshooting.
To complete this task:
-
Navigate to the logs folder in your ISM installation directory. For example:
C:\Program Files\Veracode\ISM\veracode_ism\logs -
Open the log file relevant to your issue.
endpointinstaller.logrecords the events of the endpoint installation.smartendpoint.logrecords the endpoint activity.
Test your endpoints
You can use the ISM endpoint diagnostic tool to test both of the connections necessary to complete an analysis with ISM: the connection between the endpoint and the Veracode gateway and the connection between the endpoint and your application URL.
If you run diagnostics often, you can set parameters in the application.properties file so that you do not need to set them each time you run the test.
To complete this task:
-
On the command line, navigate to your
veracode_ismdirectory. -
Run the diagnostic test command:
-
To run the test based on the default parameters or the parameters set in
applications.properties, run this command:java -jar endpoint.jar --diagnostics -
To overwrite the diagnostic test parameters at runtime, run this command:
java -jar endpoint.jar --diagnostics {diagnosticUrl} {diagnosticUrlBatchCount} {diagnosticTunnelBatchCount} {diagnosticTunnelBatchSizeKB}For example:
java -jar endpoint.jar --diagnostics https://www.veracode.com 5 3 250If you exclude any parameters from the command, the diagnostic tool uses the
application.propertiesparameters or, if you have not defined them, the default parameters.
The test results print the performance statistics for these processes to your screen:
- Data transfer between the endpoint and the Veracode gateway
- Data transfer between the endpoint and the destination URL
-
-
Review the ISM diagnostic results.
ISM diagnostic tool parameters
You can set your preferred parameters for the Veracode Internal Scanning Management (ISM) endpoint diagnostic tool in your application.properties file to avoid having to set them every time you run a test.
This table describes the parameters you can define for diagnosing ISM connection issues.
| Parameter | Description |
|---|---|
diagnosticUrl | Destination URL to scan. |
diagnosticTunnelBatchSizeKB | Size, in kilobytes, of the data package sent to the Veracode gateway. Default is 1000. |
diagnosticTunnelBatchCount | Number of times the endpoint resends the test data to the Veracode gateway. Default is 10. |
diagnosticUrlBatchCount | Number of times the endpoint attempts to connect to the destination URL. Default is 10. |
The following example application.properties file contains all the diagnostic tool parameters.
#application key
token = $TOKEN$
#gateway host name
gateway = $GATEWAY$
websocketProtocol = wss
wsendpoint = /wsendpoint
socketConnectionTimeoutMs = 5000
socketReadTimeoutMs = 5000
diagnosticUrl = https://www.veracode.com
diagnosticTunnelBatchSizeKB = 500
diagnosticTunnelBatchCount = 5
diagnosticUrlBatchCount = 5
ISM diagnostic tool results
The ISM endpoint diagnostic tool provides details of the performance of the connections to your endpoint. It measures the connection from the endpoint to both the Veracode gateway and the application you want to scan.
A successful endpoint diagnostic test returns two sets of results: the gateway diagnostics results and the destination diagnostics results.
For gateway diagnostics, the tool sends data through a secure tunnel from the endpoint to the Veracode gateway and, then, back to the endpoint, measuring the response time. The tunnel closes as soon as the data transfer completes. The gateway diagnostics summary provides these data points:
- Average Transfer Time: the amount of time, in milliseconds, it took for the data to reach the gateway and return to the endpoint.
- Average Throughput: the speed, in megabits per second, at which the data traveled.
A high transfer time or low throughput might indicate a poor connection between your endpoint server and the Veracode network.
For destination diagnostics, the tool sends data through a SOCKS5 connection between your endpoint and the URL of the application you want to scan. Then, it sends the data back to the endpoint, measuring the response time. The destination diagnostics summary provides these data points:
- Average Transfer Time: the amount of time, in milliseconds, it took for the data to reach the application URL and return to the endpoint.
- Average Throughput: the speed, in megabits per second, at which the data traveled.
A high transfer time or low throughput may indicate a poor connection between your endpoint server and the application you want to scan.
This example shows a successful diagnostic test:
c:\Program Files\Veracode\ISM\veracode_ism>java -jar endpoint.jar --diagnostics https://www.veracode.com 5 3 250
2020-03-06 20:07:21,985 INFO - Launching Smart Endpoint version: 20.3.4 Java version: 1.8.0_241
2020-03-06 20:07:22,079 INFO - Running endpoint diagnostics
2020-03-06 20:07:22,517 INFO - Running tunnel diagnostics
2020-03-06 20:07:22,689 INFO - Tunnel diagnostics complete
2020-03-06 20:07:22,689 INFO - Running destination diagnostics
2020-03-06 20:07:23,157 INFO - Destination diagnostics complete
2020-03-06 20:07:23,157 INFO - Tunnel diagnose usage stats: 0 bytes sent; 750000 bytes received
2020-03-06 20:07:23,157 INFO - Tunnel diagnose Performance stats:
2020-03-06 20:07:23,157 INFO - =======================================
2020-03-06 20:07:23,157 INFO - Gateway diagnostics results
2020-03-06 20:07:23,157 INFO - =======================================
2020-03-06 20:07:23,157 INFO - # Time(ms) Size(kB) Throughput(Mbps) Quality
2020-03-06 20:07:23,157 INFO - 1 47 250 42.55 100%
2020-03-06 20:07:23,157 INFO - 2 47 250 42.55 100%
2020-03-06 20:07:23,157 INFO - 3 47 250 42.55 100%
2020-03-06 20:07:23,157 INFO - ==========Gateway Diagnostics Summary===========
2020-03-06 20:07:23,157 INFO - Average Transfer Time:47.0 +/- 0.0
2020-03-06 20:07:23,157 INFO - Average Throughput:42.5531914893617 +/- 0.0
2020-03-06 20:07:23,157 INFO - =======================================
2020-03-06 20:07:23,157 INFO - Destination diagnostics results 1 thread each for target https://www.veracode.com
2020-03-06 20:07:23,157 INFO - =======================================
2020-03-06 20:07:23,157 INFO - # Time(ms) Size(kB) Throughput(Mbps) Quality
2020-03-06 20:07:23,157 INFO - 1 125 92.3 5.91 100%
2020-03-06 20:07:23,157 INFO - 2 78 92.3 9.46 100%
2020-03-06 20:07:23,157 INFO - 3 78 92.3 9.46 100%
2020-03-06 20:07:23,157 INFO - 4 78 92.3 9.46 100%
2020-03-06 20:07:23,157 INFO - 5 94 92.3 7.85 100%
2020-03-06 20:07:23,157 INFO - ==========Destination Diagnostic Summary===========
2020-03-06 20:07:23,157 INFO - Average Transfer Time:90.6 +/- 18.282232
2020-03-06 20:07:23,157 INFO - Average Throughput:8.429736844080741 +/- 1.4079821
2020-03-06 20:07:23,157 INFO - Smart Endpoint is shutting down
2020-03-06 20:07:23,157 INFO - Smart Endpoint shut down complete
If you see exceptions in the gateway diagnostic results, Veracode encountered issues creating a tunnel from the gateway to your endpoint. For example:
2020-06-05 17:09:52,375 DEBUG - Sockets client is running using proxy:HTTP @ /10.110.52.49:808
2020-06-05 17:09:54,695 ERROR - Error in websocket client
java.net.ConnectException: Connection refused: connect
at java.net.DualStackPlainSocketImpl.connect0(Native Method)
at java.net.DualStackPlainSocketImpl.socketConnect(Unknown Source)
at java.net.AbstractPlainSocketImpl.doConnect(Unknown Source)
at java.net.AbstractPlainSocketImpl.connectToAddress(Unknown Source)
at java.net.AbstractPlainSocketImpl.connect(Unknown Source)
at java.net.PlainSocketImpl.connect(Unknown Source)
at java.net.Socket.connect(Unknown Source)
at sun.net.NetworkClient.doConnect(Unknown Source)
at sun.net.www.http.HttpClient.openServer(Unknown Source)
at sun.net.www.http.HttpClient$1.run(Unknown Source)
at java.security.AccessController.doPrivileged(Native Method)
at sun.net.www.http.HttpClient.privilegedOpenServer(Unknown Source)
at sun.net.www.http.HttpClient.openServer(Unknown Source)
at sun.net.www.http.HttpClient.<init>(Unknown Source)
at sun.net.www.http.HttpClient.New(Unknown Source)
at sun.net.www.protocol.http.HttpURLConnection.getNewHttpClient(Unknown Source)
at sun.net.www.protocol.http.HttpURLConnection.plainConnect0(Unknown Source)
at sun.net.www.protocol.http.HttpURLConnection.plainConnect(Unknown Source)
at sun.net.www.protocol.http.HttpURLConnection.connect(Unknown Source)
at java.net.HttpConnectSocketImpl.doTunnel(Unknown Source)
at java.net.HttpConnectSocketImpl.access$200(Unknown Source)
at java.net.HttpConnectSocketImpl$2.run(Unknown Source)
at java.security.AccessController.doPrivileged(Native Method)
at java.net.HttpConnectSocketImpl.privilegedDoTunnel(Unknown Source)
at java.net.HttpConnectSocketImpl.connect(Unknown Source)
at java.net.Socket.connect(Unknown Source)
at org.java_websocket.client.WebSocketClient.run(WebSocketClient.java:387)
at java.lang.Thread.run(Unknown Source)
2020-06-05 17:09:54,702 DEBUG - Socket closed. Exit code: -1 Reason: Connection refused: connect
The most likely cause of a gateway diagnostic exception is a firewall or proxy server that blocks WebSocket traffic. To resolve this error, you must configure your firewall to allow WebSocket traffic to the Veracode gateway.
If you see exceptions in the destination diagnostic results, the endpoint cannot access the destination URL. For example:
2020-06-05 17:18:26,872 ERROR - Exception while sending diagnostic data
com.veracode.was.mvsa.smartendpointclient.proxy.ProxyException: java.net.SocketTimeoutException: connect timed out
at com.veracode.was.mvsa.smartendpointclient.proxy.embedded.socks5.AddressHandler.connect(AddressHandler.java:90)
at com.veracode.was.mvsa.smartendpointclient.proxy.embedded.ProxyChannelEmbedded.send(ProxyChannelEmbedded.java:99)
at com.veracode.was.mvsa.smartendpointclient.websocket.SmartEndpointSocketClient.lambda$openDiagnosticSocket$3(SmartEndpointSocketClient.java:296)
at java.util.concurrent.Executors$RunnableAdapter.call(Unknown Source)
at java.util.concurrent.FutureTask.run(Unknown Source)
at java.util.concurrent.ThreadPoolExecutor.runWorker(Unknown Source)
at java.util.concurrent.ThreadPoolExecutor$Worker.run(Unknown Source)
at java.lang.Thread.run(Unknown Source)
Caused by:
java.net.SocketTimeoutException: connect timed out
at com.veracode.was.mvsa.smartendpointclient.proxy.embedded.socks5.AddressHandler.connect(AddressHandler.java:90)
at com.veracode.was.mvsa.smartendpointclient.proxy.embedded.ProxyChannelEmbedded.send(ProxyChannelEmbedded.java:99)
at com.veracode.was.mvsa.smartendpointclient.websocket.SmartEndpointSocketClient.lambda$openDiagnosticSocket$3(SmartEndpointSocketClient.java:296)
at java.util.concurrent.Executors$RunnableAdapter.call(Unknown Source)
at java.util.concurrent.FutureTask.run(Unknown Source)
at java.util.concurrent.ThreadPoolExecutor.runWorker(Unknown Source)
at java.util.concurrent.ThreadPoolExecutor$Worker.run(Unknown Source)
at java.lang.Thread.run(Unknown Source)
2020-06-05 17:18:26,872 ERROR - Destination check exception
java.net.SocketException: SOCKS: Connection refused
at java.net.SocksSocketImpl.connect(Unknown Source)
at java.net.Socket.connect(Unknown Source)
at com.veracode.was.mvsa.smartendpointclient.websocket.DiagnosticClient.getDestination(DiagnosticClient.java:275)
at com.veracode.was.mvsa.smartendpointclient.websocket.DiagnosticClient.runDestinationCheck(DiagnosticClient.java:140)
at com.veracode.was.mvsa.smartendpointclient.websocket.DiagnosticClient.runDiagnostics(DiagnosticClient.java:59)
at com.veracode.was.mvsa.smartendpointclient.service.impl.SmartEndpointServiceImpl.runDiagnostics(SmartEndpointServiceImpl.java:376)
at com.veracode.was.mvsa.smartendpointclient.main.EndpointLauncher.runDiagnostics(EndpointLauncher.java:80)
at com.veracode.was.mvsa.smartendpointclient.main.Main.main(Main.java:98)
The most likely cause of a destination diagnostic exception is that your proxy does not allow access to the URL from the endpoint machine. To resolve this error, you must configure your proxy to allow your endpoint machine to access the destination URL.
Notification events
We send email notifications to your Security Leads for the following significant events that affect your gateway or endpoints.
| Event | Notification message |
|---|---|
| Your gateway goes offline. | Due to a technical issue, your gateway and its associated endpoints are offline. Veracode Support Engineers are working to fix the issue. Veracode will send you an email when the gateway and endpoints return online. URL scans using this gateway cannot complete while the gateway is offline. View the status of the gateway in the Veracode Platform. |
| Your gateway comes back online. | If you had an analysis in progress when the gateway went offline, you need to restart them now. View the status of the gateway in the Veracode Platform. |
| An endpoint goes offline. | URL scans using this endpoint cannot complete while the endpoint is offline. If you had an analysis in progress, you will need to restart them when the endpoint is back online. View the status of your endpoints in the Veracode Platform. To get your endpoint back online, view the troubleshooting guidance in the Veracode Help Center. |
| An endpoint comes back online. | If you had an analysis in progress when the endpoint went offline, you need to restart them now. View the status of the endpoint in the Veracode Platform. |
| Your endpoint is unstable. | One of your Veracode Internal Scanning Management (ISM) endpoints is unstable, repeatedly switching between online and offline. View the current status of your endpoint in the Veracode Platform. This instability might impact analyses that are in progress. Check on the connection between your network and the machine running the endpoint. If the connection is consistent and the endpoint remains unstable, contact Veracode Technical Support at [email protected]. Your notifications for this endpoint will resume if the endpoint status changes again after 24 hours. |
Troubleshooting
This section describes errors you might encounter when using the endpoint installer or ISM.
Endpoint installer errors
This table provides guidance for resolving errors you might encounter using the endpoint installer. If an issue persists after attempting the solution, contact Veracode Technical Support.
| Issue | Solution |
|---|---|
| Invalid installation folder | Verify that the location specified in the Installation Folder field is either an empty folder that you created or a nonexistent folder that the installer creates. |
Invalid JAVA_HOME path | Verify that the JAVA_HOME environment variable points to a valid Java Runtime Environment (JRE) or Java Development Kit (JDK). |
| Proxy settings errors | Verify that the proxy server is accessible from the machine running the installer and does not require more authentication in addition to username and password. The installer supports only basic proxy authentication. |
| Failure to authenticate endpoint key | Copy the endpoint key to your clipboard directly from the Veracode Platform. To copy the key, go to the gateway page, select the Actions menu for the endpoint you are installing, and select Copy Endpoint Key. If you still encounter an error, verify that you have not already installed an endpoint with that key on another machine. This issue might indicate that your network environment is blocking Java SSL certificates, or you might need to install your own certificates in the default Java KeyStore. To determine if the issue is related to SSL, check the ISM log files. |
ISM errors
This table provides guidance for resolving errors you might encounter when trying to perform an analysis using ISM. The error message appears in the ISM log files or the command output, if you're using a command line.
| Error Message | Solution |
|---|---|
ERROR - Exit due to initialization failure: Failed to reach the gateway | Verify that the gateway server on port 443 is on your allowlist and available from the machine on which the endpoint is installed. |
ERROR - Failed to get list of tunnels | Verify that the gateway server on port 443 is on your allowlist and available from the machine on which the endpoint is installed. |
ERROR - Exit due to initialization failure: GMS API invoke failed, cause : \{"error":"Token already registered","success":false\} | Run the endpoint on the machine on which it originally ran. If you want to run an endpoint on another machine, you must create a new endpoint. |
ERROR - Exit due to initialization failure: Failed to make websocket connection to gateway | Verify that WebSockets are allowed in your firewall or proxy configuration for port 443. |