Jira Cloud
You can use the Veracode Integration for Jira Cloud to import security flaws that Veracode identifies in your application to Jira Cloud.
The Veracode Integration for Jira Cloud manages the import of security flaws from Veracode and creates issues in Jira Cloud for each imported flaw. You can also use the Veracode Integration for Jira, which provides the same functionality for Jira Server and Jira Data Center.
The Veracode Integration for Jira Cloud does not support team-managed projects.
The Jira integration assigns each unique application finding to a unique Jira issue, created in the designated Jira project. Import criteria can include all open findings from all scans, all findings that affect policy, all unmitigated findings from the most recent scan, or other criteria.
You can choose to import findings on a one-time basis or selectively choose which findings to import. You can also schedule findings imports on an hourly, daily, or weekly basis. You can import findings from a specific application scan or from all your application scans. The integration can also update findings comments on the Veracode Platform, but cannot mitigate findings from within the Jira integration.
Supported versions
The integration always supports the latest version of Jira Cloud.
Jira users
There are two types of Jira users that interact with the Jira Cloud integration. You need to be aware of these user types when installing and using the integration.
- Jira User: this user is an account inside of Jira with permissions to create and modify all Jira issues for all projects to which you are importing flaws.
- Veracode User: this user has access to the Veracode Platform. The integration can only import findings for applications that this user can access. Veracode recommends that this user is an API user account.
About the finding life cycle in Jira
The Veracode Integration for Jira and the Veracode Integration for Jira Cloud import findings to Jira or Jira Cloud as issues and maintain the status of those issues. The status is based on the configuration settings on the Administration page in Jira or Jira Cloud. The integration sometimes changes the status of issues and, consequently, adds a comment to the issue describing the reason for the action.
The integration considers each issue to be in one of three status types:
- Resolved: considered to be done, but not verified or closed. The Jira status names are Resolved or In Review.
- Closed: someone has verified the issue. The Jira status names are Closed, Done, or Complete.
- Open: every other status.
If an issue is not resolved, the integration tries to transition it to Resolve, Resolve Issue, Complete Work, Close Issue, or Done. If someone reopens an issue, the integration tries to transition the status to Reopen, Reopen Issue, To Do, Queued for Action, Restart Progress, Start Progress, or Start Review.
In addition, the integration tries to change the status of issues in these situations:
- The integration does not find a previously imported finding during a new scan and the corresponding issue is not Resolved or Closed. The integration resolves the issue as Cannot Reproduce.
- The finding still exists, but, based on the import settings, the integration does not re-import it. You could manually resolve the corresponding issue as Won't Fix or Closed, for example.
- The finding still exists and the integration re-imports it, but the corresponding issue is Resolved or Closed. The integration changes the corresponding issue to Reopen or Open.
To change the status of an issue, in Jira, you can search for and execute status transitions for the project of the issue. For each transition there is a list of transition names. To resolve an issue, you can select the Jira transition that matches one of the names on the list. Jira orders the list, searches transitions in the order shown, and uses the first allowed transition. Veracode recommends transitioning an issue to an imperfect status instead of not changing its status.
Reopen transitions
- Open
- Queued for Action
- Reopen
- Reopen Issue
- Restart Progress
- Start Progress
- Start Review
- To Do
Resolve transitions
- Close
- Close Issue
- Complete Work
- Done
- Fixed
- Resolve
- Resolve Issue
Install the Jira Cloud integration
You can install the Veracode Integration for Jira Cloud as a plugin from the Atlassian Marketplace.
The Veracode Integration for Jira Cloud does not support team-managed projects.
Before you begin:
Before you can install and use the Veracode Integration for Jira Cloud, you must meet these prerequisites:
- Permissions to install the Veracode Integration for Jira Cloud.
- A Jira user account with permissions to create and modify all Jira issues for all projects to which you are importing flaws.
- Jira Cloud is configured to use specific state names and transition names for issues. When importing flaws to Jira as issues, the integration uses these names to assign the correct state and automatically make the correct transitions.
- An API user account with the Results API and Mitigation API roles.
- Generated Veracode API credentials.
- Ensured that all required Veracode IP addresses for the Veracode APIs and integrations are on the allowlist for your organization. The integration uses these addresses to authenticate with Veracode. To update your allowlist, you might need to contact your IT team.
To complete this task:
- Sign in to your Jira Cloud instance as an admin.
- From Application Switcher, select Jira Software.
- Go to Jira settings > Apps > Find new apps.
- In the Search the Marketplace field, find Veracode Integration for Jira Cloud.
- Select Install to download and install the Veracode Integration for Jira Cloud.
Configure the Jira Cloud integration
After installing the Veracode Integration for Jira Cloud, you configure it to add your Veracode credentials for accessing the Veracode Platform and to set up your findings import settings.
Add your credentials
You add your Veracode API credentials to the Veracode Integration for Jira Cloud. The integration uses these credentials to access Veracode.
Before you begin:
You have generated Veracode API credentials.
To complete this task:
- In Jira, select Jira settings > Apps > Login Credentials.
- Enter your Veracode Veracode API credentials.
- Select Test Credentials to ensure the credentials are correct. If you encounter an error, verify that there is network connectivity.
- Select Save to save the credentials.
Configure import settings
You configure the Veracode Integration for Jira Cloud to specify the findings identified during Veracode scanning to import into Jira Cloud.
You can import findings into either a:
- Default project that you select from the provided dropdown menu in this procedure.
- Project that you have named in a custom field on the Metadata page of each Veracode application profile.
To complete this task:
-
In Jira Cloud, select Jira settings > Apps > Findings Import.
-
In the Import section, select the types of findings to import. Other sections on this page become enabled or disabled depending on your selections.
noteIf you do not select Sandbox static findings or Sandbox SCA findings, steps 7 and 8 are disabled.
-
In the Filter Import By section, select which findings to import:
- All findings: from all scans, including closed findings
- Only findings from the most recent scan: all open findings that Veracode found in the most recent scan
- All unmitigated findings: from all scans, including closed findings
- Only unmitigated findings from most recent scan: all open, unmitigated findings from most recent scan
- All findings that affect policy: all open findings from all scans that affect policy
- All unmitigated findings that affect policy: all unmitigated, open findings from all scans that affect policy
During each import, the integration checks previously-imported findings to verify if it can close the findings. For example, if you select the import selection criteria Only findings from the most recent scan and the most recent scan resulted in a finding that was fixed, the integration closes the Jira issue for this particular finding.
-
Select to assign imported findings to a specific epic or link them to a related issue.
noteIf you selected to import sandbox findings, these options are disabled.
- Assign to Epic: select to assign imported findings to a specific epic. Then, from the dropdown menu, select the Veracode custom field that contains the exact epic issue key. If you leave this custom field empty, your import results in an error. The integration assigns imported findings from every Veracode application with this exact epic issue key value in the same custom field. For example, you have added the same epic issue key value to Custom Field 5 in every application profile.
- Link to Issue: select to link imported findings to a related issue. Then, from the dropdown menu, select the Veracode custom field that contains the exact issue key for the related issue to which to link imported findings. If you leave this custom field empty, your import results in an error. The integration links imported findings from every Veracode application with this exact issue key value in the same custom field. For example, you have added the same issue key value to Custom Field 7 in every application profile.
-
From the Import Static and Dynamic Findings As dropdown menu, select the issue type to apply to each imported static and dynamic finding.
For SCA findings, the integration imports components as stories and imports vulnerabilities for those components as subtasks of the related stories.
-
In the Import Issues Into section, select the Jira project into which you want to import the security findings or select the Veracode custom field that maps to the appropriate Jira project.
noteYou cannot enter custom metadata for sandbox scans of the application using the Veracode Platform. To enter custom metadata for sandbox scans, use the Development Sandbox API.
-
In the Add Values To Issues section, select the labels, or enter a string for a custom label, to add to the issues for all imported findings. You can also select to assign the issues to the next fix version scheduled for your Jira project.
For example, you can assign issues to the next fix version of your software build, add a custom label to help you triage or sort your findings, and add a label for the CWE that corresponds to the type of finding discovered during scanning.
-
If you selected to import sandbox findings, specify the Jira project into which to import findings, the labels to add to the issues during import, and whether to assign each issue to the next fix version.
-
In the Automated Issue Management section, select whether to automatically close findings mitigated in the Veracode Platform or manually update the status of mitigated findings.
-
Locate the Jira user ID. You can find the user ID from your Atlassian Administration account in Admin > User Management. In User Management, select the user and the user ID number loads as the last subdirectory of the URL in your browser. For example:
https://admin.atlassian.com/s/7c701bbe/users/{Jira_user_ID} -
In the JIRA User field, enter the user ID number of the Jira user who can create and modify issues.
This Jira user must have the necessary permissions for all Jira projects into which the integration imports findings.
- Select Test JIRA User to verify the Jira username.
- Optionally, in the Override Description section, select the Override the Jira Description field checkbox.
- Enter the text to add to the Description field in each issue or leave the text field blank. During the next findings import, the contents of this field replace any content in the issue Description field for each imported finding.
- Select Save to save all import settings.
- If Jira prompts you to perform a re-index, you can proceed with re-indexing. However, Veracode only recommends re-indexing when it is required.
Results:
The Import Settings section reports any errors detected in your configuration. If there are no errors, the configuration is complete and you can proceed with importing findings using the Veracode Integration for Jira Cloud.
Associate Veracode fields with Jira project screens
You configure your screen template in Jira Cloud to include two Veracode custom fields. When importing findings to Jira, the Veracode Integration for Jira Cloud automatically adds the custom fields to each Jira issue of imported findings and populates the values.
After installing the Veracode Integration for Jira Cloud, the integration creates the following custom fields in Jira Cloud.
- Veracode Link: manages the association of the Jira issue with the application findings in the scan results on the Veracode Platform. After completing this procedure, this custom field provides links back to the specific application, policy, and findings in the Veracode Platform.
- Mitigation Status and Comments: describes the current mitigation status, with optional comments, for an imported finding.
When using the Veracode Integration for Jira Cloud, the Veracode Link custom fields do not appear as individual fields in Jira issues, but are listed in the Issue Description field.
You must associate these custom fields, including the standard Environment field, to Jira screens for the fields to display in Jira issues.
To complete this task:
- Sign in to Jira Cloud as an administrator.
- Select Jira settings > Issues.
- Under FIELDS, select Custom fields to display the Custom fields page.
- Locate the Veracode Link field.
- Select the menu icon
 for the Veracode Link field and select Screens.
 - Select the checkbox for each screen in your Jira project to which you want to associate the Veracode Link field.
- Select Update.
- Under FIELDS, select Custom fields to go back to the Custom fields page.
- Repeat steps 5 through 8 for the Mitigation Status and Comments field and the Environment field.
- Under SCREENS, select Screens to display the View Screens page.
- On the View Screens page, select Configure on the row of a screen in your Jira project.
- On the Configure Screen page, scroll down to the Select Field dropdown menu.
- From the Select Field dropdown menu, select Veracode Link. The Veracode Link custom field is now associated with the selected screen.
- From the Select Field dropdown menu, select Mitigation Status and Comments and, then, select Environment. All three custom fields are now associated with the selected screen.
- Repeat steps 11 through 14 until you have associated all three custom fields to all selected screens.
Map Veracode fields to Jira Cloud fields
The Veracode Integration for Jira and the Veracode Integration for Jira Cloud can map data from custom fields in the Veracode Platform to fields in Jira or Jira Cloud issues. The integration can also map values from the Veracode Detailed XML Report.
To improve the import of Veracode findings into your Jira or Jira Cloud issues, you can map Custom Field 1 through Custom Field 10 in the Veracode Platform to standard or custom fields in Jira or Jira Cloud issues.
When importing findings to Jira or Jira Cloud, the integration imports the values from the mapped Veracode fields, including data from the Veracode Detailed XML Report, which you can download as detailedreport.xml. The integration has specific requirements for data types in Veracode fields and field types in Jira and Jira Cloud.
After adding field mappings, during the findings import process, the integration:
- Applies the mappings.
- Updates the values in Jira or Jira Cloud fields with any changed values in Veracode fields.
- Overrides any default values in Jira or Jira Cloud fields with the values in Veracode fields.
- Logs a WARN message in the Jira or Jira Cloud logs to warn you about any invalid Veracode field value. The import process omits these values and continues uninterrupted.
Use default Veracode fields with Jira and Jira Cloud
The Veracode Platform provides these categories of default fields that you can map to Jira issues using the Veracode Integration for Jira or the Veracode Integration for Jira Cloud:
- Common Fields: information pertaining to a specific Veracode application and also applicable to static analysis and SCA findings
- Static Fields: details for static analysis, dynamic analysis, and manual penetration test scan results
- SCA Components: security findings details for SCA components
- SCA Vulnerabilities: security findings details for SCA vulnerabilities
Jira Cloud fields that map to Veracode fields
This table lists the standard fields in Jira and Jira Cloud to which you can map Veracode custom fields on the Veracode to Jira Field Mappings page. The Veracode to Jira Field Mappings page is available with the Veracode Integration for Jira and the Veracode Integration for Jira Cloud.
| Standard Jira Field | Description |
|---|---|
| Affected Version/s | |
| Assignee | User assigned to the issue. The Veracode Integration for Jira uses these criteria when populating the Assignee field in Jira:
|
| Component/s | Comma-separated list of component values defined in custom fields in the Veracode Platform. Use this format for each component:ComponentName:ComponentDescription:ComponentLeadName:DefaultAssigneeTypeFor example: ComponentA:ComponentAdesc: :0,ComponentB:ComponentBdesc:Carl:1This example defines these components:
comp1, enter comp1: : :For the default assignee type, use these numeric values:
|
| Description | Adds the finding description value from the Veracode detailedreport.xml file and appends it to the existing description in the issue.The Description (overwrite) option replaces the Description field in Jira or Jira Cloud with the value from the selected field in the Veracode Platform. If the Veracode Platform field is empty, the mapping erases the contents of the Description field in Jira or Jira Cloud. |
| Environment | |
| Fix Version/s | |
| Issue Type | Issue type, such as story, bug, or epic. If there is no mapping for this field, the integration uses the issue type set in Jira or Jira Cloud. |
| Labels | Comma-separated list of labels to add to the issue. These labels do not affect any existing labels. During import, the integration removes any spaces between labels and concatenates any strings. |
| Original Estimate | Original estimate of the work required to resolve this issue. To map this field, you must have Time Tracking configured on the screen. |
| Reporter | User designated as the reporter for an issue. If there is no mapping for this field, the integration uses the reporter specified in Jira or Jira Cloud. |
| Time Spent | Time spent working on an issue. The value is based on the Time Tracking setting in Jira or Jira Cloud. You can set the default unit to Minute, Hour, Day, or Week. The integration converts the input long value to the default unit. To map this field, you must have Log Work configured in Jira or Jira Cloud. |
Map Jira Cloud data types and Veracode field types
The Veracode Integration for Jira and the Veracode Integration for Jira Cloud support importing string, number, and date/time data types from Veracode fields to text, number, and date/time field types in Jira or Jira Cloud.
On the Veracode to Jira Field Mappings page, when you select a Veracode custom field or Jira field, you see the supported data type or field type below your selection.
When adding a custom field in Jira or Jira Cloud, you select a field type. The integration supports these field types only:
- Date Time Picker: if the value is in a Veracode custom field, which uses free-form text, the value must be in this format:
dd/MMM/yy HH:mm. For example,14/Jan/20 11:52 - Number Field: if the value is in a Veracode custom field, which uses free-form text, the value must be an integer or decimal.
- Select List (multiple choices) and Select List (single choice): if the values are in Veracode custom fields, ensure each value is enclosed in square brackets. For example:
- Custom 1:
[value 1] - Custom 2:
[value 1][value 2][value 3]
- Custom 1:
- Text Field (multi-line) and Text Field (single line)
If you select an unsupported field type, Jira and Jira Cloud accept it without error, but you cannot select it from the Veracode Platform dropdown menu on the Veracode to Jira Field Mappings page. For text fields only, if a Veracode custom field has a value of -1, the integration imports it as [-1]. All other negative values import to text fields without square brackets.
Map Veracode fields to Jira Cloud fields
You can configure mappings between custom fields in the Veracode Platform and fields in Jira. The Veracode Integration for Jira Cloud uses these mappings to import specific information when importing findings as Jira issues.
Custom field names do not support commas (,) or colons (:).
To complete this task:
- Go to Administration > Apps > Veracode Integration > Field Mappings.
- In the Veracode Integration Field Mapping window, in the Veracode Platform column, select from the dropdown menu the name of the Veracode custom field you want to map.
- In the Jira column, from the dropdown menu, select the Jira field you want to map to the Veracode field.
- Select Add Mapping.
- Repeat these steps until you have mapped all the desired fields.
- To delete any mappings you do not want to keep, select Remove.
Next steps:
If you add any Veracode custom fields, you must add these fields to the associated project screen in Jira Cloud.
Example: Map Veracode fields to Jira fields
This example demonstrates mapping fields from application profiles in the Veracode Platform to fields in Jira or Jira Cloud issues.
This example creates a mapping between these fields:
- Default field Application Name in the Veracode Platform to the Labels field in Jira or Jira Cloud.
- Custom 1 field in the Veracode Platform to the Assignee field in Jira or Jira Cloud.
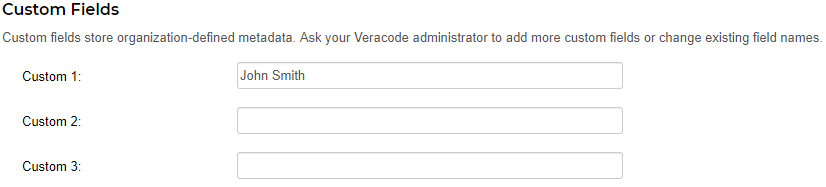
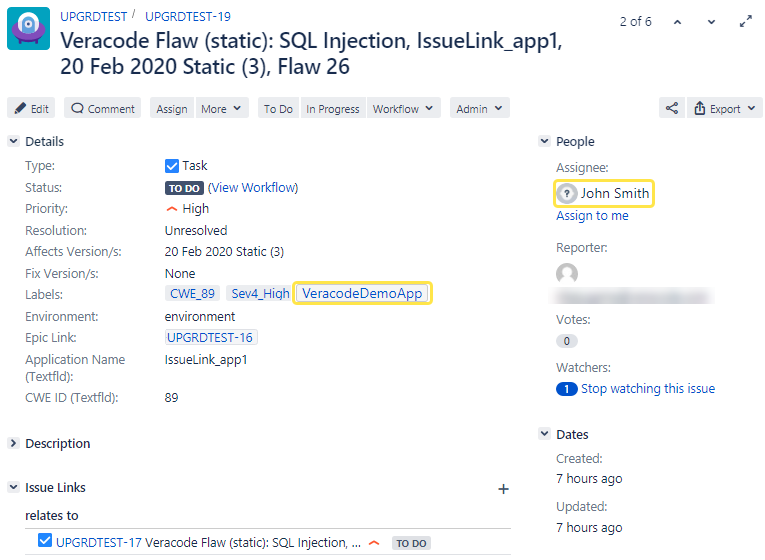
In this example, when creating the application named VeracodeDemoApp in the Veracode Platform, you edit the metadata and assign a value for custom field Custom 1. For example, enter assignee John Smith as the value.
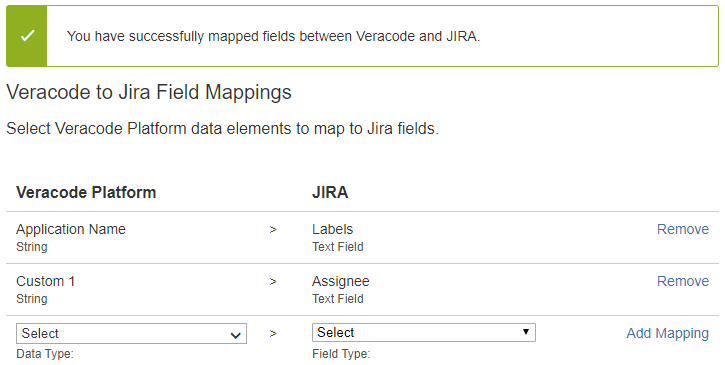
In Jira or Jira Cloud, these field mappings are configured on the Veracode to Jira Field Mappings page:
- The application name field is mapped to the Labels field.
- Custom field Custom 1 is mapped to the Assignee field.
A sample issue shows the result of the field mappings:
Map finding severities to Jira Cloud priorities
The Veracode Integration for Jira Cloud can map Veracode flaw severities in the Veracode Platform to your custom priorities in Jira Cloud.
The Veracode Platform severity scale uses six flaw severities: Very High (Critical), High, Medium, Low, Very Low, and Informational. In Jira Cloud, you can create any number of priorities using any names you want, but you are limited to mapping the six severities to a maximum of six priorities. The severity mapping applies to all new flaws during the next import to Jira Cloud. You configure severity mapping on the Veracode Severity Mappings page, which you can access in the Jira Cloud interface from: Administration > Add-ons > Severity Mappings.
Default severity mappings
After you install the integration, it checks for an existing mapping between Veracode severities and your Jira priorities. If a mapping exists, the integration leaves the mapping configuration intact and applies it to the next flaw import. If no mapping exists, the integration creates a default mapping based on the number of priorities in Jira Cloud. You can change the default mapping at any time.
For a Jira Cloud system with exactly six priorities, the integration creates this default mapping:
- The Very High (Critical) severity maps to Highest, which is the highest priority.
- The High severity maps to High, which is the second-highest priority.
- The Medium severity maps to Medium, which is the third-highest priority, and so on.
If the Jira Cloud system has more than six priorities, the integration maps the Veracode severities to the six-highest priorities. The remaining lower priorities are not mapped. If necessary, you can map a severity to a lower priority. For a Jira Cloud system with less than six priorities, the integration maps the highest severities to the highest priorities. The remaining severities all map to the same lowest priority.
Severity mapping limitations
A severity mapping has these limitations:
- You can only create a single mapping. When you change and save the mapping, which must be valid, it replaces the previous configuration. If you add, edit, or delete priorities, you must manually update and save the mapping to reflect the new priorities or the mapping might be invalid.
- The mapping only applies to new flaws you import to Jira Cloud. It does not apply to flaws (issues) already imported to Jira Cloud.
- You cannot disable severity mapping.
Invalid severity mappings
If there are issues with the mapped priorities in Jira Cloud, the severity mapping could be invalid. You must manually correct any issues with your priorities and, then, update your mapping to be in sync with the mapped priorities.
A mapping can be invalid for the following reasons:
- The mapped priorities no longer exist in the Jira Cloud system, but the configured mapping still contains the previous priorities. Someone might have deleted or renamed one or more priorities after you saved the mapping or while you were creating the mapping, but had not yet saved it. The invalid mapping causes these issues:
- After importing flaws from the Veracode Platform to Jira Cloud, the Priority field in all issues mapped to the missing priority is blank. The integration records this warning message in the Jira Cloud logs:
Invalid priority set in Severity Mappings page with priority: <PriorityName> - After configuring the mapping, when you select Save, the mapping fails to save and you see this error message:
One or more of the priorities selected are not valid Jira priorities. Please try again.
- After importing flaws from the Veracode Platform to Jira Cloud, the Priority field in all issues mapped to the missing priority is blank. The integration records this warning message in the Jira Cloud logs:
- Flaws in the Veracode Platform have a severity that is outside the severity scale. After importing the flaws into Jira Cloud, the Priority field in all issues mapped to that severity is blank. The integration records this warning message in the Jira Cloud logs:
Invalid severity received from Veracode Platform, setting priority to null. Severity received: <SeverityName>
You can map Veracode flaw severities to your customized priorities in Jira Cloud.
To complete this task:
- Select Administration > Manage apps > Severity Mappings. The Veracode Integration Severity Mappings page opens.
- In the JIRA Priority column, select the name of the Jira priority to map to the corresponding Veracode severity.
- Repeat the previous step to map each severity to a priority.
- Select Save to save the mapping.
Results:
If the mapping is valid, you see a success message. If the mapping is invalid, you see an error message and the mapping fails to save.
Next steps:
You can now import security findings to Jira Cloud, which applies the mapping to new flaws.
Example: Map finding severities to Jira Cloud priorities
This section provides an example of using the Veracode Integration for Jira Cloud to map Veracode flaw severities in the Veracode Platform to priorities in Jira Cloud.
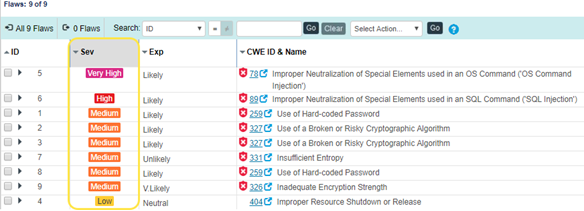
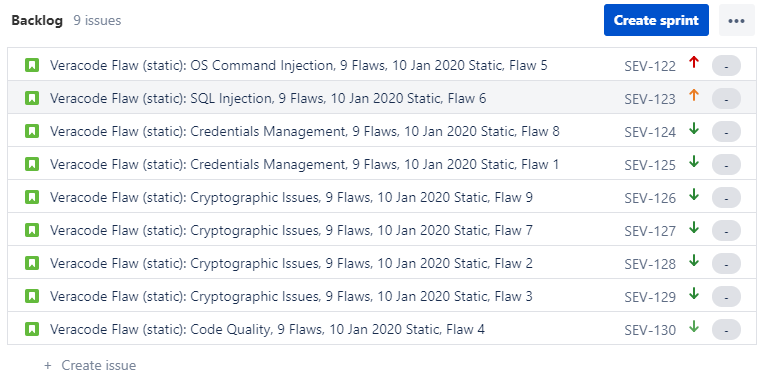
In this example, the Triage Flaws page in the Veracode Platform lists nine flaws with different severities: Very High (Critical), High, Medium, and Low.
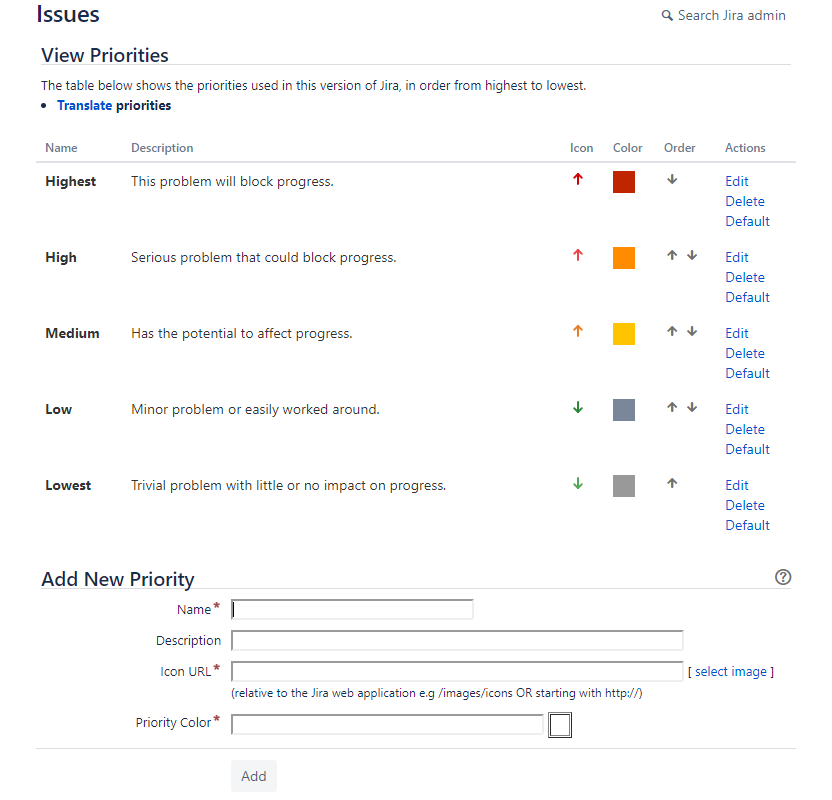
In Jira Cloud, the View Priorities page lists the five default priorities, in order, with default names.
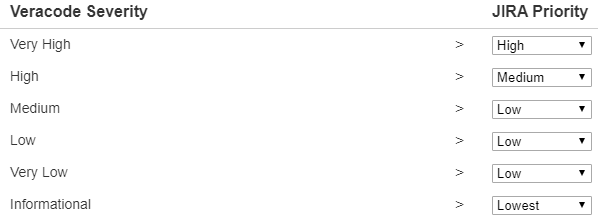
In Jira Cloud, the Veracode Integration Severity Mappings page shows these mappings:
- The Very High (Critical) severity is mapped to the High priority, instead of the default Highest priority.
- The High severity is mapped to the Medium priority, instead of the default High priority.
- The Medium and Very Low severities are mapped to the Low priority, instead of the default Medium and Lowest priorities.
- The Low severity is mapped to the default Low priority.
- The Informational severity is mapped to the Lowest priority.
After you import the flaws from the Veracode Platform to Jira Cloud as issues, the issues show these assigned priorities:
- The Very High (Critical) severity flaw has a High priority.
- The High severity flaw has a Medium priority.
- All Medium severity flaws have a Low priority.
- The Informational severity flaw has a Lowest priority.
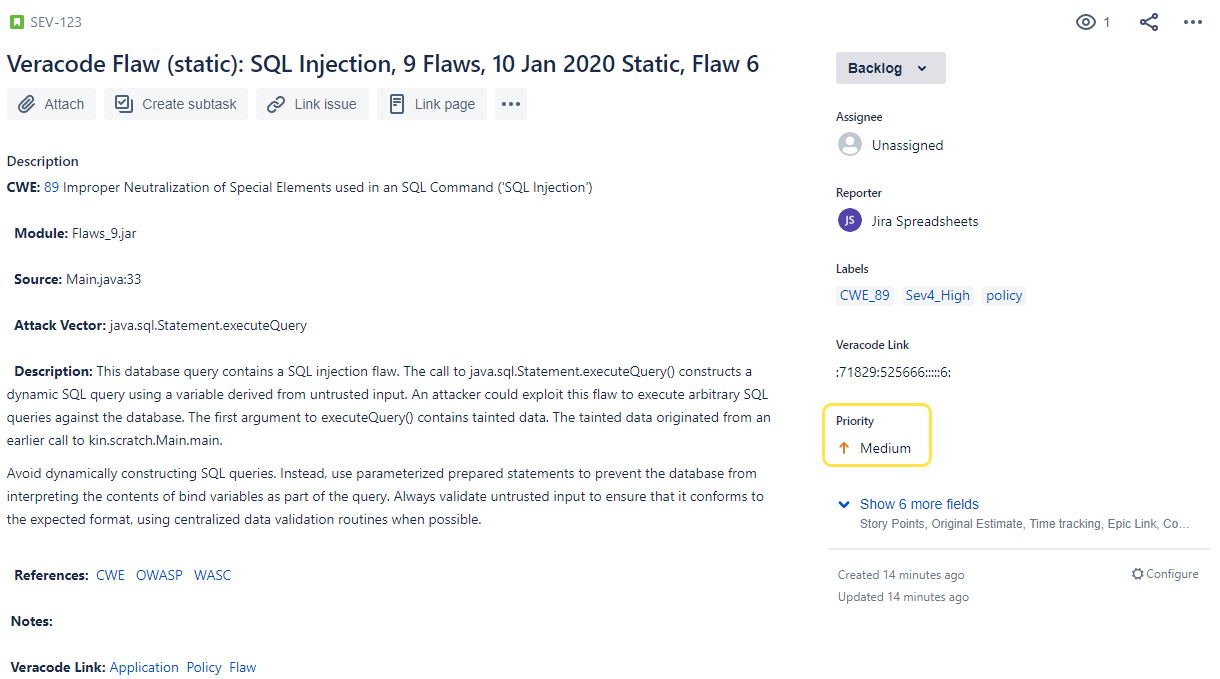
Clicking an issue ID link in Jira Cloud opens the Details view showing the priority value. In this example, issue SEV-123 for flaw ID 6, which has a High severity in the Veracode Platform, has a Medium priority in Jira Cloud.
Clear the integration cache
You can clear the cache for the Veracode Integration for Jira Cloud when attempting to troubleshoot various issues. If you clear the cache during an import, the import stops. To restart the import, you can start it manually or wait for the next automatic import.
Occasionally, bugs may cause the Veracode Integration for Jira Cloud to enter an unstable state. Clearing the cache provides a partial fresh start and enables the integration to re-gather information that can avoid the originating bug or temporarily prevent a return to the unstable state.
To complete this task:
- On the Veracode Integration page in Jira, go to the Troubleshooting section.
- Select Clear Cache to start again.
After clearing the cache, the next selective or one-time import might take longer to complete as Jira has to download all new detailed reports.
Import findings
The Veracode Integration for Jira Cloud enables you to do one-time imports, selective imports, and automated imports of security findings from Veracode scans.
The Veracode Integration for Jira Cloud automatically sets the Priority field of an imported flaw if that field is available and has default values. The integration uses this formula to set the priority based on the severity of the flaw in the Veracode scan Results:
- If Severity = 5, the bug priority is set to Highest
- If Severity = 4, the bug priority is set to High
- If Severity = 3, the bug priority is set to Medium
- If Severity <= 2, the bug priority is set to Lowest
After importing findings, you can see them in Jira Cloud, assigned to the user.
The title and description of all imported sandbox findings are prefixed with the word Sandbox to differentiate them from regular policy scan findings.
When the integration creates a Jira issue for each finding, it also adds a comment to the finding in the Veracode Platform.
To keep the status of imported findings in your ticketing system in sync with the status of the actual findings in the Veracode Platform, you must routinely run the integration.
Import findings on a schedule
Schedule automated imports of findings.
The integration imports findings in order of severity, with higher severity taking precedence, then in order of creation date, with earlier findings taking precedence.
To complete this task:
- Go to Jira settings > Apps > Veracode Integration > Import Automation.
- Select the Automate Flaw Import checkbox.
- Select an import frequency: Hourly, Daily, or Weekly.
- If you selected Daily, select a time. If you selected Weekly, select a day and time.
- In the Import Limit field, enter the maximum number of flaws you want to import at one time for any application. If you do not provide an import limit, the integration imports all flaws found in Veracode scans.
- If you want to override the general import limit for a particular application, select the Override by Application checkbox and select the Veracode custom field that determines the import limit for the application. If the Veracode custom field configuration is invalid, the integration ignores the override and applies the general import limit.
- Select Save.
Import findings one time
Perform one-time imports of findings.
The integration imports findings in order of severity, with higher severity taking precedence, then in order of creation date, with earlier findings taking precedence.
To complete this task:
- Go to Jira settings > Apps > Veracode Integration > One Time Import.
- In the Import Limit field, enter the maximum number of findings you want to import for any application. If you do not provide an import limit, the integration imports all findings found in Veracode scans.
- If you want to override the general import limit for a particular application, select the Override by Application checkbox and select the Veracode custom field that determines the import limit for the application. If the Veracode custom field configuration is invalid, the integration ignores the override and applies the general import limit.
- Select Import to JIRA.
Import specific findings
Select specific findings to import.
To complete this task:
- Go to Jira settings > Apps > Veracode Integration > Selective Import.
- In the Import Limit field, enter the maximum number of findings you want to import for any individual application.
- If you want to override the general import limit for a particular application, select the Override by Application checkbox and select the custom field that determines the import limit for the application. If the Veracode custom field configuration is invalid, the integration ignores the override and applies the general import limit.
- Select the findings you want to import.
- Select Import to JIRA.
Monitor and troubleshoot imports
Review information about imports when monitoring imports and troubleshooting errors. Information about the last four imports is available.
To complete this task:
-
In Jira Cloud, select Administration > Manage apps > Troubleshooting.
-
Ensure the Log diagnostics information on import checkbox is selected. If this option is cleared, the page only shows information for previous imports, but not the latest imports.
-
Review the following information about the imports:
- Import Type: One-Time Import, Selective Import, or Import Automation.
- Started: date and time when the import started.
- Status: current status of the import:
- IN PROGRESS: the integration is importing findings.
- PENDING: for Selective Import, the findings you can import are listed on the Selective Import page, but the integration has not yet imported them. When the import is complete, the status changes to COMPLETED.
- CACHE CLEARED: indicates that you selected Clear Cache during a status of IN PROGRESS or PENDING. This button stops any running import process. To restart the import, you can start it manually or wait for the next automatic import.
- COMPLETED: the import has completed. Check the Remarks column for any errors, which appear in red text.
- FAILED: the import has failed due to one or more issues. See the Remarks column for errors, which appear in red text.
- Completed: date and time when the import completed.
- Remarks: results of the import, including the phases of the import process and any errors, which are highlighted red.
-
Optionally, to update the page with the latest information about the imports, select Refresh.
-
If you notice error messages in the Remarks column, you can select Clear Cache to attempt to troubleshoot the issue. If you continue to see errors, contact Veracode Technical Support.
Uninstall the Jira Cloud integration
To complete this task:
- Sign in to your Jira Cloud instance as an admin.
- Go to Jira Software > Jira settings > Apps > Manage Apps.
- Filter the list by User-installed, search for Veracode Integration for JIRA.
- Expand the section.
- Select Uninstall.
- When prompted, select Uninstall App. The Veracode Integration for Jira Cloud is removed from the list of Jira Apps.