Static for Visual Studio 2019 and 2022
Veracode Static for Visual Studio 2019 and 2022 is being retired and reaches end of life on December 31, 2026.
To continue scanning code in your IDE, migrate to Veracode Scan for Visual Studio, which supports:
- Static Application Security Testing (SAST)
- Software Composition Analysis (SCA)
- Veracode Fix
This extension only supports Static Analysis scans. To run Static Analysis scans and use Veracode Fix to apply suggested code patches to flaws, we recommend you use Veracode Scan for Visual Studio.
Veracode Static for Visual Studio is an extension for Microsoft Visual Studio 2019 and 2022. You use the extension to assist with compiling your applications and uploading them to Veracode for Static Analysis.
The extension enables you to identify and work with security findings in your application, go to the line of code that contains findings, view datapath information, and get remediation guidance from within the IDE.
Supported versions
Veracode has tested the following versions, but the integration might work with other versions.
Visual Studio 2022 and 2019
Supported languages and frameworks
Veracode has tested the following versions, but the integration might work with other versions.
Visual Studio 2022:
- .NET Core 2.1–2.2, 3.0–3.1
- .NET 5.x, 6.x (partial), 7.x
- .NET Framework 4.6.2 or later
Visual Studio 2019:
- .NET Core 2.1–2.2, 3.0–3.1, .NET 5.x
- .NET Framework 4.0 or later
For more details, see the packaging requirements.
Install the Visual Studio extension
You can install Veracode Static for Visual Studio for use with Visual Studio 2019 or 2022. There are separate extensions for each IDE.
You can install the extension from the Visual Studio Marketplace.
Before you begin:
Before you begin, you must have:
-
Installed a supported version of Visual Studio and ensured your code meets the packaging requirements.
-
Stored your API credentials in an API credentials file or in environment variables.
-
Ensured you have one of these account types:
- A user account with the following roles:
- Creator or Security Lead role to create builds of your applications with the necessary Veracode settings
- Submitter role to upload scans to Veracode
- Sandbox User role to create sandboxes to use with the extension
- Reviewer role to check scan completion, propose mitigations, and import results to Visual Studio
- Mitigation Approver role to approve mitigations
- An API user account with the following API roles:
- Upload and Scan API to create application profiles, create sandboxes, and upload and scan applications
- Upload API - Submit only to submit scans
- Mitigation API to mitigate flaws found in applications
- Results API to download, import, and view Veracode results
- A user account with the following roles:
-
Ensured that all required Veracode IP addresses for the Veracode APIs and integrations are on the allowlist for your organization. The extension uses these addresses to authenticate with Veracode. To update your allowlist, you might need to contact your IT team.
-
If you use a proxy to access Veracode, ensure you have configured a proxy in your IDE. You cannot configure a proxy in the Veracode extension. For more information, see the Microsoft documentation.
-
If you have Veracode Static for Visual Studio 2017-2019 version 4.3 or earlier installed, you must uninstall it or update it to version 4.3 before installing this extension. You can run versions 4.3 and later alongside this extension in the same IDE.
To complete this task:
Download and install the extension from the Visual Studio Marketplace:
Run a scan and view results
Run Scan
If this is your first scan for an application using this extension, see the One-Time Setup section to ensure your scan is properly built and packaged for uploading to Veracode.
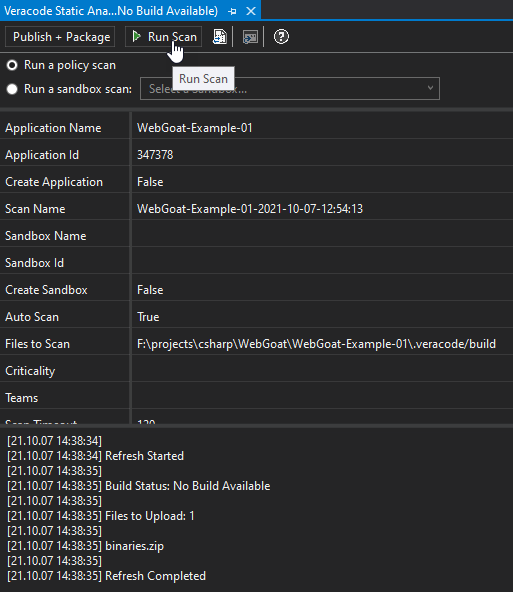
The Run Scan button is disabled if a scan is in a failed state. You must resolve the failed scan to re-enable this button.
To start a scan, select Run Scan.
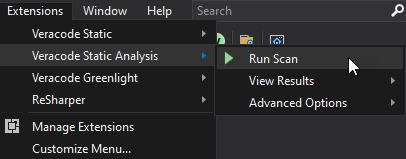
After selecting Run Scan, the application builds the solution with Veracode settings, packages the application, such as zipping the binaries and JavaScript, and begins the scan. The message panel displays the progress:
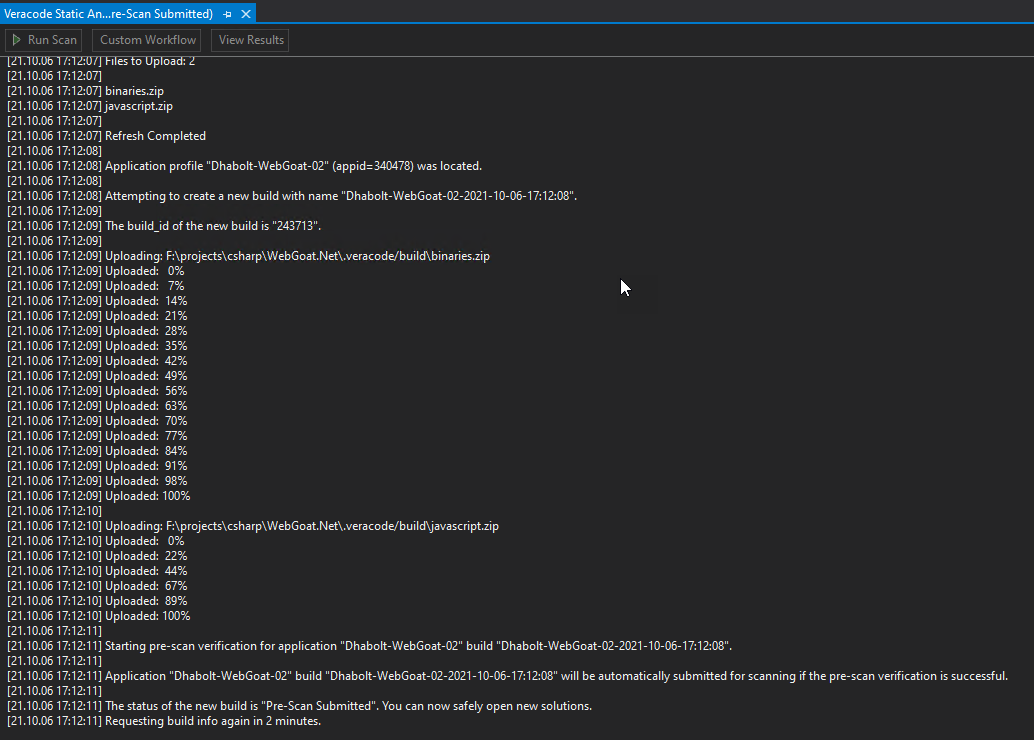
The messaging panel indicates when it is safe to open new solutions and work on other applications. When the scan completes, the Summary Report displays in the message panel to let you know the results of the scan. In this case, there are multiple findings in both the binaries and the JavaScript.
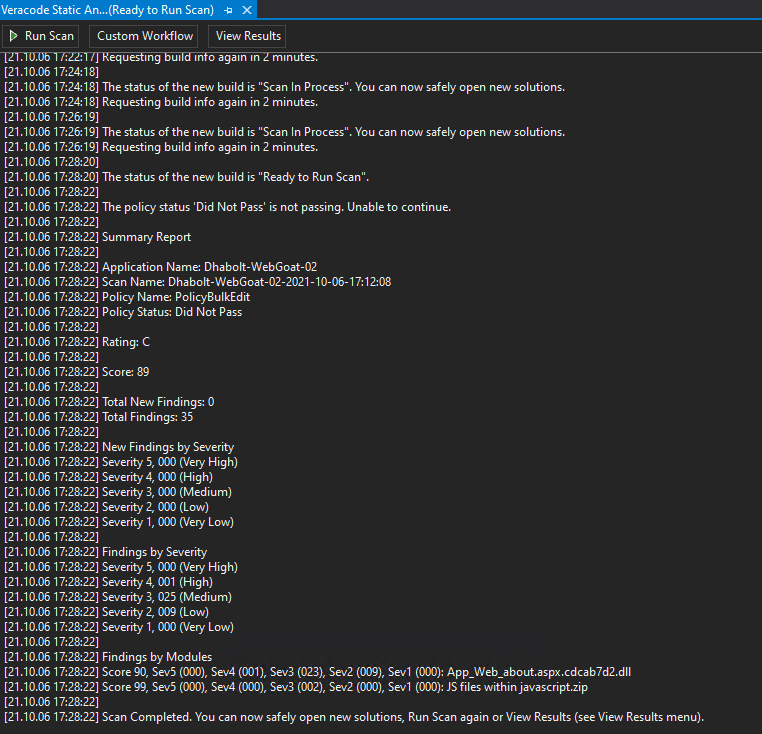
You can now select View Results to view full details on the findings.

View results
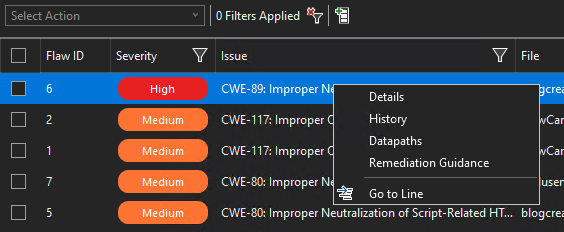
The View Results grid opens with details about the findings.

Right-click on any finding in the grid and select from these options:
- Details
- History
- Datapaths
- Remediation Guidance
- Go to Line to go directly to the line of code containing the finding. You can also double-click the grid row to go directly to the source code.
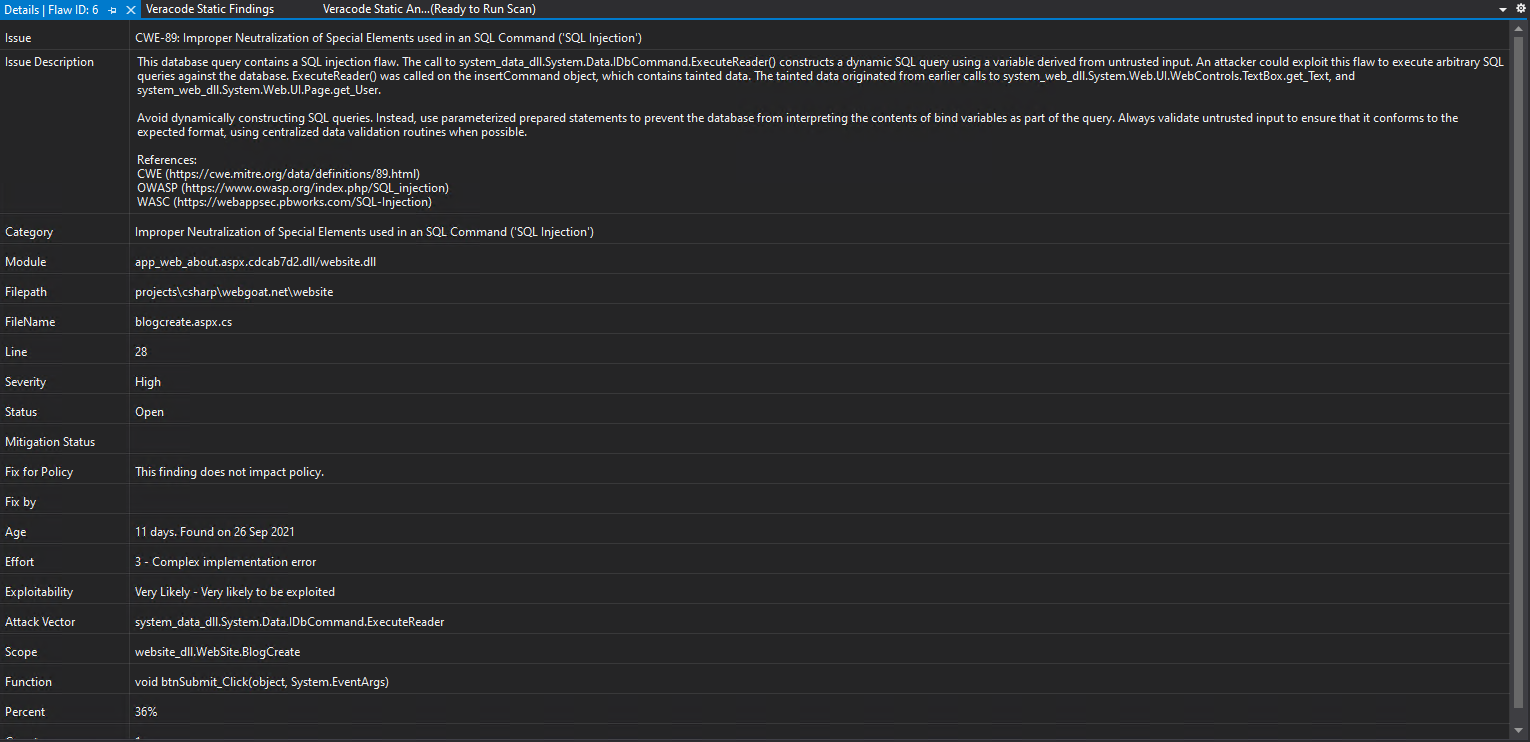
Details
The details window shows all details for the findings. Some of these details show in the grid, by default, and the details window enables you to see all details, including the Issue Description, which gives specific guidance about the finding.
History
The History window shows the history of any actions that have been applied to a finding, such as any mitigations, or as below, comments applied to a finding.

Datapaths
The Datapaths window shows the flow of the finding through the code. In this example, there can be a number of different entry points a finding can take through the code.

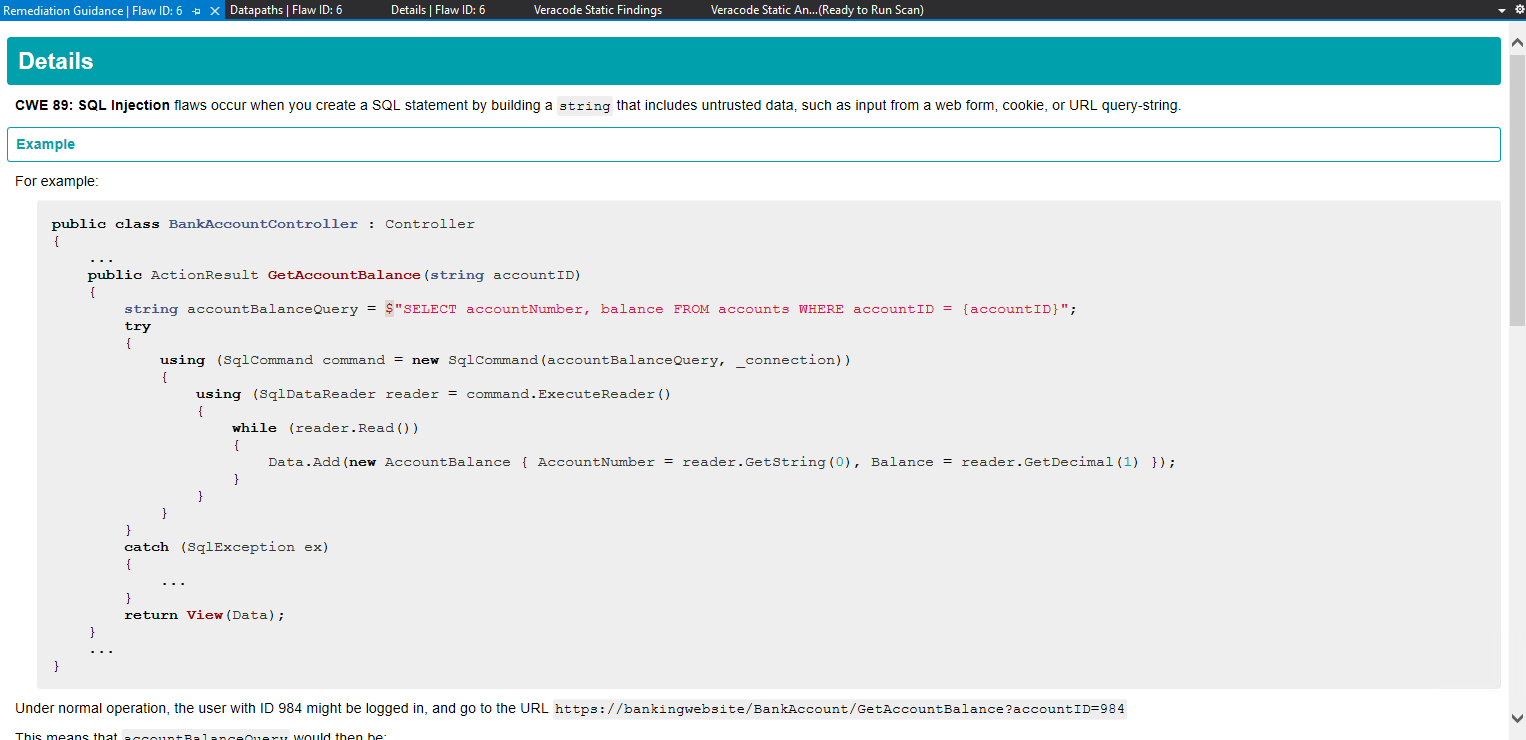
Remediation guidance
The Remediation Guidance window shows detailed information about a finding and examples of how it might be fixed. There are also links to other common websites with additional information on the finding, such as OWASP, WASC, and cwe.mitre.org.
Go to line
You can go directly to the finding in your source code by either selecting Go to Line, or by double-clicking the grid row corresponding to the finding in your source code.

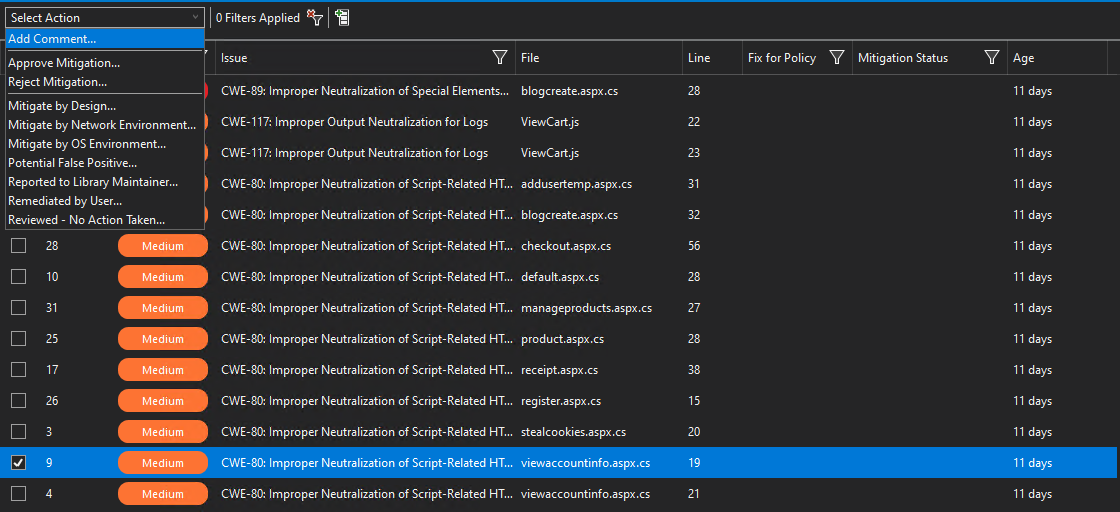
Actions
Actions allow you to apply a number of different options for each row you select in the grid. In the example below, only one row is selected, but you can select multiple rows to which to apply the action. The actions include adding comments to the findings, adding mitigation requests, such as Mitigate by Design, Mitigate by Network Environment, etc., and with the correct account permissions, the ability to approve or reject mitigations.
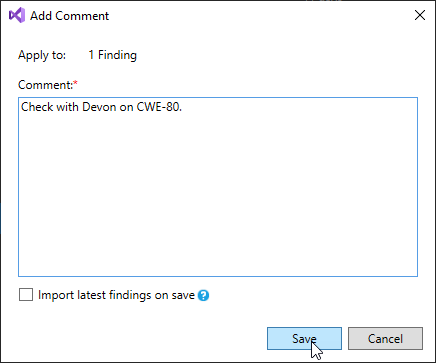
Below is an example of adding a comment to a single finding using the selected row as shown in the example above.
Windows menu
Select Extensions > Veracode Static Analysis > View Results > Windows. You can open a window for each of these menu items: View Results, Finding History, Finding Details, Finding Datapaths, and Remediation Guidance.
These windows are populated with data you viewed during the current Visual Studio session. If you exit and restart Visual Studio, you clear the data from all windows. If you have not viewed data in a window during the current session, the window is empty.
Import scan results
You can import scan results, in XML format, from the Veracode Platform to Visual Studio to review the results from within the IDE. You can also download results with the Results XML API.
Before you begin:
Ensure you have downloaded the Detailed Veracode Report.
To complete this task:
- In Visual Studio, select Extensions > Veracode Static Analysis > View Results > Import Existing XML Results.
- In the Import Existing XML Results window, which defaults to your
Downloadsdirectory, navigate to the location of the Detailed Veracode Report. - Select the XML files for the scan results to import and select Open. The imported scan results open in the View Results window.
One-time setup
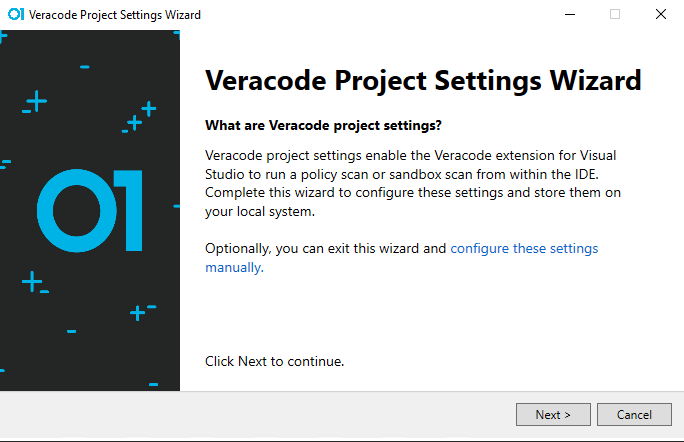
If this is your first scan with the new Veracode Static for Visual Studio extension, you might need to make small modifications to the Veracode.Package.build packaging file and the veracode-build-microsoft.json build settings file. When you run your first scan, a wizard opens to connect your current solution with the Veracode application name and sandbox name, if you typically scan with a sandbox.
After you finish the one-time setup, any developers that check out this solution do not have to make modifications to the build scripts. They only need to select Run Scan. If another developer checks out the solution for the first time, the wizard opens. The developer can select a default sandbox, but they cannot change the Veracode application name, which someone else set up previously. Run Scan proceeds to build with Veracode settings, package the artifacts, as indicated in the one time modifications to the build scripts, use the specified sandbox or policy, and complete the scan.
Before you begin:
Ensure you have stored your API credentials in an API credentials file on Windows.
The .veracode directory in your solution folder is intended to be added to your .gitignore file to prevent from checking it in to source control.
Use the custom workflow
In the extension menu, select Advanced Options > Custom Workflow.

Next, select Build + Package to see what you are uploading to the Veracode Platform if you do not make many changes.

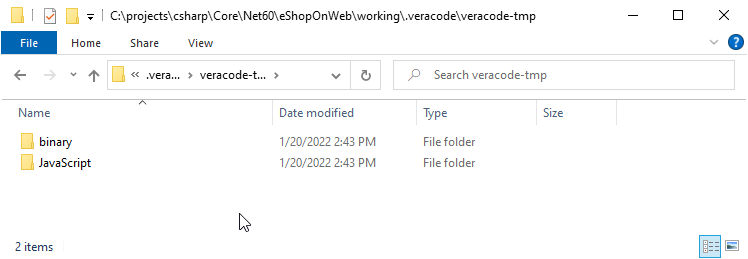
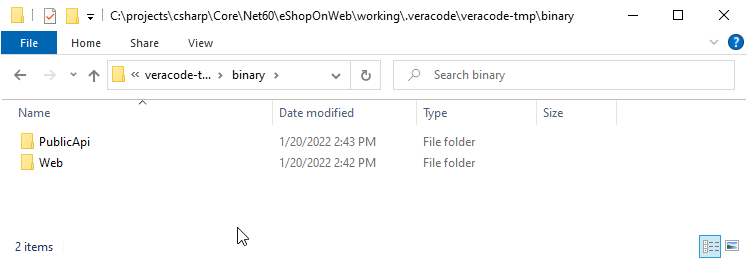
After Build + Package completes, open the temporary Veracode build output folder, which defaults to {SolutionDirectory}/.veracode/veracode-tmp/binary.

You can see a number of class library folders (e.g. ApplicationCore – almost always duplicated), a general docker-compose folder (again, with duplicate artifacts), and test class library folders, which you do not want to upload to Veracode. After analyzing the directories, it was decided that only PublicApi and Web were required. While BlazorAdmin is also a website, this is a monolithic application and BlazorAdmin is also contained in the main Web directory. This application is the Microsoft .NET Core reference application, eShopOnWeb.
We're going to be removing the following directories before uploading to Veracode:
ApplicationCore: already inWebBlazorAdmin: already inWebBlazorShared: already inWebdocker-compose: redundantFunctionalTests: test libraryInfrastructure: already inWebIntegrationTests: test libraryUnitTests: test library
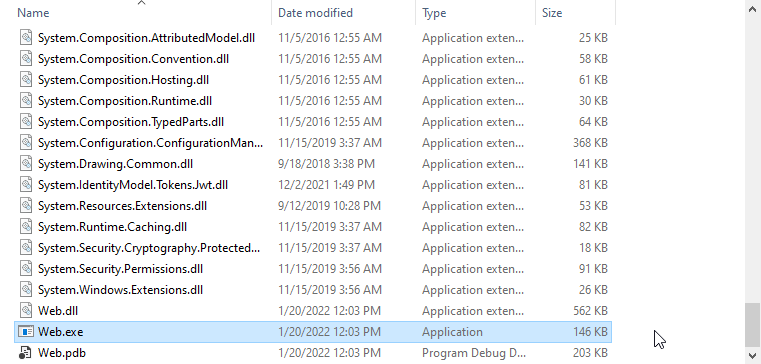
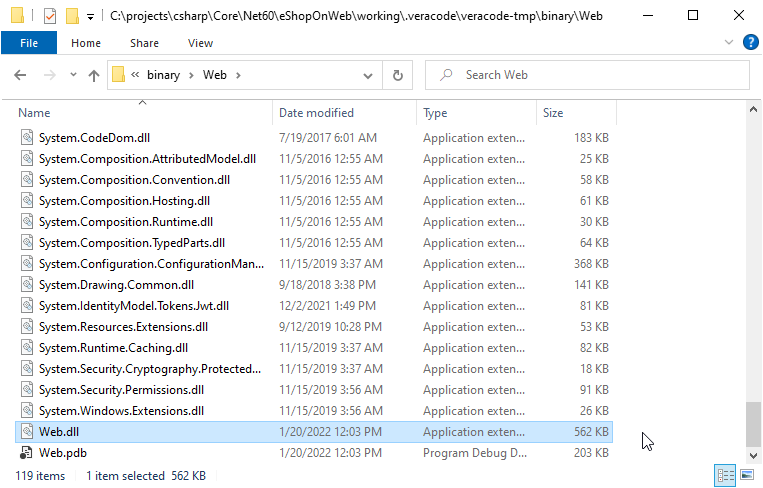
Next, if you open the Web folder and scroll to the very bottom, you see that in addition to the Web.dll and Web.pdb files, a Web.exe file is also generated. The Web.exe is a “self-contained executable” created during the .NET Core compilation process and should be removed before uploading to Veracode.
Go back to Visual Studio and open the veracode-build-microsoft.json file. Find the canRemoveExecutables property and set it to true. Default is false. This removes the Web.exe file from the files to be uploaded.
![]()
Open the Veracode.Package.build file and find the VeracodeCleanBinaries target.

This includes a placeholder example that we're going to uncomment and copy/paste for each directory you want to remove.
<RemoveDir Directories="$(VeracodeTemporaryBuildPath)ApplicationCore" />
<RemoveDir Directories="$(VeracodeTemporaryBuildPath)OrchardCore.Benchmarks" />
<RemoveDir Directories="$(VeracodeTemporaryBuildPath)OrchardCore.Benchmarks" />
The final VeracodeCleanBinaries target looks like this:

Next, if you have JavaScript to include in the artifacts you want to upload to Veracode, look for the VeracodePackageJavaScript target.

Uncomment the code and replace the WebSite/Scripts directory with the name of your parent directory that contains the JavaScript and any child directories with JavaScript. There is one line to include the JavaScript and one line to exclude unnecessary JavaScript (e.g. min.js). This is an example for eShopOnWeb:

This is an example from another application (WebGoat.Net) that includes two parent directories (repeat the pattern for as many parent directories you need to include).

After updating the Veracode.Package.build script, you can run Build + Package again and sanity check your output. You see the following in the root directory of the artifacts you want to upload:
You now see that in addition to the original binary directory, there is a JavaScript directory. In the binary directory, only two directories are included in the upload to Veracode.
Now open the Web directory to confirm the Web.exe file has been removed, as shown in this example.
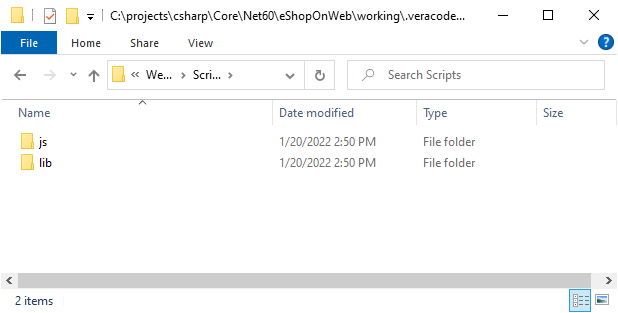
In the JavaScript directory, you see two directories containing JavaScript. One includes what appears to be third party JavaScript libraries (the lib directory) and you might decide to remove those. You can ignore these directories.
After completing the one-time setup, 99% of the time you can select Run Scan and all build/packaging changes take effect for anyone that checks out this solution from source control.
Configure project settings
The wizard
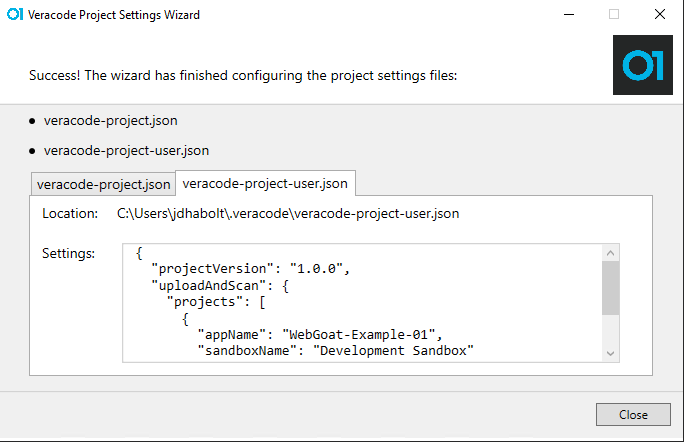
You use the Veracode Project Settings Wizard to connect the Veracode application with the currently open solution and to configure these required files:
-
veracode-project.json, which is in the root of the solution directory and checked into source -
veracode-project-user.json, which is in the same directory as the API credentials file:C:\Users\{UserName}\.veracode\veracode-project-user.json
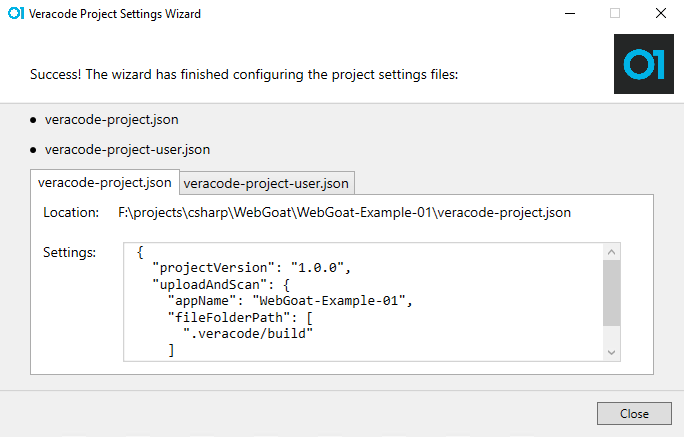
If the veracode-project.json file does not exist when you start a scan, the wizard below opens to automatically create the project settings files for you.
Application selection
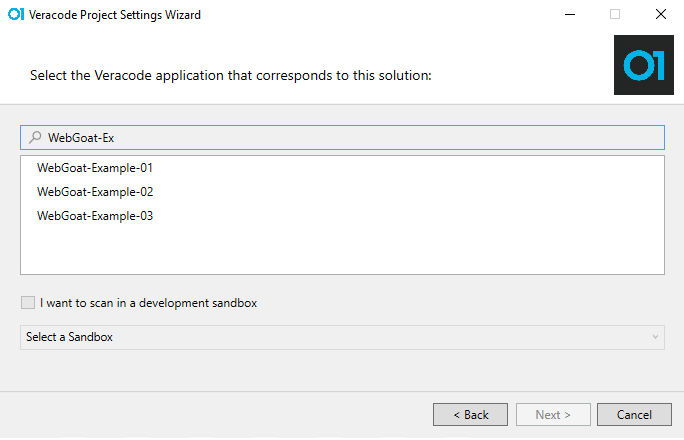
The first step in the wizard is to select the Veracode application to connect to this solution. Type any part of the Veracode application name into the entry field and select the name of the application.
Sandbox selection
If you intend to run most of your scans in a sandbox, you can select the I want to scan in a development sandbox option, and then select the sandbox for your default scan. You can select a different sandbox or a policy scan at any time through the Custom Workflow window, so you are not locked into any scan type with your choice here.

veracode-project.json
After you select your Veracode application and optional sandbox, you see an example of the veracode-project.json file you are about to create. By default, all build output is stored in a .veracode/build directory in the solution directory.
The .veracode directory in your solution folder is intended to be added to your .gitignore file, so that you do not check it in to source control.
veracode-project-user.json
As mentioned elsewhere, the veracode-project-user.json file is created in the same directory as the API credentials:
C:\Users\{UserName}\.veracode\veracode-project-user.json
For full control of these settings, if they are only relevant to your scans, you can make additional entries in this file. These entries override the settings in the veracode-project.json file.
Wizard completion
Depending on your selection, after the wizard closes, either the scan starts or the Custom Workflow tool window opens.
Create an application or a sandbox
See Add a new application and sandbox from the extension.
Custom Workflow window
The Custom Workflow window helps you with the one-time setup or to do a one-time switch of the scan type you want to run. For example, switching from your default sandbox to a policy scan.
When the Custom Workflow window opens, it shows the current project settings. In this example, a sandbox scan with the name Development Sandbox is the default selection chosen through the wizard.
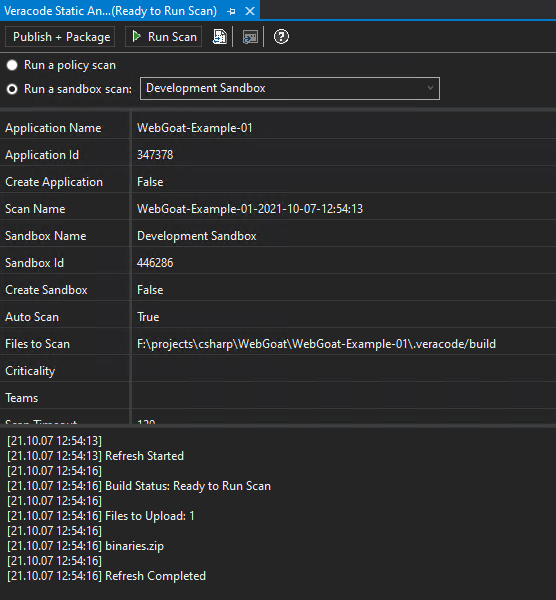
After making your one-time changes through the Custom Workflow, you can do most of your scans by selecting Run Scan from the menu.
Build, publish, and package
The Publish + Package option in the image below changes depending on the Visual Studio project types you have open. If you have any ASP.NET Framework applications in your solution, you see Publish + Package. All others show Build + Package.
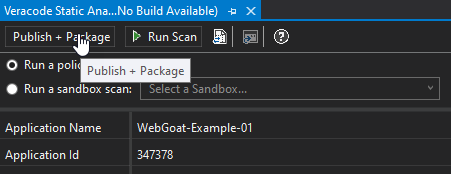
The intent of this button in Custom Workflow is to customize what you need to upload to Veracode (through modifying the build scripts), and testing those changes using Build/Package until you have the right artifacts selected based on your application.
Run scan
Select Run Scan to begin a scan with the current Policy/Sandbox changes.
For example, if you want to run an occasional policy scan, but your default is for a sandbox scan, you can select Run a policy scan.
Sync
When a new Visual Studio solution is opened, you do not want the extension to make any assumptions about whether the developer wants to scan using Veracode during that session. However, if either the Happy Path or Custom Workflow tool window are already opened, you see Sync in the area where the message panel normally displays messages.
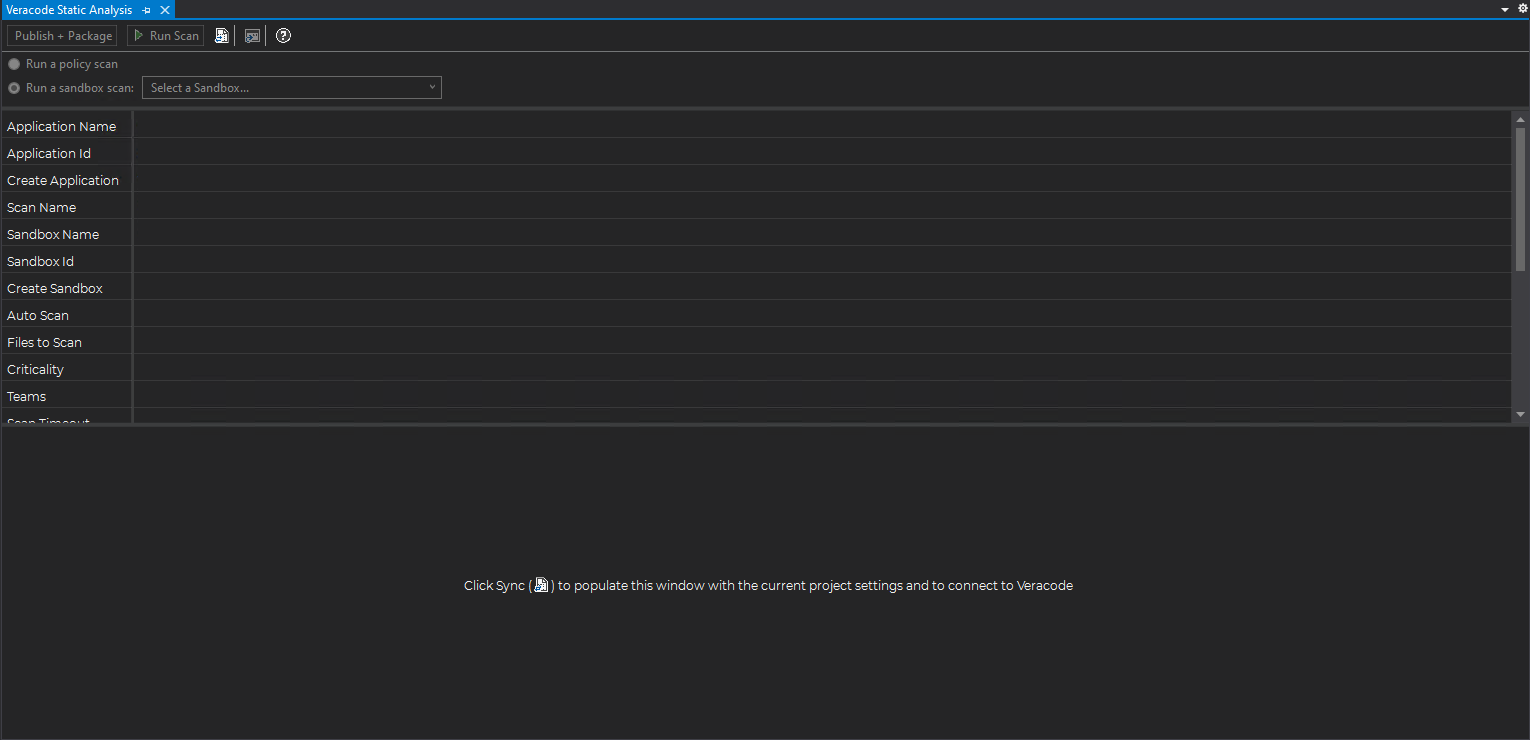
If you select Sync, it loads the settings from the project system, communicates with Veracode, and prepares the tool window for running a scan.
The Sync button is also displayed on the Custom Workflow tool window, just after the Run Scan button as shown below. This has identical functionality to the button displayed above, but is typically used if changes are made to the project system behind-the-scenes, to sync the new changes to the project system.

Change the scan name
You can rename a scan from the name Veracode assigned to it during scanning. For example, you might need to add a unique identifier to each scan name for tracking purposes.
You perform this task in the Custom Workflow window.
After renaming a scan, you must start the scan from the Custom Workflow window to retain the custom name. If you start a scan outside the Custom Workflow window, such as from the top-level menu, or close the window, the scan name reverts to the dynamically-generated name that Veracode assigned to it. To revert to the previous scan name without exiting the Custom Workflow window, select Sync.
To complete this task:
-
In Visual Studio, select Veracode Static Analysis > Advanced Options > Custom Workflow.
-
In the Scan Name field, edit the scan name value. For example:
ID-4214-MyAppIn the Custom Workflow window, you can now run Build + Package or switch between sandboxes or the policy scan while retaining the custom name.
-
If you want to run a scan, select Run Scan in the Custom Workflow window to retain the custom name.
Settings and scripts for building and packaging
The build/packaging steps can be refined and customized through a number of files outlined here. The files are listed in rough order of importance. It is worth noting that all six files discussed below are automatically created after the first Veracode build.
The files are veracode-build-microsoft.json (a settings file), veracode-build-microsoft-user.json (a corresponding user version of the microsoft build file), and four MSBuild files: Veracode.Package.build, Directory.Build.targets, Veracode.props, and VeracodePublishProfile.pubxml. The MSBuild files are build templates. If these files do not exist, the extension copies them to each application. They are intended to be checked into source control so that any developer that checks out the solution already has the files in place to successfully build and package the solution with any custom settings already applied.
veracode-build-microsoft.json
This file is the orchestrator of the build system. It controls the build engine for each application (msbuild or dotnet), the parameters to pass to the build system for each of the build actions, and more. There is a corresponding user file discussed further below and is primarily used to change the location of your MSBuild or .NET CLI locations.
This file is created in the root directory of the solution folder and is intended to be checked into source control.
Some of the most important settings are discussed below.
buildEngine
By default, this is set to msbuild to use the MSBuild executable for all building and packaging. This can also be set to dotnet to use the dotnet CLI for all building and packaging.
"buildEngine": "msbuild",
Setting the dotnet CLI as the default:
"buildEngine": "dotnet",
canRemoveExecutables
Because all modern versions of .NET Core, .NET 5, and .NET 6 create a fully self-contained executable, set this to true during your initial setup. This file can cause module selection issues on the Veracode Platform.
By default, this is false.
buildArguments
All of the build/rebuild/publish/package arguments are being grouped together here for discussion purposes since they're all closely related and basically work the same.
These are all arrays of MSBuild (buildArguments) or dotnet CLI commands (dotnetBuildArguments) that are executed based on the buildEngine option you have chosen. Each line in the array is executed separately. Typically, you do not need to modify any of the default settings. However, since these are MSBuild or dotnet CLI statements, you can modify them for specialized use if you are familiar enough with MSBuild or the dotnet CLI.
veracode-build-microsoft-user.json
This file is created in the same directory as the API credentials:
C:\Users\{UserName}\.veracode\veracode-build-microsoft-user.json
Below are some of the most important settings.
msBuildPath
When the veracode-build-microsoft-user.json is initially created during the build, the application vswhere.exe executes to find the default location of MSBuild.exe. You might want to change this, such as if you wanted to use a 64-bit version of MSBuild, so you can modify the location.
"msBuildPath": "F:\apps\Microsoft\VS\2019\Professional\MSBuild\Current\Bin",
dotnetPath
The default location for the dotnet CLI is in a fixed directory (for the default 64-bit version), and is set here. If for some reason your dotnet CLI is in a different location, or you want to specifically use the 32-bit version, you can change it here.
"dotnetPath": "C:\Program Files\dotnet",
solutions
The solutions array allows you to override the default settings for any specific solution. You use the name of the solution you want to override in the solutionName property, and any settings you want to override after that. A placeholder entry is automatically added to this file if it does not exist. See the last entry WebGoatCore.
The example below shows how you can change the logging verbosity level for the WebGoat.Net solution from its default m , for minimal logging level, to d, for detailed logging. You can copy and paste the buildArguments from the primary veracode-build-microsoft.json file and change verbosity:m to verbosity:d.
  "solutions": [
    {
      "solutionName": "WebGoat.Net",
        "buildArguments": [
          "Veracode.Package.build /t:VeracodeClean /p:VeracodeBuild=true",
          "'{SolutionName}.sln' /p:VeracodeBuild=true /p:VeracodeSolutionName='{SolutionName}' /p:VeracodeBuildOutputPath='{BuildOutputPath}' /p:VeracodeRemoveExecutables={RemoveExecutables} /verbosity:d"
        ]
    },
    {
      "solutionName": "WebGoatCore"
    }
  ]
Directory.Build.targets
This is a special Microsoft MSBuild file that, if included in your solution directory or any parent directory, with this name, executes the included MSBuild commands, once for each project in your solution. The Veracode extension only runs these commands when a special VeracodeBuild flag is passed, otherwise it ignores this file.
By default, the file includes the DLL, EXE, and PDB output to upload to Veracode. The line that controls this is:
<BinFiles Include="$(OutputPath)/**/*.dll;$(OutputPath)/**/*.exe;$(OutputPath)/**/*.pdb" />
Two examples are commented out that show how you can remove all Microsoft.* files or System.* files if this is recommended by your Veracode solution architect.
<!-- <BinFiles Remove="$(OutputPath)/**/Microsoft.*" /> -->
<!-- <BinFiles Remove="$(OutputPath)/**/System.*" /> -->
While rare, if you are already using a Directory.Build.targets file in your solution directory, you can add the Veracode-specific parts to your file by copying everything within the Project node to your file.
Veracode.Package.build
This file packages the output, including zipping the files, for uploading to Veracode. The typical customizations that might be made to this file is the removal of test class libraries from the final output, or any other directories or files that might be inappropriate to upload to Veracode.
Several examples are included and commented out to give ideas of how directories or files can be removed as shown below:
<!-- <RemoveDir Directories="$(VeracodeTemporaryBuildPath)OrchardCore.Benchmarks" /> -->
<!-- <Delete Files="$(VeracodeTemporaryBuildPath)OrchardCore.Mvc.Web/OrchardCore.Mvc.Web.exe" /> -->
There is also a section commented out that you can use as an example to upload JavaScript files if this were a web application.
Veracode.props
This file should never need to be modified, and simply sets property names used by the reset of the MSBuild files.
VeracodePublishProfile.pubxml
For older ASP.NET web applications, this file is added to the Properties/PublishProfiles directory of each ASP.NET web application included in the solution. There is usually no reason to customize the file further.
veracode-project.json properties
See uploadandscan.do for additional details on the parameters. References to the CLI below, are the parameters passed to the API wrapper CLI. Veracode Static for Visual Studio uses the UploadAndScan composite action.
scanName
This is version in the CLI. If you do not specify a scanName, the default is "scanName": "{appName}-{timestamp}".
The scanName property can use the two placeholders shown below, or any string constant as shown in the second example.
"scanName": "{appName}-{timestamp}"
"scanName": "DivisionA-{appName}-{timestamp}"
scanTimestampFormat
There is no equivalent in the CLI. If you do not specify a scanTimestampFormat, it defaults to "scanTimestampFormat": "yyyy-MM-dd-HH:mm:ss".
You can customize the output of the timestamp placeholder by using this property. The format follows the standard Microsoft custom date and time format strings.
"scanTimestampFormat": "yyyy-MM-dd-HH:mm:ss"
autoScan
This is autoscan in the CLI. By default, this is set to true. Do not set it to false unless you understand the ramifications.
appName
This is appname in the CLI. This is a required field that you must either add manually or add through the wizard.
"appName": "Your Veracode Application Name"
fileFolderPath
This is filepath in the CLI. This is a required field that the wizard adds by default:
"fileFolderPath": [
  ".veracode/build"
]
Currently, even though this is a JavaScript array, the extension only expects a single entry here. The Veracode.Package.build file places all artifacts you want to upload to Veracode within this directory.
sandboxName
This is sandboxname in the CLI. This is typically added through the wizard. While it is more commonly added to the veracode-project-user.json file, for special use cases it can also be added to the veracode-project.json.
"sandboxname": "YourSandboxName"
sandboxId
This is sandboxid in the CLI. This is used for advanced use cases and is set to empty by default.
criticality
This is null, by default.
Only used for special workflows that create the appName if it does not already exist.
createApplication
This is createprofile in the CLI. Defaults to false.
Only used for special workflows that create the appName on the Veracode Platform if it does not already exist.
createSandbox
This is createsandbox in the CLI. Defaults to false.
Only used for special workflows that create the sandboxName on the Veracode Platform if it does not already exist.
scanTimeout
This is scantimeout in the CLI. Defaults to 120 minutes.
"scanTimeout": "120"
exclude
Defaults to an empty string.
include
Defaults to an empty string.
pattern
Defaults to an empty string.
replacement
Defaults to an empty string.
scanAllNonFatalTopLevelModules
This is scanallnonfataltoplevelmodules in the CLI. Defaults to false.
selected
Defaults to false.
selectedPreviously
This is selectedpreviously in the CLI. Defaults to false.
teams
Defaults to an empty string.
topLevel
This is toplevel in the CLI. Defaults to false.
Troubleshooting
Publish + Package fails on ASP.NET framework web apps
This condition can occur if you are preparing an ASP.NET Framework Web application for uploading to Veracode. The Publish + Package step can fail with the following message:
C:\projects\csharp\WebGoat\WebGoat-01\Veracode.Package.build(33,3): error MSB3941: Failed to zip directory "C:\projects\csharp\WebGoat\WebGoat-01\.veracode\veracode-tmp\binary\" because it does not exist or is inaccessible.

========== Package for Static Scanning failed ==========
This issue might be due to:
- Both Visual Studio 2019 and Visual Studio 2022 are installed on the same machine.
- The default MSBuild version is not the same version that Visual Studio uses to run Publish + Package. For example, if you run Publish + Package from Visual Studio 2022 and your version of MSBuild is set to a 2019 version.
You can change the default version in your C:\Users\{UserName}\.veracode\veracode-build-microsoft-user.json file.
{
  "projectVersion": "1.0.0",
  "msBuildPath": "C:\Program Files (x86)\Microsoft Visual Studio\2019\Professional\MSBuild\Current\Bin",
To resolve this issue, you can either change the default version of MSBuild to a 2022 version, such as:
{
  "projectVersion": "1.0.0",
  "msBuildPath": "C:\Program Files\Microsoft Visual Studio\2022\Professional\MSBuild\Current\Bin",
Or, you can change it for specific solutions, such as:
  "solutions": [
    {
      "solutionName": "WebGoat-01",
      "msBuildPath": "C:\Program Files\Microsoft Visual Studio\2022\Professional\MSBuild\Current\Bin"
    },
Publish + Package continues to fail on ASP.NET framework web apps
If the above does not resolve the issue, and you participated in the Early Access (EA) program for this extension, remove the VeracodePublishProfile.pubxml file from each ASP.NET Web project. These files are located in the Properties/PublishProfiles directory. The extension re-creates these file(s) during the next time you run Publish/Package.
Inconsistent module selection on ASP.NET 5 or greater web apps
This condition can be triggered if you have an ASP.NET Core Web application with .NET 5 or later, and are using the Microsoft.VisualStudio.Web.CodeGeneration.Design library. This library generates a dotnet-aspnet-codegenerator-design.exe file that causes the module selection issue.
To resolve this issue:
-
Ensure that the
canRemoveExecutablesproperty inveracode-build-microsoft.jsonis set totrue:"canRemoveExecutables": true -
Update the
Directory.Build.targetsfile to remove thedotnet-aspnet-codegenerator-design.exefile from the final artifacts directory by adding the second<BinFiles Remove=line as shown below.
<ItemGroup Condition=" '$(VeracodeRemoveExecutables)' == 'true'">
  <BinFiles Remove="$(OutputPath)/**/$(MSBuildProjectName).exe" />
  <BinFiles Remove="$(OutputPath)/**/dotnet-aspnet-codegenerator-design.exe" />
</ItemGroup>
After making the changes above, the packaging step should remove the offending dotnet-aspnet-codegenerator-design.exe any time you run a scan.
Open-source scripts
Veracode for Visual Studio Build Scripts is a GitHub repository for managing different build/publish/package/scan script use cases. The main branch contains the default scripts that the Veracode Static for Visual Studio 2019 and 2022 extensions create. The branches contain customizations of these files for various use cases. For example: