Scan for VS Code
Veracode Scan for VS Code is an extension for the Visual Studio Code IDE that integrates Veracode Pipeline Scan, Veracode SCA Agent-based Scan, and Veracode Fix into your Software Development Lifecycle (SDLC).
From within your IDE:
- To find and review flaws in your code, run pipeline scans.
- To remediate flaws by applying suggested fixes, use Veracode Fix.
- To propose mitigations for flaws, import flaws found by the pipeline scans.
- To find and review vulnerabilities in open-source libraries and assess license risk, run SCA agent-based scans.
- To resolve findings manually, use the provided remediation guidance.
For a complete demonstration, see the learning path.
When you scan your project, the extension automatically:
- Packages your project code into an artifact, such as ZIP or JAR.
- Uploads the artifact to Veracode for analysis.
- Downloads the results and displays them in your IDE.
Supported versions
Veracode has tested the following versions of VS Code, but the extension might work with other versions.
1.78.2 or later
Supported languages and frameworks
Veracode has tested specific versions (if listed) of the following languages and frameworks, but the extension might work with other versions.
- For Pipeline Scan, see Pipeline Scan supported languages.
- For SCA Agent-based Scan, see the supported languages.
- For Fix, see the supported languages. Fix in Veracode for VS Code does not support Go.
- For autopackaging, see supported languages.
About application packaging
Before Veracode can run pipeline scans on your project, the code must be packaged into a supported artifact, such as ZIP or JAR. When you start a scan, the extension uses an autopackager to automatically package your project. Then, the extension uploads the artifact to Veracode for scanning. This option does not apply to SCA scans.
If the autopackager is not able to package your application, or you prefer to create the artifact yourself, you can use the Veracode packaging guidance to package your application manually. The default location for manually packaged artifacts is <project root>/.verascan. At the root of your project, create the .verascan folder and add your artifact to this folder. When you start the scans, the extension first looks for an artifact in the default location. To store your artifact in a different location, where the extension looks next, configure the setting veracode-scan.SAST Features.artifactGlob.
A packaged artifact must not exceed the total file size limit of 200 MB.
Prerequisites
Before you install and use Veracode Scan for VS Code, ensure that you have:
-
A supported version of VS Code and a source project in a supported language or framework. The extension does not support monorepos.
-
Single Sign-On (SSO) enabled and configured with service provider (SP)-initiated authentication to access Veracode in your IDE using OAuth.
-
All required Veracode IP addresses on your organization's allowlist. The extension uses these addresses to authenticate with Veracode, upload code, and download scan results. You might need to contact your IT team to update the allowlist.
-
To view the prerequisites for an integrated product or feature, select an option from the following list:
- Autopackager
- Pipeline Scan
- SCA
- Fix
To use autopackaging, you must have:
- All required build tools, such as compilers and supported package managers, for the language of your project, installed on your local system.
- All required build tools must be available on the default command-line prompt, which typically uses PATH. If you open a different project that uses other tools or versions, ensure those tools are also available on the default command-line prompt before scanning.
To run pipeline scans and view flaws, you must have:
- An active Static Analysis license.
- One of the following Veracode accounts:
- A human user account with one of the following user roles: Security Lead, Creator, or Submitter.
- An API user account with the Upload and Scan API or Upload API - Submit Only API role.
- Ensured your application builds successfully. If your project files change between scans, rebuild your project and ensure it builds successfully.
- Enabled one-way communication on port 443.
To run SCA scans and view vulnerabilities, you must have:
- An active Veracode SCA license.
- To receive notifications when SCA licenses are unavailable, ensure your system has a valid SSL certificate chain and make the path to the certificate known to the installed SCA agent. If an SCA license is unavailable, the SCA agent uses the certificate to show an error message in your IDE.
- A human user account with the Security Lead, Workspace Administrator, Workspace Editor, or Submitter role. API user accounts are not supported.
- The SCA workspace My Workspace with an available project slot. The plugin can only use My Workspace.
- Added your project to a version control system, such as Git, or configured a source code management (SCM) environment variable on your operating system that defines your version control system. If you prefer to not use a version control system, but want to run SCA scans, configure the SCM variable
SRCCLR_NO_GIT=1. - Installed a supported package manager.
- If your internal repository rejects proxy traffic for open-source libraries, contact Veracode Technical Support.
To generate suggested code fixes and apply them to flaws, you must have:
- A Veracode Fix license.
- A supported code language.
- A Veracode account with the Submitter user role.
- A Git-based repository that includes your project.
Create an API credentials file
For human user accounts, we recommend using SSO configured with SP-initiated authentication instead of API credentials. With SSO, you can securely sign in to Veracode using OAuth from your IDE without needing to create or maintain an API credentials file.
Generate API credentials in the Veracode Platform and store them in a local credentials file. The extension uses these credentials to authenticate with Veracode. If you have generated an SCA agent token, you must still create an API credentials file.
Install the extension
Install the extension from the VS Code Marketplace.
You can only install the extension on one machine. If you install the extension on multiple machines, it might fail to authenticate with Veracode.
Before you begin:
- Ensure you meet the prerequisites.
- You must have an API credentials file.
To complete this task:
- In VS Code, on the Activity bar, select Extensions.
- Search for
veracode. - Select Veracode Scan for VS Code.
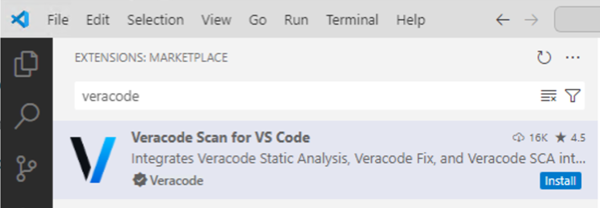
- Select Install.
- On the Activity bar, select Veracode Scan
 . The Veracode Scan sidebar opens.
Authenticate with Veracode
You can authenticate using one of the following methods:
-
OAuth: If your organization uses SSO configured with SP-initiated authentication, use OAuth to sign in with your Veracode username or email address and password.
To complete this task:
- In the Veracode Scan side bar, under AUTHENTICATION, select Authenticate. This opens the Activate your device page in your browser.
- Sign in with your Veracode username or email address and password.
-
API credentials: If your organization doesn't use SSO, use your API credentials to authenticate with Veracode. The extension automatically detects your API credentials file and attempts to authenticate with Veracode.
-
If authentication is successful, the SETUP view opens.
-
If authentication failed, the AUTHENTICATION view opens.
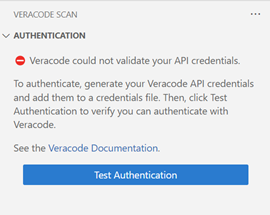
Complete one or more of the following, then select Test Authentication:
a. Ensure your API credentials file is configured correctly and the file is in the required location.
b. Ensure your API credentials are valid. If your credentials are invalid or expired, generate new credentials and replace the invalid credentials in your credentials file with your new credentials.
c. If you need to authenticate through a proxy server, add your proxy credentials.
-
Complete post-installation setup
After you authenticate with Veracode, install a local agent and, optionally, apply an SCA security policy.
To complete this task:
-
To install a local agent, under SETUP, select Install Agent. The extension requires this agent for autopackaging, communicating with Veracode, and scanning your project.

-
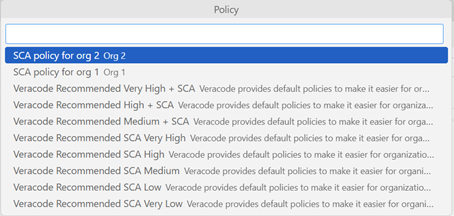
To apply an SCA security policy that filters the discovered vulnerabilities, select Settings
 . Then, select User > Extensions > Veracode Scan. This policy does not apply to flaws.
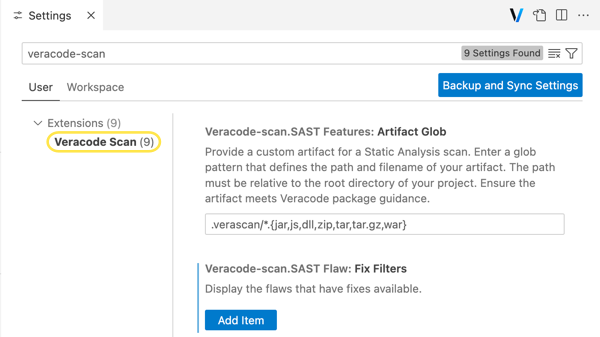
-
On the Settings tab, select the checkbox under Policy.
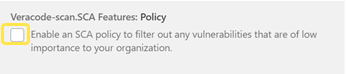
-
From Policy, select a policy to apply to your project. The menu lists only policies that contain the Findings by Severity or Vulnerability CVSS Score rule types. To change the policy in the future, use the configuration settings. The installation is complete.
Configure the extension
Optionally, configure scan settings, filter discovered findings, or add your proxy credentials to authenticate with Veracode through a proxy server.
To complete this task:
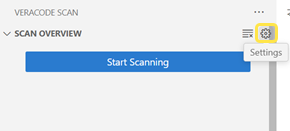
-
To open the Settings tab, in the SCAN OVERVIEW view, select Settings.
-
Configure the following options:
- SAST Flaw.Sev Filters: to hide or show flaws in the FLAWS IN MY CODE view, add or remove the related severities.
- SCA Features.Auto SCA Scan: select to automatically run an SCA scan when you open VS Code, open a new project, or when your open-source libraries change. The extension will monitor changes to certain project files, such as package manager dependency files (
package.jsonorpom.xml). - SCA Features.Policy: to filter out vulnerabilities in the VULNERABILITIES IN MY LIBRARIES view, select to enable an SCA security policy that you can assign to your project. Then, from the Policy dropdown menu, select a policy. The menu only lists policies that contain the Findings by Severity or Vulnerability CVSS Score rule types. To use this option, the Unified Policy must be activated for your account. This policy does not apply to flaws.
- SCA Features.Recursive Scan: select to run a recursive SCA scan of all folders and files in your selected project. After you select this option, you must rescan your project to update the results.
- SCA Features: Skip Vulnerable Method Analysis: select to reduce SCA scan times. SCA scans will not analyze your project for vulnerable methods. We recommend that you leave this setting turned off (the default) and resolve all vulnerable methods. To apply this setting, rescan your project.
- SCA Vulnerability.Sev Filters: to hide or show vulnerabilities in the VULNERABILITIES IN MY LIBRARIES view based on the risk level, add or remove the related severities.
- SCA Vulnerability.Usage Filters: to filter vulnerabilities in the VULNERABILITIES IN MY LIBRARIES view based on how the project uses a vulnerable library, add or remove Direct or Transitive (indirect).
- SAST Features.artifactGlob: enter a glob pattern that defines the path and filename for a packaged artifact that you created manually or placed in a custom location. The path must be relative to your project root directory.
Add proxy credentials
If your organization requires you to authenticate with Veracode through a proxy server, add your proxy credentials to the extension. Only Basic authentication is supported.
To complete this task:
-
To open the Settings tab, in the SCAN OVERVIEW view, select Settings
. -
Search for
proxy. Then, select User > Application > Proxy. -
Under Http: Proxy, enter the URL for your proxy server. If you do not know the proxy server URL, contact your IT administrator.
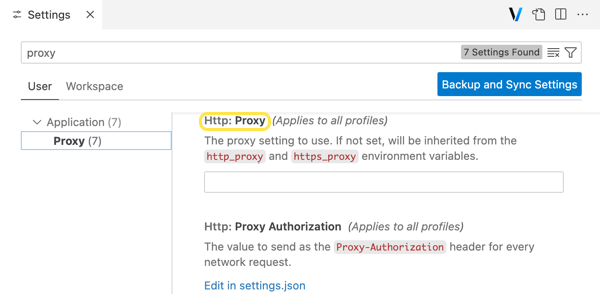
Alternatively, add the proxy server URL to an environment variable. The Http: Proxy option overrides the environment variable.
- Windows
- macOS or Linux
Create the following environment variable:
- For Variable name, enter
https_proxyorveracode_https_proxy. - For Variable value, enter the URL for your proxy server.
At a command prompt, run:
export HTTPS_PROXY=<URL of your HTTPS proxy server> -
In the Add Proxy Credentials window, enter your proxy username and password. If you do not see this window or you want to re-open it, in the Command Palette, enter
HTTP Proxy Credentials. -
Select Add Credentials. The extension authenticates with Veracode.
Scan your project
To analyze the security risk of your code and all open-source libraries and licenses, scan your project. Because each scan uses the data paths in your project files to detect flaws in lines of code, it does not scan your code as you type. To detect flaws in new or changed lines of code, you must rescan your project. To automatically run an SCA scan after you change your open-source libraries or when you open a project, turn on Auto SCA Scan.
A Veracode account is limited to six pipeline scans per 60 seconds and each scan is limited to a maximum scan time of 60 minutes. The scan results, from both Pipeline Scan and SCA, and suggested fixes, from Veracode Fix, are only available in your IDE. You cannot access the results or suggested fixes in the Veracode Platform.
Before you begin:
Ensure you meet the prerequisites.
To complete this task:
- Open a supported project.
- On the Activity bar, select Veracode Scan .
- In the SCAN OVERVIEW view, select Start Scanning. If you have already scanned this project, select Rescan
 . If you have more than one project open, you can select the project you want to scan from the Command Palette.
 - Wait for the scans to complete. When all scans are complete, the results for the selected project appear in the following views: SCAN OVERVIEW, FLAWS IN MY CODE, VULNERABILITIES IN MY LIBRARIES, and LIBRARY LICENSES.
Cancel all running scans
You can cancel all running scans at any time. It might take several minutes for all scans to stop.
To cancel all scans, in the SCAN OVERVIEW view, select Cancel Scan ![]() .
.
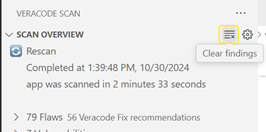
Review the scan overview
After you scan your project, in the Veracode Scan window, the SCAN OVERVIEW view provides the following information about the scans and the results:
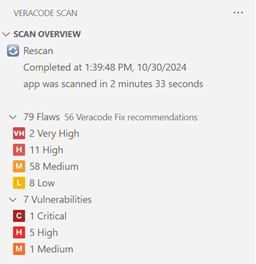
- The scan completion time stamp and the duration of the scans.
- The total number of flaws from the pipeline scans. To view the flaws categorized by severity, expand Flaws. If there are suggested fixes from Veracode Fix, you see the total number of available fixes.
- The total number of vulnerabilities from the SCA scans. To view the vulnerabilities categorized by severity, expand Vulnerabilities.
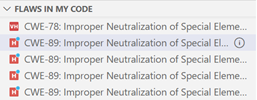
Working with flaws
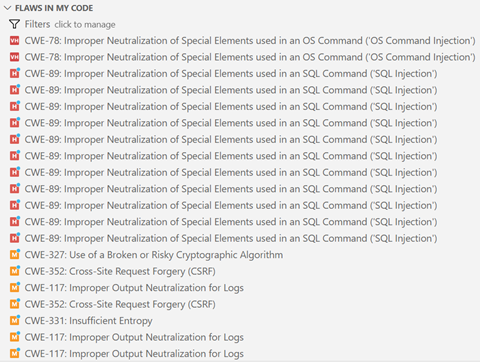
To review, fix, or ignore discovered flaws, use the FLAWS IN MY CODE view.
Review flaws
Learn about the discovered flaws and their severity, and get remediation guidance that can help you fix them.
Before you begin:
Ensure you have scanned your project.
To complete this task:
-
On the Activity bar, select Veracode Scan
. -
In the FLAWS IN MY CODE view, you see a list of flaws. Each flaw shows the Common Weakness Enumeration (CWE) ID and name, sorted by severity. The flaws with the highest severity are at the top of the list. If there are suggested fixes for a flaw, the flaw icon shows a blue dot
 . After you apply a suggested fix from Veracode Fix, the flaw icon changes to gray
  .
.
-
Optionally, to only show specific flaws in the list, select Filter
 to filter the flaws.
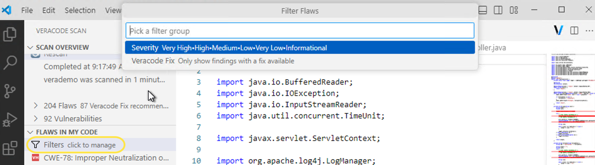
-
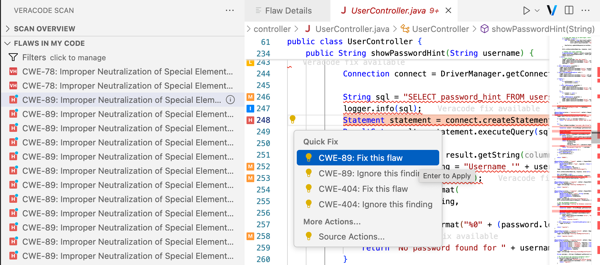
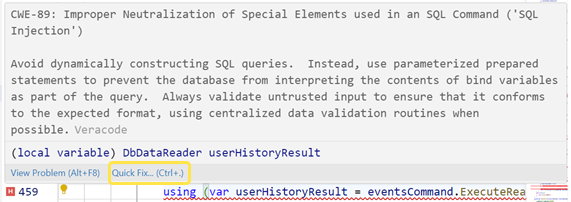
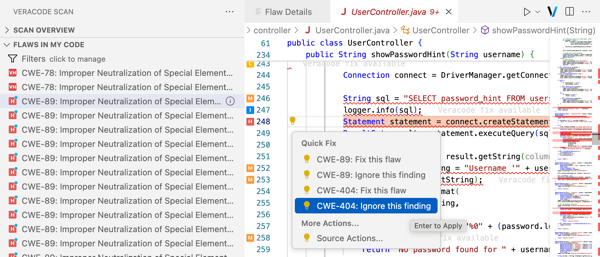
To view a flaw within a source file, select a flaw. The source file opens in a tab and the line of code where the flaw exists is underlined in red. An icon to the left of the line of code shows the flaw severity.

If the line of code contains multiple flaws, the icon shows the highest severity of all flaws. If there are suggested fixes for the flaw, to the right of the line of code, you see
Veracode fix available. -
To view a detailed description of a flaw and the remediation actions you can take to fix it, in the FLAWS IN MY CODE view, point to a flaw, then select View flaw details
 . The Flaw Details tab opens.
 -
Alternatively, to open the Flaw Details tab from a flaw in a source code file, hover over a line of code with a red underline. Then, select Quick Fix and a CWE. You can also select a CWE from Show Code Actions
 .
.
-
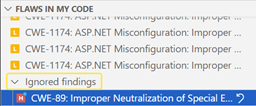
To review ignored flaws, at the bottom of the FLAWS IN MY CODE view, expand Ignored findings.
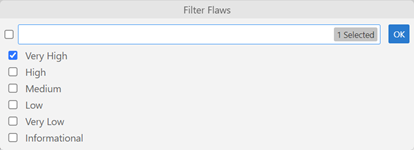
Filter flaws
To control which flaws are listed in the FLAWS IN MY CODE view, you can filter them.
Before you begin:
Ensure you have scanned your project.
To complete this task:
-
In the FLAWS IN MY CODE view, select Filters
. -
From the Filter Flaws dropdown menu, select a filter:
- Severity: hide or show flaws based on their severity.
- Veracode Fix: only show flaws with suggested fixes you can apply or flaws that have fixes applied .
-
To apply a filter, select OK. To indicate that the flaws are filtered, the filter icon shows an orange dot
 .
.
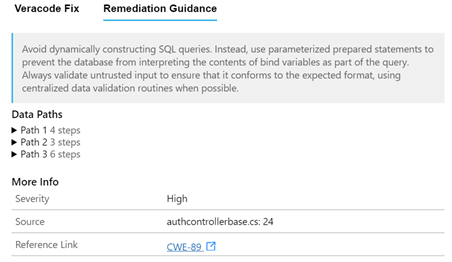
Fix flaws
To fix discovered flaws, you can apply suggested fixes from Veracode Fix or follow the remediation guidance available in your IDE. If the scan results do not include the path to a flaw, Veracode Fix does not provide suggested fixes for that flaw.
Before you begin:
- Ensure you have scanned your project.
- To generate and apply suggested code fixes, you must have a Veracode Fix license.
To complete this task:
-
In the FLAWS IN MY CODE view, select a flaw you want to fix. If the flaw has suggested fixes, the severity icon shows a blue dot
.
-
Optionally, to show only flaws with suggested fixes, or flaws with fixes applied, select Filters
to filter the flaws. -
To open the Flaw Details tab, point to a flaw, then select View flaw details.
-
To open the source file that contains the flaw, select the flaw. In the source file, the line of code where the flaw exists is underlined in red. A line of code can contain multiple flaws.
-
In the Flaws Details tab, select from the following tabs. You only see the Veracode Fix tab if Fix supports the CWE ID for the selected flaw.
-
Veracode Fix: to apply the suggested fix for this flaw, select Apply Fix. After you apply the fix, a notification opens with details about the applied fix and the flaw icon in the FLAWS IN MY CODE view turns gray
. If you fix a flaw manually, its flaw icon doesn't turn gray.noteIf you use Veracode Fix, each time you open a flaw in the Flaw Details tab and select Veracode Fix, it regenerates the suggested fix. To avoid losing a suggested fix that you might want to apply later, consider copying the suggested fix code to a text file outside your IDE.
-
Remediation Guidance: to fix this flaw manually, follow the remediation guidance. To see the path that the scanner followed to locate this flaw, under Data Paths, expand a path. Then, select the Step link for the source file and code line number you want to view.
-
-
Alternatively, to open the Flaw Details tab from a flaw in the source file, hover over a line of code with a red underline. Then, select Quick Fix and select either Fix this flaw or, if there are no suggested fixes, select More information. You can also access the Quick Fix options from the Show Code Actions menu
. -
Rebuild your project and verify that it compiles successfully. Updating code to remediate a flaw—whether manually or with a Veracode Fix suggestion—might break the build. For example, a fix might reference a missing library.
To learn about other potential build errors and troubleshooting guidelines for manually packaged applications, see About Veracode Fix.
-
To confirm a flaw is fixed, rescan your project and verify that it no longer appears in the FLAWS IN MY CODE view.

Ignore flaws
To temporarily remove flaws from the scan results, you can ignore them. For example, you might want to ignore flaws that continually appear or are of low importance, such as Informational.
Before you begin:
Ensure you have scanned your project.
To complete this task:
-
In the FLAWS IN MY CODE view, select a flaw. The source file that contains the flaw opens in a tab and the line of code where the flaw exists is underlined in red.
-
In the source file, hover over a line of code with a red underline.
-
To ignore a flaw, select Quick Fix > Ignore this finding on a CWE. If the line of code contains multiple flaws, the menu lists multiple CWEs. The flaw moves to the Ignored flaws section at the bottom of the FLAWS IN MY CODE view and is no longer visible in the source file. You can also access the Quick Fix options from Show Code Actions
.
-
To unignore a flaw, at the bottom of the FLAWS IN MY CODE view, expand Ignored flaws. Then, locate a flaw and select Unignore flaw
 . The flaw moves out of the Ignored flaws list and is visible in the source file.
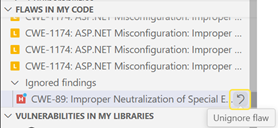
Working with vulnerabilities
To review and fix discovered vulnerabilities, use the VULNERABILITIES IN MY LIBRARIES view.
Review and fix vulnerabilities
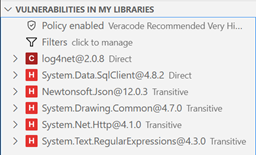
To see detailed information about libraries with vulnerabilities, the vulnerability risk level, and guidance for mitigating them, review the discovered vulnerabilities for all open-source libraries in your project in the VULNERABILITIES IN MY LIBRARIES view.
If you do not have an active SCA subscription, you do not see vulnerabilities in the SCAN OVERVIEW view. The VULNERABILITIES IN MY LIBRARIES view and the LIBRARY LICENSES view are also empty.
Before you begin:
Ensure you have scanned your project.
To complete this task:
-
On the Activity bar, select Veracode Scan
. -
In the VULNERABILITIES IN MY LIBRARIES view, you see a list of libraries sorted by risk level. Libraries with the most and highest-risk vulnerabilities are at the top of the list. The usage appears to the right of the library.
-
Optionally, to only list libraries with vulnerabilities of specific severities, select Filters
to filter the vulnerabilities.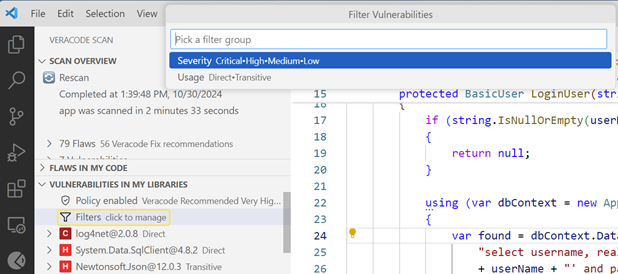
-
To view the detected vulnerabilities, expand a library.
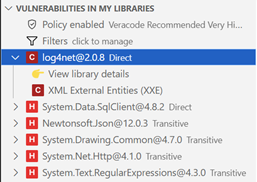
-
To view information about the library, select View library details. The Library Details tab provides useful information about the library, such as the usage, the latest version available, the known safe version, and links to more information. If the library has vulnerable methods, the Has vulnerable methods field shows
Yesand you should prioritize resolving this library first. If the library does not have vulnerable methods or the Skip Vulnerable Method Analysis setting is turned on, the Has vulnerable methods field showsNo.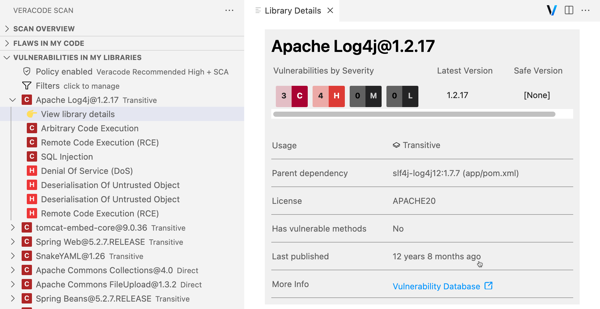
-
To open the package manager file, such as
package.json, where the vulnerable library is referenced, select Go to library location. In the package manager file, the vulnerable library (direct or transitive) is highlighted. You only see this option if your project uses Maven, npm, or Yarn. -
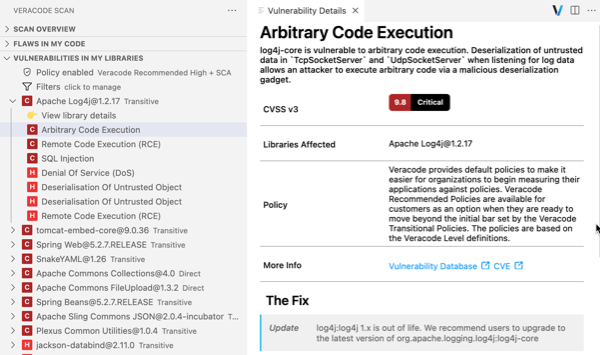
To see additional information about a vulnerability and the remediation guidance you can use to fix it, select it. The Vulnerability Details window shows the CVSS score, all libraries in your project with this vulnerability, a link to view it in the Veracode Vulnerability Database, and the recommended fix.
-
To fix the vulnerability, under The Fix, follow the remediation steps. For example, if an NPM project library has a vulnerability, you might need to upgrade or downgrade the library in
package.jsonto a safe version. -
To ensure compatibility with any updated libraries, rebuild your project and verify that it compiles successfully.
To learn about other potential build errors and troubleshooting guidelines for manually packaged applications, see About Veracode Fix.
-
To confirm a vulnerability is fixed, rescan your project and verify that the affected library or vulnerability no longer appears in the VULNERABILITIES IN MY LIBRARIES view.
Filter vulnerabilities
To control which vulnerabilities are listed in the VULNERABILITIES IN MY LIBRARIES view, you can filter them by severity.
Before you begin:
Ensure you have scanned your project.
To complete this task:
-
In the VULNERABILITIES IN MY LIBRARIES view, select Filters
. -
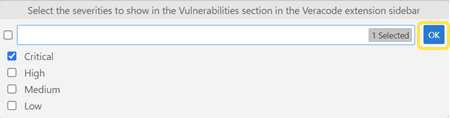
Select Filter Vulnerabilities, then select one or more filters:
- Severity: hide or show vulnerabilities based on their risk level.
- Usage: hide or show vulnerabilities based on their usage.
-
To apply a filter, select OK. To indicate that the view is filtered, the filter icon shows an orange dot
.
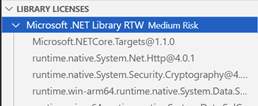
Review open-source licenses
Review a list of all open-source licenses in your project, the libraries that use these licenses, and the license risk level. Your organization uses this information when deciding whether it might need to change a license to a safe version.
Before you begin:
Ensure you have scanned your project.
To complete this task:
-
On the Activity bar, select Veracode Scan
. -
In the LIBRARY LICENSES view, scroll through the list of detected licenses to see the names, versions, and license risk. The licenses with the highest risk level appear at the top of the list.

-
Expand a license to see the libraries that use it.
Import flaws
Import flaws from the pipeline scans directly into the IDE to review the flaws and propose mitigations.
To complete this task:
- On the Activity bar, select Veracode Scan.
- In the FLAWS THAT VIOLATE POLICY view, select Import Flaws. The IDE fetches the list of application profiles mapped to your user account and displays in the Command Palette.
- From the list of applications, select the applicable application profile. The list of policy and sandbox scans associated with the application displays.
- From the list of scans, select the applicable sandbox or policy scan.
- The flaws from the selected scan display in the FLAWS THAT VIOLATE POLICY view.
Review flaws that violate policy
Learn about the imported flaws, their severity, remediation guidance, and mitigation history.
Before you begin:
Ensure you have imported flaws from the pipeline scans.
To complete this task:
- In the FLAWS THAT VIOLATE POLICY view, you see a list of flaws, each showing the CWE ID and name, sorted by severity (highest first).
- Optionally, to show only specific flaws, select Filter.
- To view a flaw in the source file, select it. The file opens and the flaw line is underlined in red, with an icon indicating severity.
To view a flaw in the source file, open the relevant application in the IDE.
- To see a detailed description, remediation guidance, propose mitigation, or review mitigation history, hover over a flaw and select the View flaw details icon. The Flaw Details tab opens.
Filter flaws that violate policy
Control which flaws appear in the FLAWS THAT VIOLATE POLICY view.
Before you begin:
Ensure you have imported flaws from the pipeline scans.
To complete this task:
- In the FLAWS THAT VIOLATE POLICY view, select Filter.
- From the Filter Flaws dropdown, choose:
- Severity: show or hide flaws by severity
- Mitigation Status: show or hide flaws by mitigation status
- Fix for Policy: show or hide flaws that affect your policy
- Select OK. An orange dot on the filter icon indicates active filters.
Propose mitigation for flaws
Use the Triage Flaws tab to assign mitigations.
Before you begin:
You must have the Reviewer or Security Lead role to assign mitigating factors to a flaw.
To complete this task:
-
In the FLAWS THAT VIOLATE POLICY view, select Open Triage Flaws icon.
-
On the Triage Flaws tab, select one or more checkboxes to enable bulk actions.
-
From Select Action, choose:
- Mitigate by Design to state that custom business logic within the body of the application, which may not be fully identifiable by an automated process, addressed the vulnerability
- Mitigate by Network Environment to state that an environmental control provided by the network on which the application is running addressed the vulnerability
- Mitigate by OS Environment to state that an environmental control provided by the operating system on the machine on which the application is running addressed the vulnerability
- Potential False Positive to state that Veracode has incorrectly identified something as a vulnerability
noteIf you identify a flaw as a potential false positive, it does not cause Veracode to remove a potential false positive from your published report. Your organization can remove a potential false positive from the published report by approving it. If your organization approves a flaw as a false positive, your organization is accepting the risk that this flaw might be valid.
- Reported to Library Maintainer to state that the current team does not maintain the library containing the flaw; you referred the vulnerability to the library maintainer.
- Accept the Risk to state that your business is willing to accept the risk associated with a finding; your organization evaluated the potential risk and effort required to address the finding
-
After selecting a mitigation, the Mitigate Flaws tab opens.
-
In the Comments field below the Action menu, enter your reasoning for your proposed mitigation. You cannot save your mitigation without entering comments.
-
Select Save.
Clear all findings
Remove all findings from all views and the extension.
Before you begin:
Ensure you have scanned your project.
To complete this task:
You cannot undo this action or recover the cleared findings. To see results, rescan your project.
In the SCAN OVERVIEW view, select Clear findings ![]() .
.
Troubleshooting
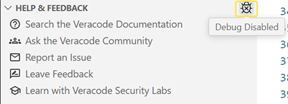
To generate a log file for all scans, Veracode Fix, and the autopackager, turn on debugging. You can use these logs to troubleshoot issues.
Debugging does not remain enabled after a scan. Turn it on before each scan. If you are troubleshooting Veracode Fix recommendations or applying them, enable debug mode again after the scan.
To complete this task:
In the HELP & FEEDBACK view, select Debug ![]() . The icon shows a red dot and the tooltip changes to Debug Enabled.
. The icon shows a red dot and the tooltip changes to Debug Enabled.
The logs are stored on your local machine in .veracode/ide_agent/vscode/. The filename for each log file is the VS Code session ID at the time you started the scans.
To remove these files, you must delete them manually.
To turn off debugging, select Debug to remove the red dot. The tooltip changes to Debug Disabled.
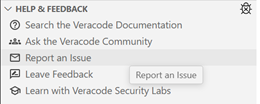
Get help or provide feedback
If you need help or want to report an issue, in the HELP & FEEDBACK view, select a link to visit the Veracode Community or report an issue.
For additional help, contact Veracode Technical Support.