Set up the Qualys connector
Qualys is a security and compliance platform for detecting and remediating vulnerabilities in your IT environments.
Ingesting Qualys vulnerability data into Veracode Risk Manager (VRM) helps power risk prioritization and best next actions to ensure that VRM recommends the best actions to reduce the most risk in your environment.
Qualys requirements
The VRM connector for Qualys must be able to access the vulnerability data in Qualys. To set up the connector, you must meet the following requirements:
- Have the Reader role with access to all cloud tags and cloud asset groups.
- Have the EC2 Scanning feature enabled for your Qualys subscription.
- If you use a Qualys service account, ensure that your account has accepted the Qualys End User License Agreement (EULA).
Additionally, Veracode recommends using a dedicated service account for the connector because parallel usage of the same credentials can lead to an account lockout.
Important: Because Qualys imposes relatively steep API rate limits in many cases, ensure that adding this connector will not impact any of your existing use cases.
Accept Qualys EULA
If you are using a new Qualys service account, you must accept the Qualys EULA before you can use the connector. See Qualys's instructions for accepting the Eula using the API. However, replace the cURL command in the instructions with the following command:
curl -u "USERNAME:PASSWORD" -H "X-Requested-With: Curl" -H "Content-Type: application/json" "<QUALYS_URL>/msp/acceptEULA.php" -d '{"name": "acceptEULA.php", "username": "USERNAME"}'
Replace <QUALYS_URL> with the required API URL.
Enable access to cloud resources
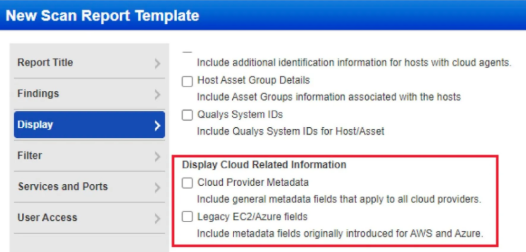
To tie findings to cloud resources, VRM requires access to host-based scan reports that include the Cloud Provider Metadata and Legacy EC2/Azure fields.
To complete this task:
-
Log in to the Qualys platform.
-
Select Vulnerability Management > Reports > Templates.
-
Select the report template that you want VRM to ingest, and select Edit.
-
Select the Display tab.
-
In the Display Cloud Related Information section, select Cloud Provider Metadata and Legacy EC2/Azure fields.
-
Select Save.
Create a VRM connector
After enabling access in Qualys, you can set up your connector in VRM to start ingesting data from Qualys.
- In VRM, from the left navigation menu, select the Settings icon
 .
. - Select Add Connector.
- Select the Qualys tile.
- Enter a name for the connector.
- Enter your Qualys base API URL. See additional information on identifying your API URL.
- Enter your Qualys username and password.
- Select Add Connector.
After the connector is created, VRM begins fetching your findings, which can take several minutes.