Veracode Pipeline Scan
Pipeline Scan embeds Veracode Static Analysis directly into your development tools and workflows. Scan code in your IDEs, SCM repositories, and CI/CD pipelines.
To automate application packaging, use or integrate autopackaging. To automate resolving security findings found in your applications, use or integrate Veracode Fix.
Pipeline Scan is not connected to the Veracode Platform, so it doesn't support certain features, such as flaw mitigations or flaw matching. If you require these features, use Upload and Scan.
How does Pipeline Scan work?
- Uploads a packaged artifact of your application code to the Static Analysis Engine.
- Performs a prescan verification of your code.
- Performs a Static Analysis to detect security findings in source code.
- Compares the results to the results in a baseline file of known findings to identify new findings.
- Analyzes the results of your code against security policies to assess the application's compliance with your organization's security requirements.
- Provides scan results that you can review in your development tools and resolve automatically using Veracode Fix.
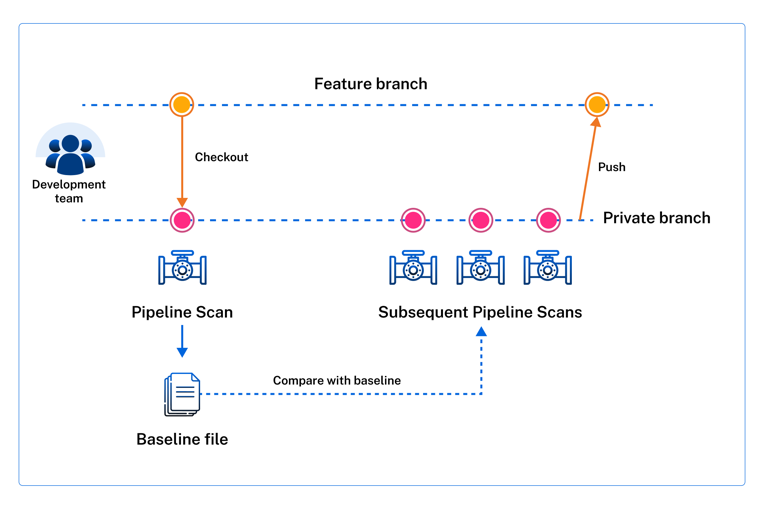
The following example shows an initial Pipeline Scan that creates a baseline file of known findings followed by additional scans that run iteratively against the baseline. The iterative scanning approach enables you to gradually identify and resolve new findings until those new findings no longer appear in the scan results.
How can I use Pipeline Scan?
Run scans locally or in your pipelines.
Pipeline Scan is integrated in the following products.
Prerequisites
Your environment must meet these specific prerequisites before you can successfully upload your packaged application to the Veracode Platform and run Pipeline Scans:
-
An active Veracode Static Analysis license.
-
One of the following Veracode accounts:
-
You have generated API credentials. You can provide your credentials with the command parameters or with an API credentials file.
-
Enable port 443 in the environments you run Pipeline Scans. The Pipeline Scan uses the Pipeline Scan REST APIs, which use the standard HTTPS port 443.
-
You have ensured that all required Veracode IP addresses for the Veracode APIs and integrations are on the allowlist for your organization. Pipeline Scan uses these addresses to authenticate with Veracode. To update your allowlist, you might need to contact your IT team.
-
You have compiled and packaged your application source files according to the packaging requirements.
-
You have installed Java 8 or later.
-
You have access to a development or test pipeline to which you can add the Pipeline Scan. If you do not have access to a pipeline, you can try running the Pipeline Scan from the command line.
noteEach pipeline scan is limited to a maximum scan time of 60 minutes.
-
The application you want to scan:
-
Builds successfully.
-
Does not exceed the total file size limit of 200 MB.
-
Meets the packaging requirements for the supported languages
noteYou cannot use the Pipeline Scan if the source-code language for your application is not supported.
-
-
If you are using authenticated HTTPS proxy connections, ensure you have configured the proxy settings using this format:
java -Dhttps.proxyHost={myproxy} -Dhttps.proxyPort={myport} -Dhttps.proxyUser={myuser} -Dhttps.proxyPassword={mypass}
Supported languages
Pipeline Scan supports several languages and frameworks
About Pipeline Scan baseline files
The Pipeline Scan provides the option to set a baseline of known security findings using the Static Analysis results from a Pipeline Scan of an application. By default, each scan saves its results to a results.json file, and you can use this file as a baseline of findings for that application.
In your Pipeline Scan configuration, set the --baseline_file parameter to the name of your results.json. You can safely rename results.json to something else, such as baseline.json.
To identify new findings, the Pipeline Scan compares the current scan results with those listed in the baseline file. It ignores the baseline findings during the scan and only uses them to flag new issues.
For a CI/CD workflow, you can decide whether any new findings outside your baseline are important enough to "break the build". Set the --fail_on_severity parameter to fail the build based on the severity of the findings. Then, your team can determine a mitigation strategy for addressing these findings before moving the code to the next phase in your development pipeline.
You can only create a baseline file using the Pipeline Scan—not through the Veracode Platform. For examples of how to create a baseline file using the veracode static scan command, see the CLI reference.
Use Pipeline Scan to run Veracode Static Analysis scans locally, in your development pipelines, or using Veracode products that support it.
Obtain the Pipeline Scan files
You can obtain the latest version of the Pipeline Scan as a ZIP archive from Veracode or as a container image from Docker Hub.
The ZIP archive contains the pipeline-scan.jar, which includes all dependencies except the required Java 8 compatible JRE, and a README with detailed code examples. You add the full path to pipeline-scan.jar in your pipeline scripts for running a Pipeline Scan. The provided script examples include steps to both download and extract the ZIP as part of the Pipeline Scan job.
To complete this task:
-
Select from the following locations.
- Docker Hub to use a Docker image. Veracode recommended.
- Veracode Downloads to download a ZIP archive.
-
If you downloaded the ZIP archive, extract the contents to a local directory.
Scan from the command line
You can run a few Pipeline Scan commands at a local console, outside a development pipeline, to get started with running a scan and viewing scan results without the need for a test or production pipeline. You can also use the command line for debugging.
Before you begin:
Before running a Pipeline Scan, ensure you meet the prerequisites.
This is an optional procedure that steps you through running a few Pipeline Scan commands from the command line using different command parameters for generating scan results, creating a custom baseline file, and running a Pipeline Scan against that baseline file.
If you want to add a Pipeline Scan to your development pipeline, you can skip this procedure and go to Run a Pipeline Scan in a pipeline. You can also run and manage scans using the Pipeline Scan API.
A Veracode account is limited to six Pipeline Scans per 60 seconds, and each scan is limited to a maximum scan time of 60 minutes.
The example Java application is a WAR file named verademo.war, which you can download from the Veracode GitHub repository. You can also use any application that meets the prerequisites.
To complete this task:
-
To view all scan results for an application, run:
java -jar pipeline-scan.jar --file verademo.warEach scan returns a status code.
-
To include additional details about each finding in the scan results, run:
java -jar pipeline-scan.jar --file verademo.war -id true -
To save the scan results to a JSON file with a custom filename, run:
java -jar pipeline-scan.jar --file verademo.war -jf verademo_results.jsonBy default, Pipeline Scan saves the scan results to a
results.jsonfile in the local directory. This file is also called an artifact.noteEach Pipeline Scan command overwrites the default
results.jsonfile with the latest results. By giving your JSON file a unique filename you can prevent subsequent scans from overwriting your saved scan results.The JSON file contains detailed information about each flaw in key-value pair. This example shows a single finding in a JSON file.
-
To set your custom JSON file as the baseline file of known findings for this application, run:
java -jar pipeline-scan.jar --file verademo.war -bf verademo_results.json
Next steps:
- If you set a baseline file, store it in version control at the same level as the scanned application. Any changes to a baseline file can affect your security strategy. It is important that you version this file to ensure it contains the required baseline of findings for the given application. If necessary, you can revert to a previous version of the file.
- Review the scan results with your team to determine a mitigation plan for addressing the discovered flaws.
Scan in a pipeline
You can add the Pipeline Scan to a job in your development pipeline. You can use the provided code examples as templates for adding the Pipeline Scan as a stage in a pipeline job and configure the command parameters to achieve the desired scan results.
You can configure scans to run based on various triggers, such as commits, merge requests, or code builds. You can also configure scans to break the build based on flaw severity, CWE category, or security thresholds.
Before you begin:
Before running a Pipeline Scan, ensure you meet the prerequisites.
We recommend that you configure a Pipeline Scan in a test pipeline. For example, use a test pipeline on a local workstation or virtual machine (VM) in case you encounter any problems. You can safely resolve any problems in your test pipeline and ensure your configuration provides the expected scan results before moving the configuration to your production pipeline.
If you want to run a Pipeline Scan, try different commands, debug, or review scan results outside a pipeline, you can Run a Pipeline Scan from the Command Line.
You can also run and manage scans using the Pipeline Scan API.
A Veracode account is limited to six Pipeline Scans per 60 seconds, and each scan is limited to a maximum scan time of 60 minutes.
We recommend that you set the job to download pipeline-scan-LATEST.zip or get the latest Docker image, each time the job runs, to ensure that you are using the latest version of the Pipeline Scan. Alternatively, you can cache pipeline-scan-LATEST.zip locally on your CI system and download it at regular intervals. The code examples include a step for downloading and extracting the latest version of the Pipeline Scan ZIP archive.
To complete this task:
- Obtain the Pipeline Scan files.
- In your development pipeline, add or edit a job for the Pipeline Scan that runs after the stage for building your application.
- Add the code for your CI/CD code repository to the Pipeline Scan stage. For additional code examples or to ask questions, visit the Veracode Community.
- In the Pipeline Scan job, include either the
pipeline-scan.jarfile you extracted frompipeline-scan-LATEST.zipor the Docker image. - Edit the Pipeline Scan job to include the command parameters that meet the security-scanning requirements for your application. The example configuration scenarios provide common configurations for specifying fail-build criteria, such as failing the pipeline on specific flaw severities or CWEs.
- Run the pipeline to run the Pipeline Scan job.
The scan results provide a list of discovered flaws, if any, and a status code. If the Pipeline Scan finds any flaws, it returns the status code >=1, or greater than or equal to 1, to indicate the number of flaws found and fails the pipeline job.
The Pipeline Scan saves the scan results to a build artifact, which is a JSON file named results.json. You can rename the JSON file and use it as a baseline file to set a baseline of discovered flaws for the scanned application.
Next steps:
- If you set a baseline file, store it in version control at the same level as the scanned application. Any changes to a baseline file can affect your security strategy. It is important that you version this file to ensure it contains the required baseline of findings for the given application. If necessary, you can revert to a previous version of the file.
- Review the scan results with your team to determine a mitigation plan for addressing the discovered flaws.
Status codes
The following table describes the status codes for a completed Pipeline Scan. You can configure your development pipeline to use these status codes for pass-fail criteria during scanning.
| Status code | Description |
|---|---|
| 0 | Pipeline Scan did not find any flaws. |
| 1-200 | Range of the number of discovered flaws. |
| -1 or 255 | Scan failed because of network flaws, invalid Veracode API credentials, or other problems. |
| -2 or 254 | Scan did not complete within the default timeout of 60 minutes. |
| -3 or 253 | Scan did not complete within the time specified for the --timeout parameter. |