Manage custom workspace rules
Custom workspace rules expose the controls that the rules engine uses. You can edit these controls per workspace and decide what actions to take when projects violate controls, ensuring that no software ships unless it meets your security requirements.
You cannot create custom rules for a workspace if your organization enforces organization rules.
View rules
Before you begin:
You must have the Security Lead, Workspace Administrator, or Workspace Editor role.
To complete this task:
- In the Veracode Platform, select Scans & Analysis > Software Composition Analysis.
- Select Agent-Based Scan.
- Either select a workspace to view workspace rules or select Agent-Based Scan Settings to view organization rules.
- Select Rules.
Create custom rules
Create custom rules that define unique security requirements for your workspace.
Before you begin:
You must have the Security Lead, Workspace Administrator, or Workspace Editor role.
To complete this task:
- In the Veracode Platform, select Scans & Analysis > Software Composition Analysis.
- Select Agent-Based Scan.
- Either select a workspace to view workspace rules or select Agent-Based Scan Settings to view organization rules.
- Select Rules.
- Select Custom Rules. A copy of the default rules appears.
- To open edit mode, select Edit.
- Make your adjustments, then select Save.
To define a control, see rule controls and manage controls.
Edit custom rules
You can edit custom rules if you want to change the security requirements for your workspace.
Before you begin:
You must have the Security Lead, Workspace Administrator, or Workspace Editor role.
To complete this task:
- In the Veracode Platform, select Scans & Analysis > Software Composition Analysis.
- Select Agent-Based Scan.
- Either select a workspace to view workspace rules or select Agent-Based Scan Settings to view organization rules.
- Select Rules. The currently applied custom rules appear.
- Select Edit. The controls change from view-only mode to edit mode. The details of each control are collapsed by default.
- Make your adjustments, then select Save. The custom rules are active for any future scans in the workspace.
To define a control, see rule controls and manage controls.
Reset custom rules
You might want to update your custom rules by starting over from the default rules and making new customizations. Complete the following steps to discard any customizations, reset all controls to the default rules, and apply the changes immediately.
Before you begin:
You must have the Security Lead, Workspace Administrator, or Workspace Editor role.
To complete this task:
- In the Veracode Platform, select Scans & Analysis > Software Composition Analysis.
- Select Agent-Based Scan.
- To view workspace rules, select a workspace. To view organization rules, select Agent-Based Scan Settings.
- Select Rules. The currently applied custom rules appear.
- Select Edit.
- Select Veracode Defaults.
- Select Reset rules.
Specify the CVSS version for agent-based scans
If your organization has activated the Unified Policy feature, which replaces agent rules, all agent-based scans use Common Vulnerability Scoring System (CVSS) version 3 to evaluate your vulnerabilities.
Configure a rule that specifies the CVSS version of the security standard to use for evaluating vulnerabilities. For example, select CVSS version 3 to evaluate your vulnerabilities against the latest version of the standard.
Before you begin:
You must have the Security Lead, Workspace Administrator, or Workspace Editor role to edit the CVSS version for a workspace rule. You must have the Security Lead role to edit the CVSS version for an organization rule.
To complete this task:
- In the Veracode Platform, select Scans & Analysis > Software Composition Analysis.
- Select Agent-Based Scan.
- Select a workspace.
- Select Custom Rules.
- Select Edit.
- Choose a rule control you want to modify or select Add control to create a new control.
- For Level, choose if you want violations of this control to result in an error or a warning. Errors result in a build failure. Warnings result in log entries to the continuous integration systems, but they do not cause a build failure.
- Expand the control row to display all condition options.
- From the Severity dropdown menu, select the CVSS score you want to use for this control.
- If you want to generate issues based on the CVSS severity, select Create Issue.
- Select Save.
Custom rule examples
This section provides some examples of custom rules you can apply to a workspace.
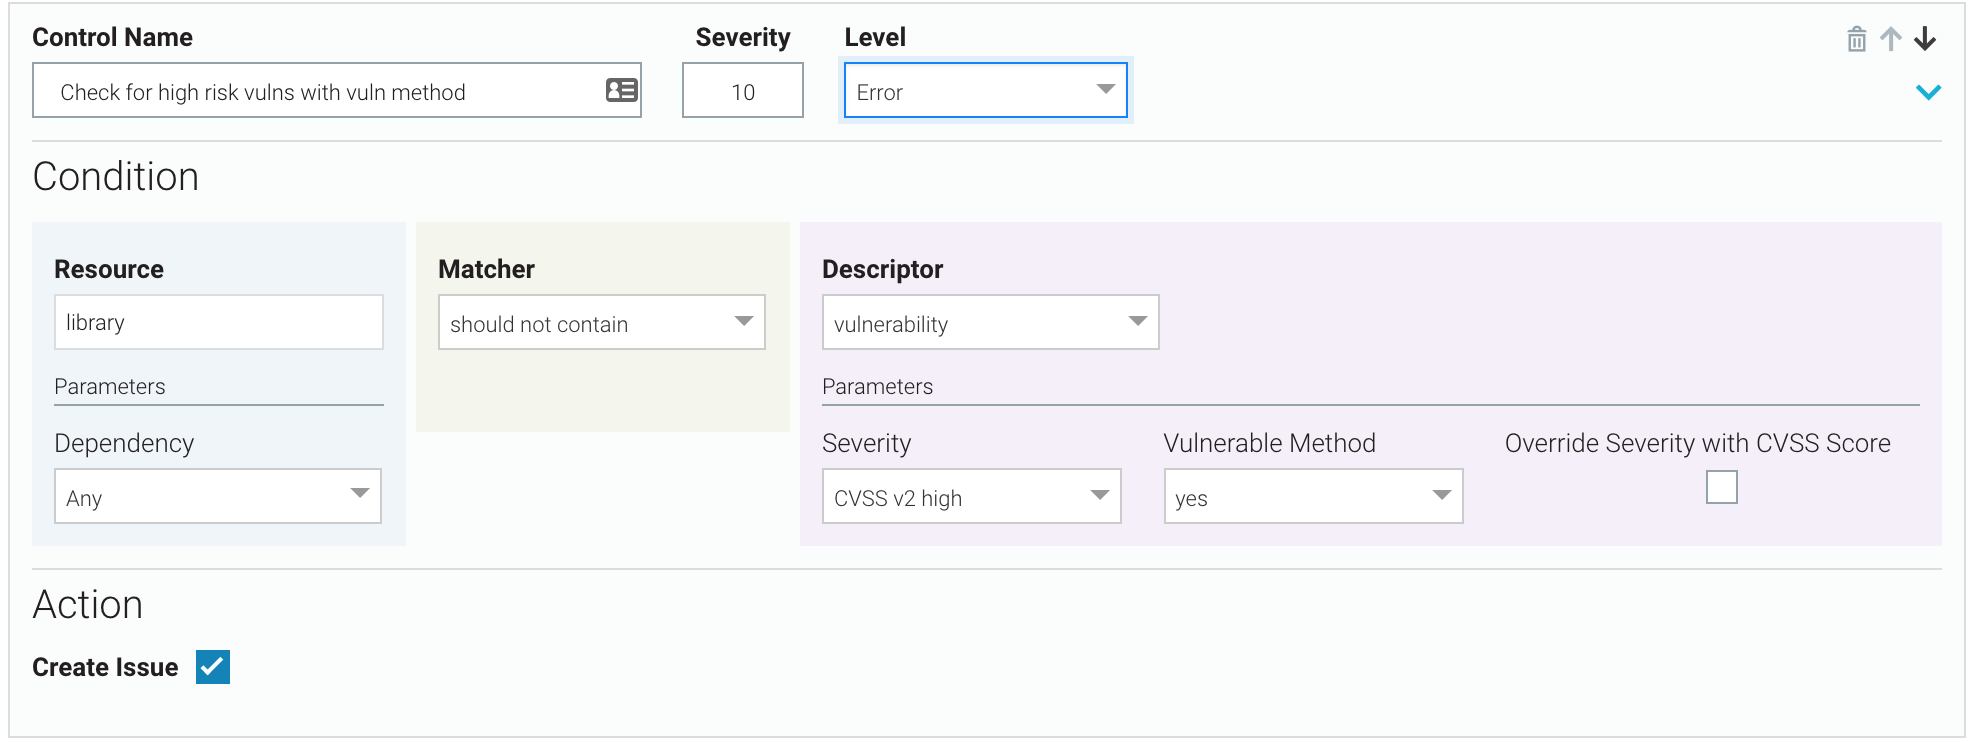
High-risk vulnerabilities with vulnerable methods
There should be no CVSS v2 high-risk vulnerabilities where vulnerable methods are found. If there are, assign a severity of 10, break the build, and create a Veracode SCA issue.
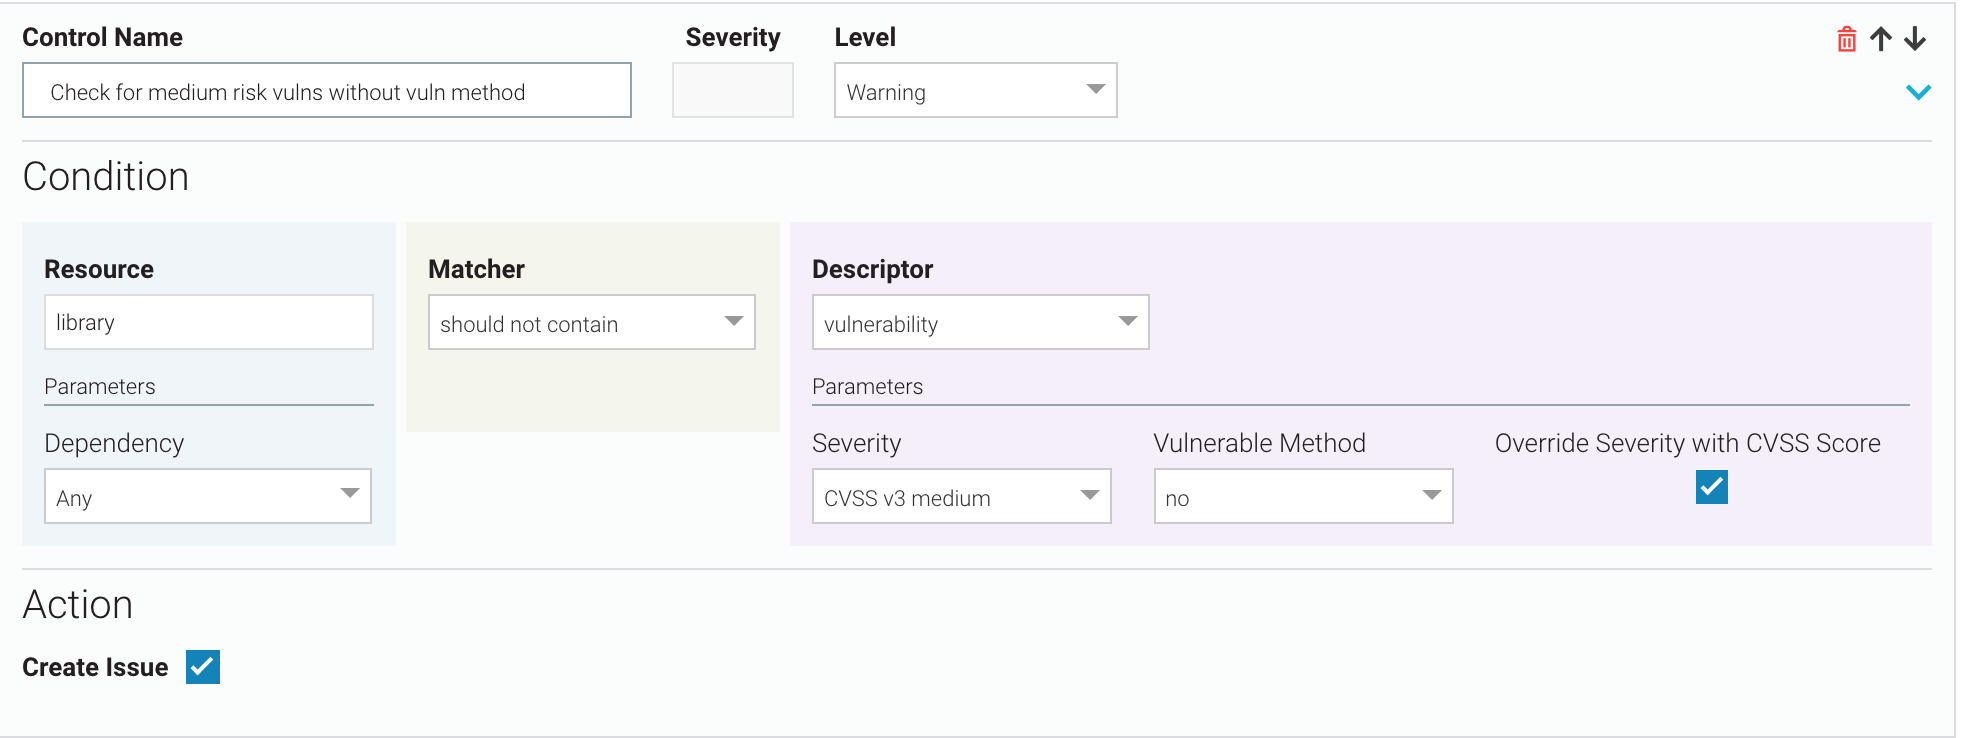
Medium-risk vulnerabilities without vulnerable methods
There should be no CVSS v3 medium-risk vulnerabilities where vulnerable methods are not found. If there are, use the CVSS score of the vulnerabilities as the control severity, do not break the build, but do create a Veracode SCA issue.
Allow low-risk vulnerabilities without vulnerable methods
If you do not want to track low-risk vulnerabilities where no vulnerable methods are found, you can delete any controls where Descriptor = vulnerability, Severity = low risk, and Vulnerable Method = no. The SCA scan will not create SCA issues for this kind of vulnerability.
Alternatively, you can clear the Create Issue checkbox in a control where Descriptor = vulnerability, Severity = low risk, and Vulnerable Method = no. You might prefer this method if you may want to create Veracode SCA issues for this control in the future.
High-risk licenses with exceptions
If your condition rejects libraries that contain high-risk licenses, you can select one or more specific high-risk licenses to allow. In this example, you allow one exception for Open Software License 1.0.

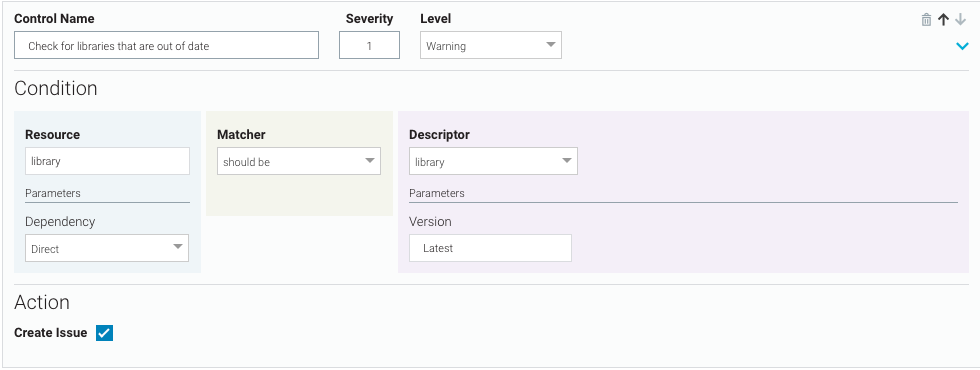
Out-of-date libraries
Ensure all direct libraries are up-to-date. For any out-of-date libraries, do not break the build, but do create a Veracode SCA issue with severity = 1.