Set up and use the Jira connector
The Veracode Risk Manager (VRM) connector for Jira integrates VRM’s best next actions and issues with Jira's issue-tracking tools. It leverages the Jira Cloud REST API to create tickets, ensuring that VRM’s powerful recommendations move to the next stage of remediation and are routed to the correct team workflows.
Complete the following tasks to set up and use your VRM connector for Jira.
Jira requirements
Your Atlassian user account must have:
- Member access to the Jira projects you want to connect to VRM. :::note Even if you're an administrator of your Jira instance, you must be a member of the projects.
- The following Jira permissions:
write:issue:jirawrite:comment:jirawrite:comment.property:jirawrite:attachment:jiraread:issue:jira:::
Create an API token
You need to create a scoped API token to access Jira APIs.
To complete this task:
-
In Jira, navigate to Settings > Security > Create API token with scopes.
-
Select Next, then select Jira as the application.
-
Select Next again, then select the following scopes:
read:jira-workwrite:jira-workread:jira-user(to fetch user details)
The following table shows how Veracode uses these scopes:
API Endpoint HTTP Method Required Scopes List Projects GET /rest/api/3/project/searchread:jira-workList Issue Types GET /rest/api/3/issuetype/projectread:jira-workGet Create Metadata/Fields GET /rest/api/3/issue/createmeta/{projectId}/issuetypes/{issueTypeId}read:jira-workGroup/User Picker GET /rest/api/3/groupuserpickerread:jira-workCreate Single Issue POST /rest/api/3/issuewrite:jira-workCreate Bulk Issues POST /rest/api/3/issue/bulkwrite:jira-work -
Select Create token, then copy the token and save it to a secure location.
For more information, see Atlassian's API token documentation.
Create a VRM connector
- In VRM, select the Settings icon
 from the left navigation menu.
 - Select Add Connector.
- Select the Jira tile.
- Enter a name for the connector.
- Enter the email address of the user account you want to associate with the connector.
- Paste the API token that you generated for the Jira user account.
- Enter the full URL for your Jira organization. For example:
https://myorganization.atlassian.net - Select Add Connector.
Creating tickets in VRM
The Jira connector lets you create Jira tickets from the Issues page, directly from an issue summary, and from the Solutions page in VRM.
Create a ticket from the Issues page
- In VRM, select the Issues icon
 from the left navigation menu.
 - Select the checkbox for an issue.
- Select Actions > Create Ticket.
- For Connection Name, select your Jira connector. VRM generates a Jira ticket with following fields pre-populated:
- Project: the name of the Jira project in which you want to create the issue.
- Type:
Task,Story, andBugare the only supported ticket types. - Summary: the name of the issue. Not editable.
- Description: an outline of the affected assets, where the issues were detected, and possible solutions. Not editable.
- Status: the workflow status of the issue in VRM. By default, creating a ticket moves the status to
Noted. - Reason: the reason that the status is changing. By default, creating a ticket sets the reason to
Remediating Risk. - Comment: comments to include in the Jira ticket.
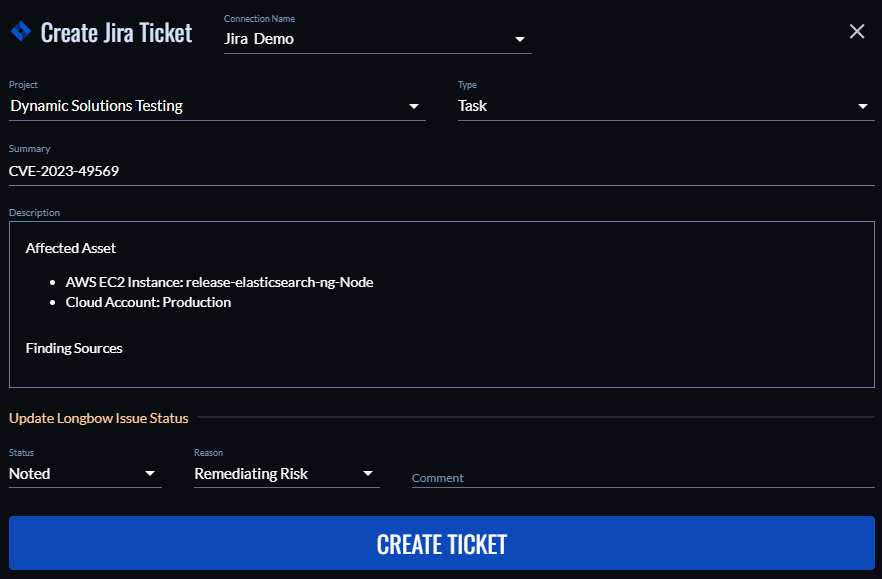
- If necessary, edit the pre-populated fields.
- Select Create Ticket. When the ticket is created in Jira, a pop-up window appears in VRM that includes a link to the ticket.
Create a ticket from the Issue Summary page
- In VRM, select the Issues icon from the left navigation menu.
- Select an issue.
- Select Create Ticket in the upper-right corner of the screen. If a ticket already exists for an issue, select Tickets > File Another Ticket in the upper-right corner of the screen.
- For Connection Name, select your Jira connector. VRM generates a Jira ticket with following fields pre-populated:
- Project: the name of the Jira project in which you want to create the issue.
- Type:
Task,Story, andBugare the only supported ticket types. - Summary: the name of the issue. Not editable.
- Description: an outline of the affected assets, where the issues were detected, and possible solutions. Not editable.
- Status: the workflow status of the issue in VRM. By default, creating a ticket moves the status to
Noted. - Reason: the reason that the status is changing. By default, creating a ticket sets the reason to
Remediating Risk. - Comment: comments to include in the Jira ticket.
- If necessary, edit the pre-populated fields.
- Select Create Ticket. When the ticket is created in Jira, a pop-up window appears in VRM that includes a link to the ticket.
Create a ticket from the Solutions page in VRM
- In VRM, select the Solutions icon
 from the left navigation menu.
 - Expand the remediation for which you want to create a ticket.
- Select the items from the Summary of Changes table that you want to include in the ticket.
- Select Actions:[number] Changes > Create Ticket.
- For Connection Name, select your Jira connector. VRM generates a Jira ticket with following fields pre-populated:
- Project: the name of the Jira project in which you want to create the issue.
- Type:
Task,Story, andBugare the only supported ticket types. - Summary: the name of the issue. Not editable.
- Description: an outline of the affected assets, where the issues were detected, and possible solutions. Not editable.
- Status: the workflow status of the issue in VRM. By default, creating a ticket moves the status to
Noted. - Reason: the reason that the status is changing. By default, creating a ticket sets the reason to
Remediating Risk. - Comment: comments to include in the Jira ticket.
- Ticket and subtasks to be created:: select each subtask for which you want to create a Jira ticket. The ticket for each subtask will be a child of the parent ticket.
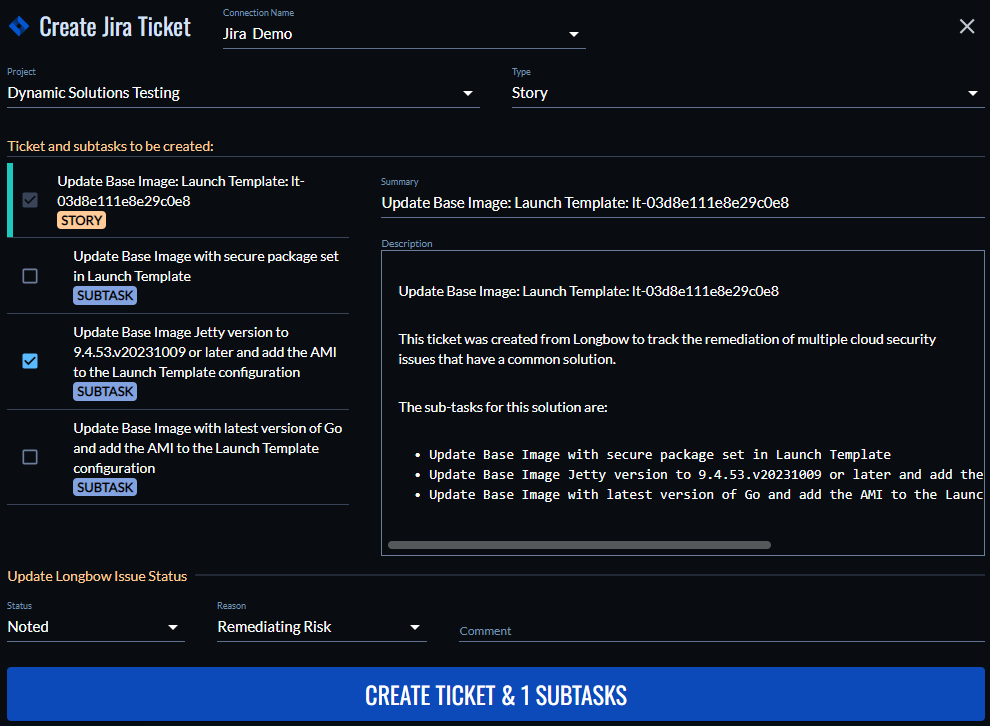
- If necessary, edit the pre-populated fields.
- Select Create Ticket. When the ticket is created in Jira, a pop-up window appears in VRM that includes a link to the ticket.