Customer managed encryption key (CMEK)
Veracode uses a root encryption key to secure your data and assets transmitted across networks during security scans. For each asset—such as binary uploads or PDF reports of scan results—Veracode generates a data key from the root encryption key to encrypt and decrypt the asset during various stages of security testing.
Customer Managed Encryption Key (CMEK) provides an additional layer of isolation and control by allowing you to supply your own root encryption key. When CMEK is enabled, Veracode uses your root encryption key instead of Veracode’s. You manage this key in your own environment and can revoke access to assets secured by it at any time.
CMEK is particularly useful if regulatory requirements or internal policies require you to retain greater control over how your assets are secured and how quickly access can be revoked.
CMEK encrypts the following types of data:
- Packaged application binaries uploaded to the Veracode Platform
- Results and index files generated by the Veracode Platform
- Downloadable PDF reports generated by the Veracode Platform
Prerequisites and limitations
Veracode CMEK uses a root encryption key located and managed in the key management system of your environment.
Currently, CMEK supports only the AWS Key Management Service (KMS).
CMEK relies on access policies configured in your AWS environment. As the customer, you are responsible for granting only the required access to Veracode and preventing exposure of other AWS KMS secrets or assets in your account.
In AWS, select a region according to the following table or choose the region geographically closest to your Veracode account region.
| Veracode account region | AWS region |
|---|---|
| US | us-east-1 |
| EU | eu-central-1 |
To select an AWS region:
- Sign in to your AWS account.
- Locate the AWS banner at the top of the page.
- On the right side of the banner, use the region selector to choose your preferred region.
Activate Customer Managed Encryption Key
To activate Customer Managed Encryption Key (CMEK), contact your Veracode Customer Success Manager.
Set up Customer Managed Encryption Key
To set up CMEK, complete the following tasks:
- Configure user and permissions in AWS KMS
- Configure a root encryption key
- Enable the Veracode Platform to access the AWS account
- Configure a new Veracode application to use CMEK
- Reconfigure an application to use CMEK
- Validate CMEK configuration
Configure user and permissions in AWS KMS
For Veracode to access your root encryption key, you must provision an AWS IAM user with the required permissions.
To complete this task:
- Create an AWS IAM Policy
- Attach the IAM policy to an AWS IAM user
- Generate access credentials for the IAM user
Create an AWS IAM policy
-
Sign in to your AWS account.
-
Under Console Home, select IAM.
-
Under Access Management, select Policies.
-
Select Create policy.
-
For Policy editor, select JSON.
-
Copy the JSON policy below and paste it into the policy editor:
{"Version": "2012-10-17","Statement": [{"Sid": "VisualEditor0","Effect": "Allow","Action": ["kms:Decrypt","kms:Encrypt","kms:GenerateDataKeyWithoutPlaintext","kms:DescribeKey"],"Resource": "*"}]}ImportantYou must review the IAM policy to ensure that it provides only the necessary access to Veracode to enable CMEK, prohibits unnecessary actions, inhibits the exposure of unrelated information, and complies with your security policies and practices.
-
Select Next. The Review and create page opens.
-
For Policy name, enter a policy name.
-
Select Create policy.
Attach the IAM policy to an AWS IAM user
In this step, create an AWS IAM user and attach the policy you created to the user.
-
Sign in to your AWS account.
-
Under Console Home, select IAM.
-
Select Create user.
-
For User name, enter a user name.
ImportantVeracode recommends that this user not have access to the AWS Management Console. Do not select Provide user access to the AWS Management Console.
-
Select Next. The Set permissions page opens.
-
Under Permissions options, select Attach policies directly.
-
Under Permissions policies, search for the policy that you created.
-
Select your policy and then select Next.
-
Select Create user.
Generate access credentials for the IAM user
- Sign in to your AWS account.
- Under Console Home, select IAM.
- Select the user you created.
- Select the Security credentials tab.
- Under Access keys, select Create access key.
- In Access key best practices & alternatives, under Use case, select Application running outside AWS. Then, select Next.
- In Set description, you may optionally provide a tag. Then, select Next.
- In Retrieve access keys, view the Access key and Secret access key. Select Show under Secret access key to reveal the key.
- Copy the access key and the secret access key and save it in a secure location. This is the only time the access key and secret access key are available. Be sure to save them in a secure location.
- Select Done. The user information page is displayed.
Configure a root encryption key
You can use an AWS-generated key or a key generated outside AWS KMS to create the root key. If you use an external key, ensure that you have access to it before proceeding.
To complete this task:
-
Sign in to your AWS account.
-
Under Console Home, select Key Management Service.
-
Select Create key. The Configure key page opens.
-
Select the options in one of the following tables, based on whether you are using an AWS-generated key or an external key.
If you use an AWS-generated key:
Key type Key usage Advanced options, Key material origin Regionality Symmetric Encrypt and Decrypt KMS – recommended Single-Region key If you use an external key:
Key type Key usage Advanced options, Key material origin Regionality Symmetric Encrypt and Decrypt External (Import Key material) Single-Region key Follow the AWS guidelines for importing keys.
-
Select Next. The Add labels page opens.
-
Enter an alias. Optionally, add a description and assign tags according to your organization’s policies.
-
Select Next. The Define key administrative permissions page opens (optional).
-
Under Key administrators, select the AWS user who is allowed to manage the key.
-
Under Key deletion, select Allow key administrators to delete this key.
-
Select Next. The Define key usage permissions page opens (optional). Select the AWS IAM user you created earlier.
-
Select Next. The Edit key policy page opens (optional). Review the key policy to ensure that it grants the appropriate permissions and includes necessary restrictions.
:::warning [Caution] Review the KMS key policy to ensure that it provides only the access required to enable CMEK, prevents unnecessary actions, restricts exposure of unrelated information, and complies with your security policies and practices. :::
- Select Next. The Review page opens.
- Review the configuration and select Finish.
You have now created the root encryption key. Save the AWS key alias in a secure location. You will need it to configure Veracode applications to use CMEK.
Enable the Veracode Platform to access the AWS account
After you configure user permissions, generate access credentials, and create the root key, contact Veracode Support to enable CMEK on the Veracode Platform. Veracode Support will request the following information to allow the Veracode Platform to access the root encryption key stored in your AWS KMS:
- Access key
- Secret access key
- AWS region
- AWS account ID
After you provide this information, Veracode will configure the platform to access the encryption key stored in your AWS KMS.
Configure a new Veracode application to use CMEK
To configure a new Veracode application to use Customer Managed Encryption Key (CMEK), send a request to the Application Profile Creation API and include the custom_kms_alias field in the payload.
You can enable CMEK for a new application only using the Veracode REST API. This action is not available in the Veracode Platform user interface. If you create a new application using the platform interface, it will use Veracode Managed Key by default.
The custom_kms_alias field is a key-value pair that takes the alias of the root key as a string input.
In the following example request payload, the custom_kms_alias field specifies the alias of the root key:
"custom_fields": [
      {
        "name": "string",
        "value": "string"
      }
    ],
    "custom_kms_alias": "string",
    "description": "string",
    "name": "string",
    "policies": [
      {
        "guid": "string",
        "is_default": true,
        "name": "string",
        "policy_compliance_status": "DETERMINING"
      }
    ],
Reconfigure an application to use CMEK
You can update an application that currently uses a Veracode Managed Key to instead use a Customer Managed Encryption Key (CMEK).
To reconfigure an existing application to use CMEK, follow the same steps as configuring a new application to use CMEK.
After configuration, all new assets will be encrypted using the CMEK. Veracode will also initiate key rotation to re-encrypt all existing assets—previously encrypted with the Veracode Managed Key—using the new CMEK.
To identify applications still using the Veracode Managed Key, go to Analytics, create a query to show the Custom KMS Alias, and filter for applications with an empty alias field. See Validate CMEK configuration for details.
Validate CMEK configuration
You can confirm whether CMEK is properly configured for an application using Analytics.
To complete this task:
-
In the Veracode Platform, select Analytics and then select Explore Your Data.
-
Under Explore Your Data, select Applications.
-
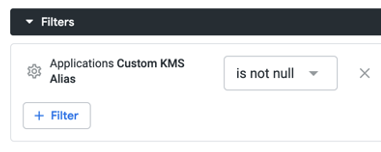
Create a query using the following dimensions: Application ID, Application Name and Custom KMS Alias.
-
Use Filters to show only applications with a non-empty Custom KMS Alias.
-
To run the query, select Run.
If the custom KMS alias is configured properly for an application, then the application appears along with its corresponding custom KMS alias.
Rotate your key
You should periodically rotate or change your CMEK according to your regulatory, compliance, or internal policy requirements.
To rotate your CMEK, configure a new root encryption key and reconfigure your applications to use the new root encryption key.
Revoke access to CMEK
You can temporarily withhold or permanently revoke Veracode access to your encrypted assets stored on the Veracode Platform. Be cautious—some actions might result in irreversible data loss.
Veracode cannot recover your root key or your assets on the Veracode Platform if you intentionally or unintentionally delete your AWS KMS root key and revoke access.
If you don't correctly configure the AWS KMS key or access permissions for applications that use CMEK, Veracode cannot provide support for those applications.
CMEK only encrypts specific types of data on the Veracode Platform. If you want all data in your account to be encrypted, contact Veracode Support.
The following table shows actions you can take on your root key to revoke access, their effects, and recovery options.
| Action | Effect | Recovery procedure |
|---|---|---|
| Delete AWS KMS key | Permanent access revocation | You cannot undo this action unless you cancel the scheduled key deletion within the configured waiting period. |
| Disable AWS KMS key | Temporary access revocation | Your AWS KMS administrator can re-enable the key again in AWS KMS. |
| Remove IAM permissions from the AWS IAM user | Temporary access revocation | You can restore the required IAM permissions to the AWS IAM user. |
| Remove access credentials from the AWS IAM user | Temporary access revocation | You can create new access credentials and provide them to Veracode Support. |