Set up the Microsoft Azure connector
This guide provides the information you need to deploy Veracode Risk Manager (VRM) for your Azure cloud infrastructure. Once you have gathered the appropriate information, it should take only a few minutes to set up the connector and initiate the data ingestion process.
The VRM setup process includes these tasks:
- Have the required permissions
- Create a service principal for VRM
- Provide the required permissions to access Microsoft Graph API
- Provide the required permissions to access Resource Graph API
- Create a secret for the application registration
- Connect to Azure environment and define integration settings
Azure requirements
You must have Global Administrator permissions in your Azure environment.
Create a Service Principal for VRM
VRM gathers data from your Azure tenant using an enterprise application backed by an app registered in your Azure tenant. VRM uses application secret authentication. The service principal allows VRM to read Azure data from a wide variety of services.
To complete this task:
Follow the Microsoft instructions on how to provision an app registration and create a service principal. However, when creating a new registration, under Supported account types, select Account in any organizational directory (Any Microsoft Entra ID tenant - Multitenant).
Provide the required permissions for the VRM Service Principal to access Microsoft Graph API
Once you have created an app registration, you must grant Microsoft Graph API permissions to it so VRM can read data from Azure.
To complete this task:
- In Microsoft Entra, from the App registrations page, select the app registration you created in the previous section.
- Select API Permissions > Add a permission > Microsoft Graph > Applications permissions.
- Ensure the app registration has the following permissions:
Application.Read.All— provides access to the application used for SSO.AuditLog.Read.All— allows VRM to read and query your audit log activities without a signed-in user.DeviceManagementManagedDevices.Read.All— allows VRM to read the properties of devices managed by Microsoft Intune.Directory.Read.All— provides read access to read data in your organization's directory, such as users, groups, and apps.Group.Read.All— provides the list of groups used for SSO.GroupMember.Read.All— provides the list of users for the groups above.Policy.Read.All— provides read access to read your organization's policies.SecurityEvents.Read.All— provides read access to all security events across the tenant.UserAuthenticationMethod.Read.All— allows VRM to read users authentication methods.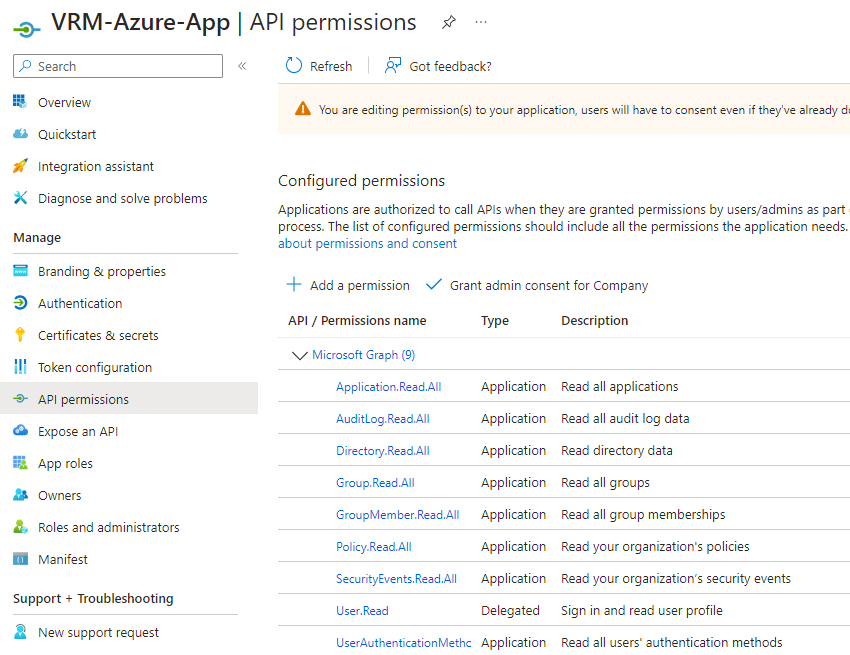
- To provide consent to the application for the permissions to take effect, a tenant administrator must open the corresponding enterprise application object and select Permissions > Grant Admin Consent.
NOTE: You can selectively omit permissions, although doing so causes VRM to function in a reduced capacity. If you want to edit the permission, reach out to your VRM customer success contact.
Provide the required permissions for the VRM service principal to access the Resource Graph API
Your application must have access to the Azure Resource Graph API to read context about Azure assets. This requires that your application be assigned the Reader role in Azure.
You can assign this role at three levels:
- A management group that has access to all subscriptions that you want to onboard to VRM
- The tenant root group
- Individual subscriptions
Assign permissions at management group level
To complete this task:
- In the Azure portal, search for
management groupsand select the management group to which you want to assign permissions. - Select Access Control (IAM) > Add > Add role assignment.
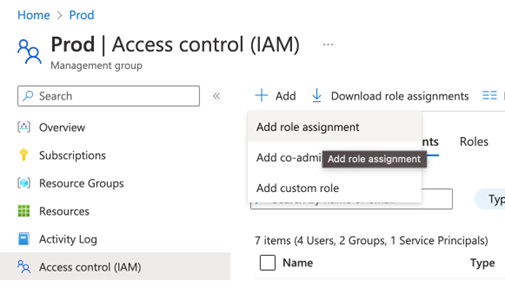
- Under Role, select Reader, and then select Next.
- Select + Select Members.
- Select the VRM service principal you created, and then select Select.
- Select Review + assign.
- Review the output to make sure the settings are correct, and then select Review + assign.
- Repeat these steps to add the Storage Blob Data Reader role. This access is only used to read Terraform State Files stored in Azure blob storage.
Assign permissions at tenant root group level
If you do not have a management group with access to all desired subscriptions, you can assign permissions at the tenant root group level, which covers all subscriptions within the tenant.
These instructions use Microsoft user interfaces, which require your user account to have the proper permissions to change role assignments at the tenant root management group level.
To assign permissions using PowerShell, follow the Microsoft documentation.
To complete this task:
- In Microsoft Entra, search for and then select Tenant properties.
- Under Access management for Azure resources, select Yes.
- Select Save.
- In the Azure portal, search for
management groupsand select the tenant root group.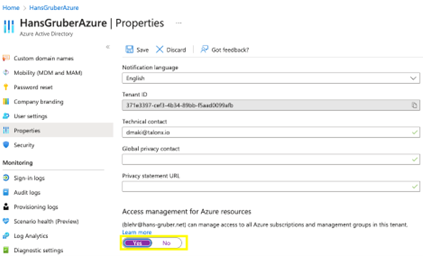
- From the tenant group, select Access Control (IAM) > Add > Add role assignment.
- Under Role, select Reader, and then select Next.
- Select + Select Members.
- Select the VRM service principal you created, and then select Select.
- Select Review + assign.
- Review the output to make sure the settings are correct, and then select Review + assign.
- Repeat these steps to add the Storage Blob Data Reader role.
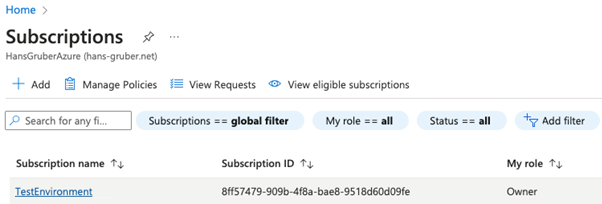
Assign permissions at individual subscription level
In some cases, you cannot assign the Reader role to VRM at the management group or tenant root group level. If this is your situation, you can assign permissions for each individual subscription that you want to deliver data to VRM.
To complete this task:
- In the Azure portal, select Subscriptions and select the relevant subscription.
- Select Access Control (IAM) > Add > Add role assignment
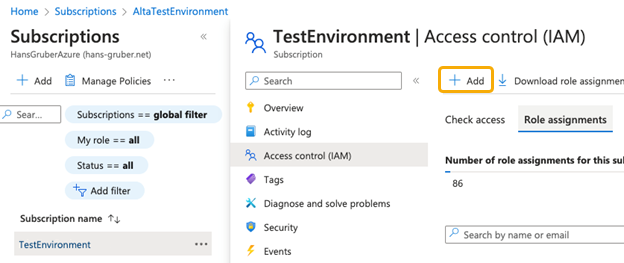
- Under Role, select Reader, and then select Next.
- Select + Select Members.
- Select the VRM service principal you created, and then select Select.
- Select Review + assign.
- Review the output to make sure the settings are correct, and then select Review + Assign.
- Repeat these steps to add the Storage Blob Data Reader role.
Create a secret for the application registration
- In the Azure portal, open the application you created as the service principal.
- Select Manage > Certificates & secrets from the left menu.
- Select New client secret.
- Enter a description and set the expiration date based on your company policy. Veracode recommends 12 months.
- Select Add.
- On the Overview page, copy the Directory (tenant) ID and the Application (client) ID to a secure location.
- On the Certificates & secrets page, copy the client secret from the Value column to a secure location.
In VRM, the copied values have the following mapping:
| Azure name | VRM name |
|---|---|
| Directory (tenant) ID | Tenant ID |
| Application (client) ID | Client ID |
| Value (in client secret table) | Client secret |
Connect VRM to your Azure environment
After completing the setup tasks in Azure, you can set up your Microsoft Azure connector in VRM.
To complete this task:
- In VRM, from the left navigation menu, select the Settings icon
 .
. - Select Add Connector.
- Select the Microsoft Azure tile.
- Paste the tenant ID, client ID, and client secret that you saved when creating the secret for your application registration.
- Select Continue.
- Select the specific subscriptions you want to add to VRM or select all subscriptions.
- On the Integration Settings page, enter a name for the connector.
- Optionally, select an account value, which helps VRM understand the relative importance of this account in your organization.
- Optionally, select the regions that you want VRM to access and monitor.
- Select Continue.
- On the remaining pages, you can perform the optional setup configurations that enhance VRM’s security analysis by leveraging your existing tagging schema. If you want to edit these settings later, select your Azure connector from the Connectors page, and select Actions > Manage Connector.
- After configuring your connector, select View Prioritized Issues to review issues in your environment.