Set up the AWS connector
This guide provides the information needed to deploy Veracode Risk Manager (VRM) for customers using Amazon Web Services (AWS) cloud infrastructure. Once the account credentials have been gathered, this setup process should only take a few minutes to initiate the data ingestion process.
You can deploy the AWS connector at the organization level or at the account level. If you prefer to manually deploy the connector, Veracode Technical Support can provide assistance.
Veracode recommends organization-level deployments because they easily onboard every AWS account in your organization in one simple setup process. Not only is the StackSet deployment a means to onboard all accounts at once, it also ensures that future accounts will automatically be added to your VRM deployment.
Veracode recommends using account-level deployments only for tactical and test environments where an account-by-account setup is acceptable and a large scale deployment is not necessary. It allows you to quickly see how VRM asset and finding ingestion works without requiring the elevated permissions required to achieve an organization-level deployment.
Set up the AWS connector for organization accounts
This section provides the information needed to deploy the VRM connector for AWS at the organization level.
AWS organization account access and permissions
In AWS, you must have:
- Access to the AWS management account for your organization
- Administrator permissions that allow you to create cross-account roles and create lambda functions
NOTE: This process will not work if your AWS organization only has Consolidated Billing Features enabled. This is a rare configuration as most AWS organizations have Enable All Features active.
After you configure the connector, VRM will have selective read access to your AWS environment. See the list of read-only permissions granted to VRM by default.
Onboard Your AWS organization using CloudFormation StackSets
VRM supports the onboarding of AWS accounts using CloudFormation StackSets. This provides a simple and fast way to onboard hundreds of accounts from an AWS organization. AWS accounts can still be onboarded with VRM manually, if desired.
Before you begin:
- Log in to an AWS account that has the required permissions.
- If you have previously deployed VRM and need to clean that installation, complete the following steps:
- From the AWS Console, remove the existing VRM Cross-Account Role from the previous deployment. This role has a name similar to the following:
LongbowCrossAccountRole\_a12aa34b-c123-4abc-5ab6-ac123456789 - Remove any existing VRM stacks from CloudFormation Stacks or StackSets.
- From the AWS Console, remove the existing VRM Cross-Account Role from the previous deployment. This role has a name similar to the following:
- Have the following information about your VRM account:
-
Access token
-
External ID
-
Tenant ID
If you do not have this information, reach out to your organization's customer success manager or contact Veracode Technical Support at [email protected].
-
To complete this task:
-
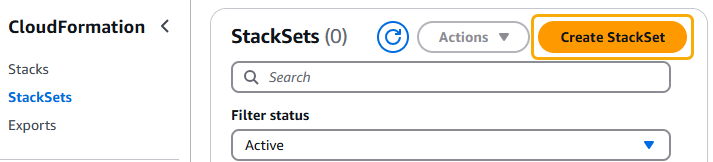
From your AWS management account, select StackSets from the left navigation menu.
-
Select Create StackSet.
-
Accept the default values in the Permissions and Prerequisite - Prepare template sections.
-
For Amazon S3 URL, enter
https://longbow-prod-external.s3.us-west-2.amazonaws.com/aws-organizations/longbow_prod_cross_accounts_role.yaml -
Select Next.
-
Enter a StackSet name. For example:
VRM-deployment-stackset-nov22 -
Optionally, enter a description for the StackSet.
-
In the AccessToken, ExternalId, and TenantId fields, enter the values that Veracode provided to you.
-
On the Configure StackSet options page, optionally, add metadata tags or edit the Execution configuration setting.
-
Select the acknowledgement checkbox and select Next.
-
Accept the default values for Add stacks to stack set and Deployment locations.
-
For Specify regions, select one region. Typically, this is the region most commonly used in your AWS organization.

-
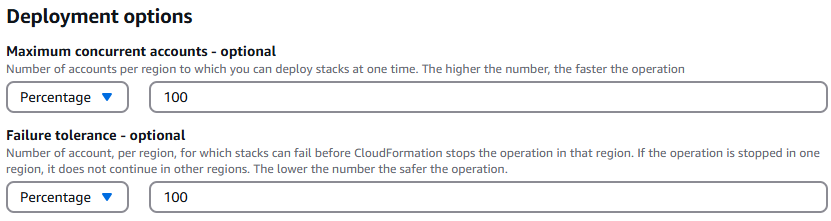
For Maximum concurrent accounts - optional, select Percentage and enter
100. -
For Failure tolerance - optional, select Percentage and enter
100.
-
Select Next.
-
Select Submit. AWS CloudFormation now creates a StackSet for every account in your organization. On the Connectors tab of the Settings page in the VRM platform, you will see new accounts appear after a few minutes.
Connect VRM to your AWS management account
Connecting VRM to an AWS management account, instead of a user account, allows the connector to display account names, rather than account numbers, and gather additional important metadata.
To complete this task, log in to an AWS management account that has the required permissions and complete the steps listed in Connect VRM to Your AWS Account.
Set up the AWS connector for individual accounts
This section provides the information needed to deploy the VRM connector for AWS at the account level.
AWS individual account access and permissions
In AWS, you must have:
- Access to the AWS accounts you want to integrate into VRM
- Administrator permissions that allow you to create cross-account roles and create lambda functions
After you configure the connector, VRM will have selective read access to your AWS environment. See the list of read-only permissions granted to VRM by default.
Connect VRM to your AWS account
Before you begin:
Log in to an AWS account that has the required permissions.
To complete this task:
-
In VRM, from the left navigation menu, select the Settings icon
 , and then select Add Connector.
 -
Select Amazon Web Services.
-
Select Launch CloudFormation Template. VRM automatically populates the required fields in the Quick create stack page with the appropriate values.
-
Select the acknowledgement checkbox.
-
Select Create stack. It may take a few minutes for VRM to receive the stack details.
-
On the Integration Settings page in VRM, optionally replace the default name for the connector.
-
Optionally, select an account value, which helps VRM understand the relative importance of this account in your organization.
-
Optionally, select the regions that you want VRM to access and monitor.
-
Select Continue.
-
Optionally, map the following types of asset tags to customize how VRM calculates asset risk and issue urgency:
- Asset Value - map existing AWS tags to VRM’s four asset value categories: Crown Jewel, High Value, Medium Value, and Low Value.
- Asset Environment - map existing AWS tags to VRM’s four asset environment categories: Production, Build, Test/Staging, and Development.
- Data Compliance - provide VRM with existing AWS tags that indicate which assets are in or out of scope from a data compliance perspective.
- Data Classification - map your AWS tags to four data classification categories: Restricted, Confidential, Internal, and Public.
If you want to edit these settings later, select your AWS connector from the Connectors page, and select Actions > Manage Connector.

-
Select Continue. Completing this step initiates the VRM data ingestion process, which may take several minutes.
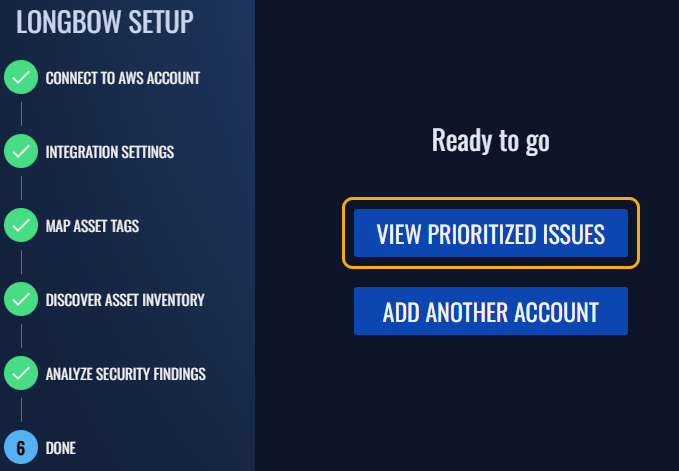
-
After configuring your connector, select View Prioritized Issues to review issues in your environment.
Manually deploy the AWS connector using IAC
Some AWS operators prefer, or are required, to deploy manually without using the automation (Lambda scripts) from the deployments described in the preceding sections. If your organization wants to use alternate Infrastructure as Code (IAC) configuration methods, contact Veracode Technical Support at [email protected] for assistance.
AWS permissions required by VRM
These permissions are granted to VRM through the YAML template file associated with your connector. While it is not recommended, it is possible to selectively omit some of these permissions and VRM will still function in a reduced capacity. Check with your VRM customer success contact before modifying this list during setup.
- access-analyzer:Get*
- access-analyzer:List*
- account:Get*
- account:List*
- acm-pca:Describe*
- acm-pca:Get*
- acm-pca:List*
- acm:Describe*
- acm:Get*
- acm:List*
- airflow:Get*
- airflow:List*
- amplify:Get*
- amplify:List*
- apigateway:GET
- appconfig:Get*
- appconfig:List*
- application-autoscaling:Describe*
- appmesh:Describe*
- appmesh:List*
- appsync:Get*
- appsync:List*
- aps:Describe*
- aps:Get*
- aps:List*
- athena:Get*
- athena:List*
- autoscaling-plans:Describe*
- autoscaling:Describe*
- backup-gateway:Get*
- backup-gateway:List*
- backup:Describe*
- backup:Get*
- backup:List*
- clouddirectory:BatchRead
- clouddirectory:Get*
- clouddirectory:List*
- clouddirectory:LookupPolicy
- cloudformation:Describe*
- cloudformation:Detect*
- cloudformation:Get*
- cloudformation:List*
- cloudfront:DescribeFunction
- cloudfront:Get*
- cloudfront:List*
- cloudtrail:Describe*
- cloudtrail:Get*
- cloudtrail:List*
- cloudtrail:LookupEvents
- cloudwatch:Describe*
- cloudwatch:Get*
- cloudwatch:List*
- cognito-identity:Describe*
- cognito-identity:GetIdentityPoolRoles
- cognito-identity:List*
- cognito-identity:Lookup*
- cognito-idp:AdminGet*
- cognito-idp:AdminList*
- cognito-idp:Describe*
- cognito-idp:Get*
- cognito-idp:List*
- cognito-sync:Describe*
- cognito-sync:Get*
- cognito-sync:List*
- config:Batch*
- config:Describe*
- config:Get*
- config:List*
- config:Select*
- ce:GetCostAndUsageWithResources
- datapipeline:Get*
- datapipeline:List*
- datasync:Describe*
- datasync:List*
- detective:Batch*
- detective:Describe*
- detective:Get*
- detective:List*
- detective:SearchGraph
- dlm:Get*
- ds:Describe*
- ds:Get*
- ds:List*
- dynamodb:Describe*
- dynamodb:List*
- ec2:Describe*
- ec2:Get*
- ec2:Search*
- ec2messages:Get*
- ecr:BatchGetRepositoryScanningConfiguration
- ecr:Describe*
- ecr:Get*
- ecr:List*
- ecs:Describe*
- ecs:List*
- eks:Describe*
- eks:List*
- elasticache:Describe*
- elasticache:List*
- elasticbeanstalk:Describe*
- elasticbeanstalk:List*
- elasticbeanstalk:Request*
- elasticbeanstalk:Retrieve*
- elasticfilesystem:Describe*
- elasticloadbalancing:Describe*
- es:Describe*
- es:Get*
- es:List*
- events:Describe*
- events:List*
- fms:Get*
- fms:List*
- glacier:Describe*
- glacier:Get*
- glacier:List*
- globalaccelerator:Describe*
- globalaccelerator:List*
- glue:Batch*
- glue:Get*
- glue:List*
- grafana:ListWorkspaces
- greengrass:DescribeComponent
- greengrass:Get*
- greengrass:List*
- guardduty:Describe*
- guardduty:Get*
- guardduty:List*
- iam:Get*
- iam:List*
- identitystore:Describe*
- identitystore:Get*
- identitystore:List*
- identity-sync:GetSyncProfile
- identity-sync:GetSyncTarget
- identity-sync:ListSyncFilters
- imagebuilder:Get*
- imagebuilder:List*
- inspector:Describe*
- inspector:Get*
- inspector:List*
- inspector2:BatchGetAccountStatus
- inspector2:DescribeOrganizationConfiguration
- inspector2:GetDelegatedAdminAccount
- inspector2:GetMember
- inspector2:List*
- iot:Describe*
- iot:Get*
- iot:List*
- kafka:Describe*
- kafka:Get*
- kafka:List*
- kinesis:Describe*
- kinesis:Get*
- kinesis:List*
- kms:Describe*
- kms:Get*
- kms:List*
- lambda:Get*
- lambda:List*
- lightsail:Get*
- lightsail:Is*
- logs:Describe*
- logs:FilterLogEvents
- logs:Get*
- logs:List*
- macie2:Batch*
- macie2:Describe*
- macie2:Get*
- macie2:List*
- mq:Describe*
- mq:List*
- network-firewall:Describe*
- network-firewall:List*
- networkmanager:Describe*
- networkmanager:Get*
- networkmanager:List*
- organizations:Describe*
- organizations:List*
- proton:Get*
- proton:List*
- ram:Get*
- ram:List*
- rds:Describe*
- rds:List*
- redshift:Describe*
- redshift:GetReservedNodeExchangeConfigurationOptions
- redshift:GetReservedNodeExchangeOfferings
- resource-groups:Get*
- resource-groups:List*
- route53:Get*
- route53:List*
- route53resolver:Get*
- route53resolver:List*
- s3:Describe*
- s3:Get*
- s3:List*
- sagemaker:Describe*
- sagemaker:Get*
- sagemaker:List*
- schemas:Describe*
- schemas:Get*
- schemas:List*
- sdb:Get*
- sdb:List*
- secretsmanager:Describe*
- secretsmanager:GetResourcePolicy
- secretsmanager:List*
- securityhub:BatchGetStandardsControlAssociations
- securityhub:Describe*
- securityhub:Get*
- securityhub:List*
- serverlessrepo:Get*
- serverlessrepo:List*
- ses:Describe*
- ses:Get*
- ses:List*
- shield:Describe*
- shield:Get*
- shield:List*
- signer:DescribeSigningJob
- signer:Get*
- signer:List*
- sns:Get*
- sns:List*
- sqs:Get*
- sqs:List*
- sqs:Receive*
- ssm-incidents:Get*
- ssm-incidents:List*
- ssm:Describe*
- ssm:Get*
- ssm:List*
- sso-directory:Describe*
- sso-directory:List*
- sso-directory:Search*
- sso:Describe*
- sso:Get*
- sso:List*
- sso:Search*
- states:Describe*
- states:GetExecutionHistory
- states:List*
- sts:GetAccessKeyInfo
- sts:GetCallerIdentity
- swf:Count*
- swf:Describe*
- swf:Get*
- swf:List*
- tag:DescribeReportCreation
- tag:Get*
- timestream:Describe*
- timestream:List*
- waf-regional:Get*
- waf-regional:List*
- waf:Get*
- waf:List*
- wafv2:CheckCapacity
- wafv2:Describe*
- wafv2:Get*
- wafv2:List*
- xray:BatchGet*
- xray:Get*